


Chicken Cordon Bleu Creamy Mac & Cheese
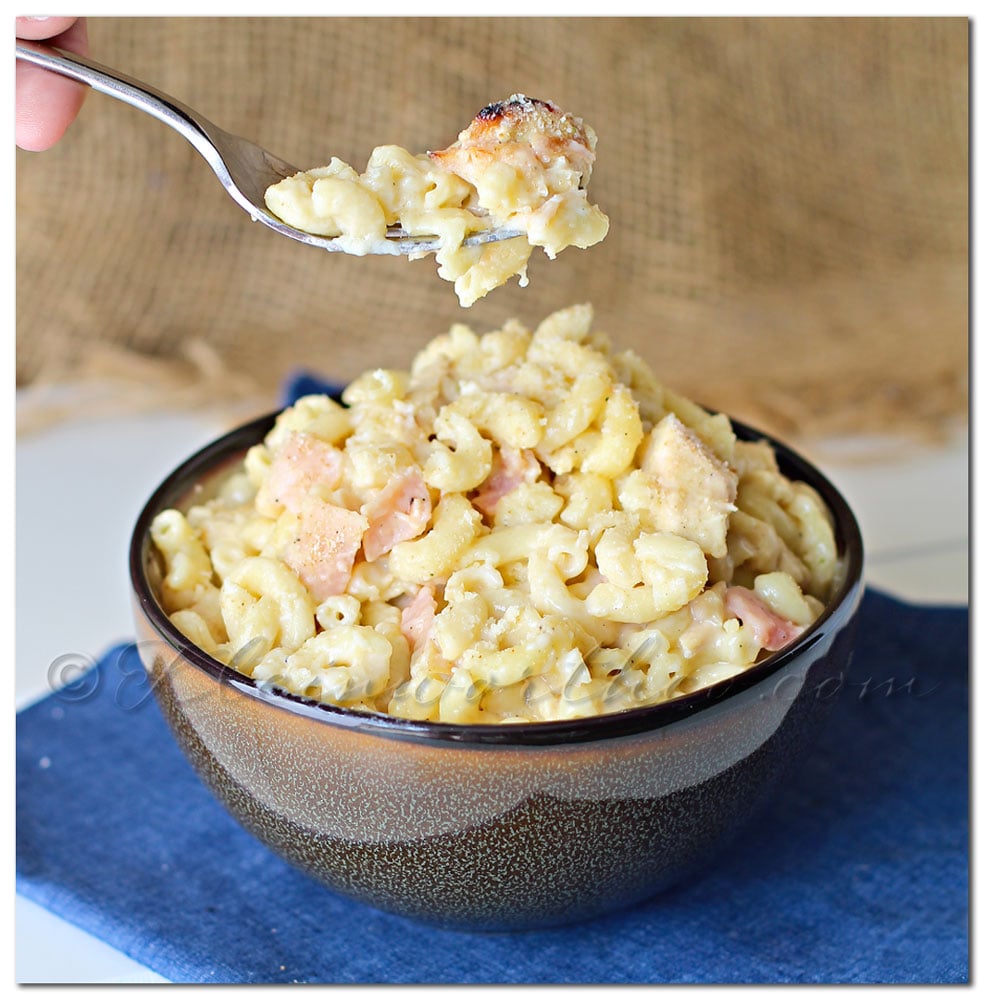
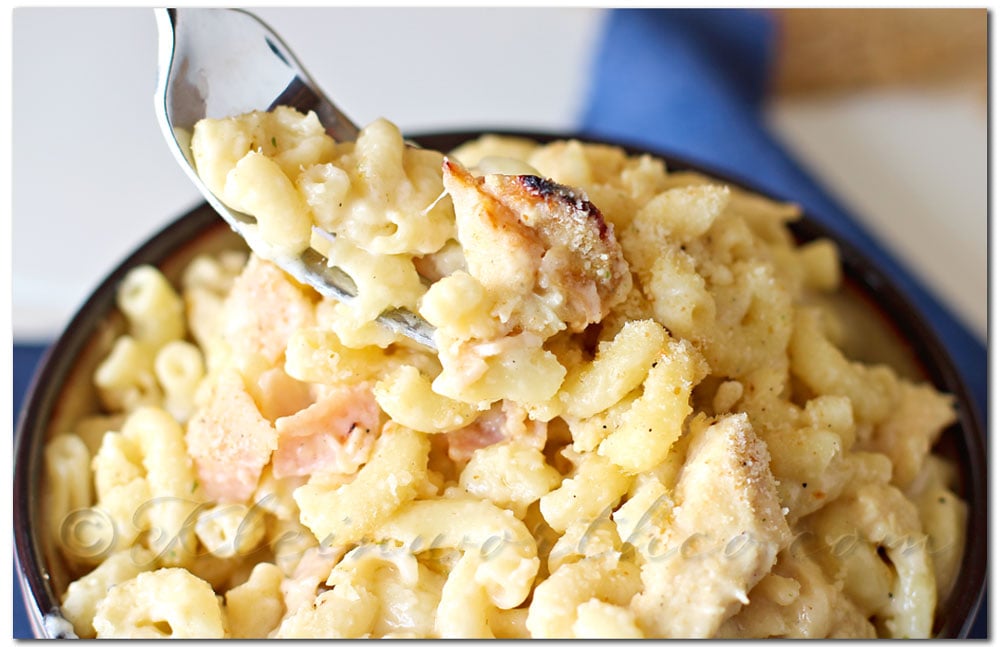
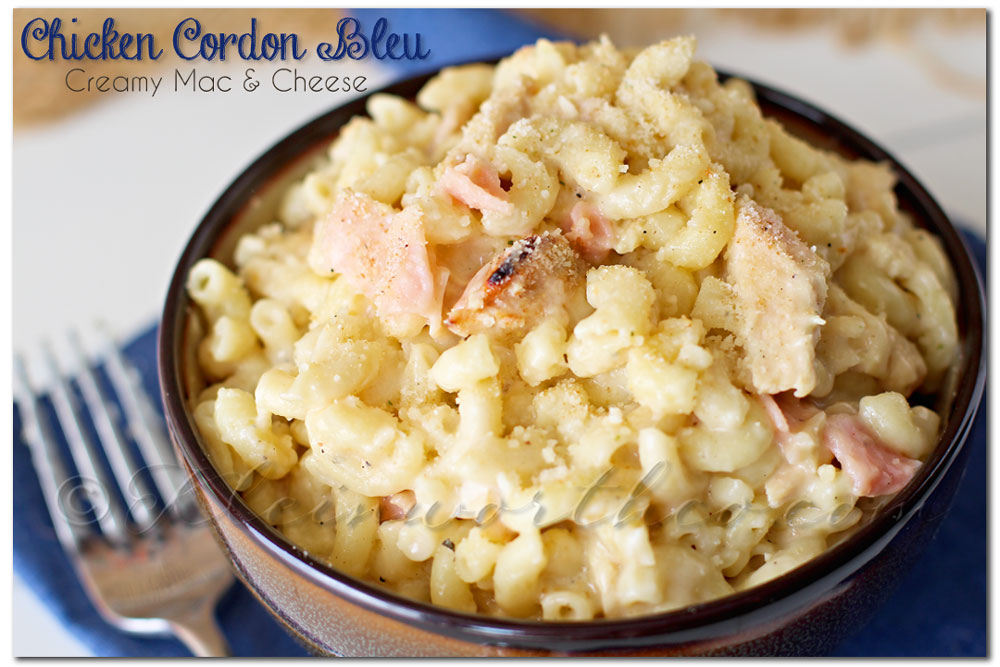

Chicken Cordon Bleu Creamy Mac & Cheese
Ingredients
- 4 boneless skinless chicken breasts - seasoned & grilled on BBQ & cut into bite sized chunks or pieces or rotisserie chicken
- 1 pack Honey Baked Ham slices- diced
- 16 oz bag of elbow macaroni
- 2 sticks butter
- 1 cup flour
- 2 tsp salt though I usually just sprinkle in the seasonings to taste
- 1 tsp pepper
- 4 cups low fat milk
- 2-1/2 cups shredded sharp cheddar cheese
- 2 cups shredded Swiss cheese
Instructions
- Cook your chicken- cut & set aside.
- Dice your ham- set aside.
- Prepare pasta noodles to package directions- cooking al dente so they hold up in the mixing process. Drain & set aside in large covered pot.
- Prepare your roux by melting your butter in a medium saucepan over med/high heat. Once it's almost melted quickly whisk in your flour & seasonings.
- Keep it moving & wait for it to darken slightly & come to a thick creamy texture.
- Whisk in your milk & increase your heat to high to get mixture to thicken- keep whisking.
- Stir in your cheeses & heat until all cheese is melted & combined - at least 2-3 minutes.
- Pour into your pot of noodles- add chicken & ham- stir well to combine & coat everything with cheese.
- ENJOY!!!
If you make any of these recipes- please leave a link or tag me on Instagram @KleinworthCo
Looking for more easy family dinner ideas?

Don’t miss these great ideas from these bloggers….
Pizza Tater Tot Casserole from Simply Stacie
Chicken, chorizo, olive and chickpea stew from Supergolden Bakes
To see where I am linking today- visit HERE
Best Apple Peach & Pear Recipes for Fall
I decided that since my brain is in full fall mode-
I would choose the Best Apple, Peach & Pear Recipes for Fall as the features this week.
You can see that there were a ton to choose from- I will be trying every single one.

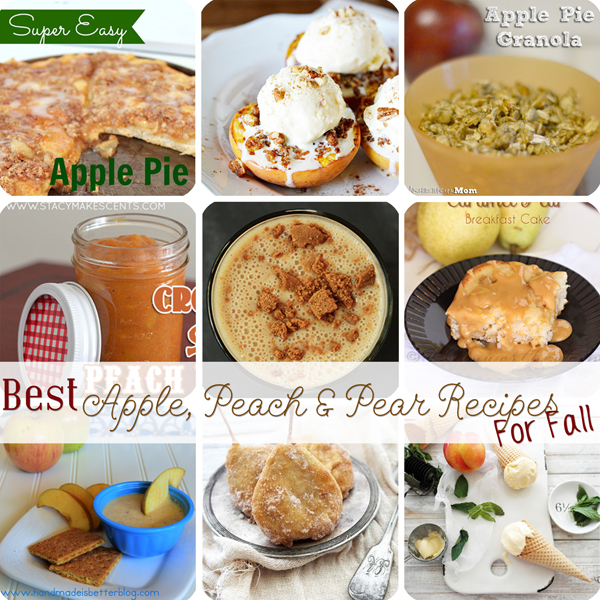
I sure hope you give some of these a try. Don’t they look delicious?
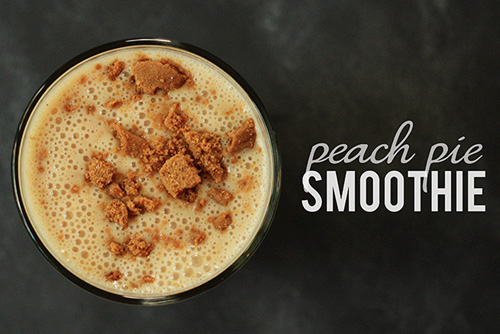 Mix it Up- Peach Pie Smoothie from Circus Berry
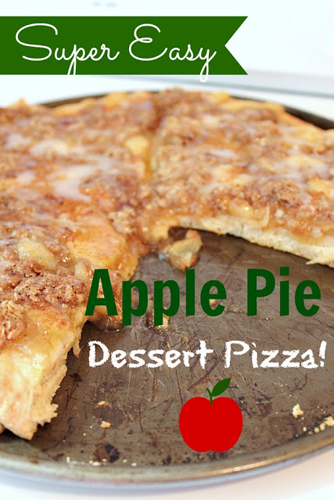
Super Easy Apple Pie Dessert Pizza from The Creek Line House
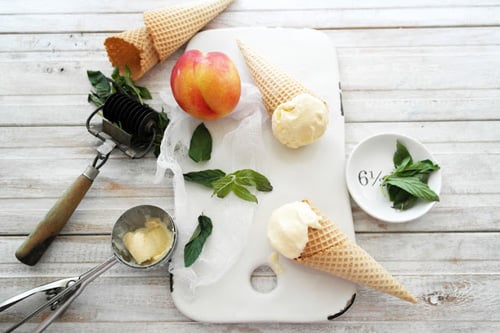
Honey Roasted Peach & Fresh Mint Ice Cream from Twigg Studios

Caramel Pear Breakfast Cake from Kleinworth & Co.
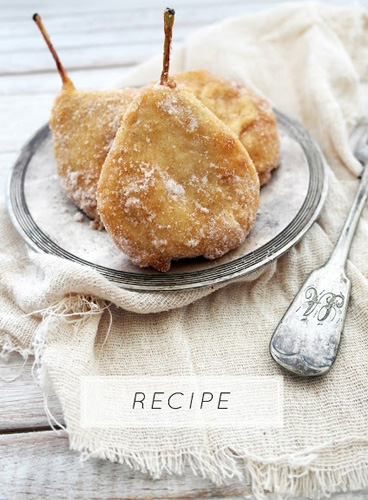
Pear Fritters & Cinnamon Sugar from Twigg Studios
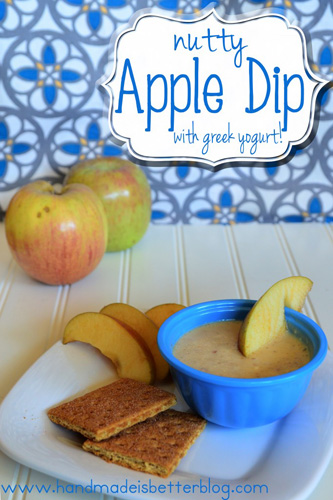
Nutty Apple Dip from The Handmade is Better Blog

Crock Pot Spiced Peach Butter from Stacy Makes Cents
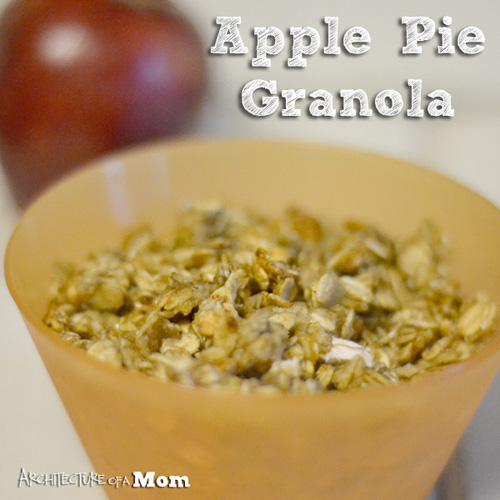
Apple Pie Granola from Architecture of a Mom
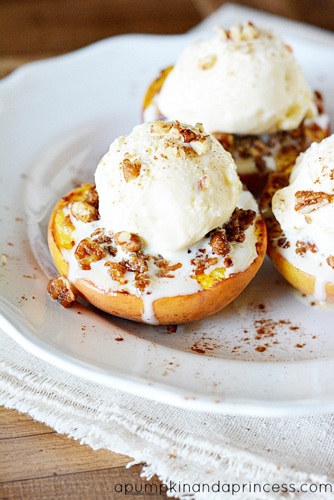
Biscoff-Pecan Baked Peaches from A Pumpkin & A Princess
If you were featured- grab a button from one of the hosts.

A very special THANK YOU to Jaime, Lucy & Taryn. It’s been an absolute pleasure to work with you all.
Don’t forget to come back & join me on Mondays for Project 52
To see where I am linking today- visit HERE

[jetpack_subscription_form]
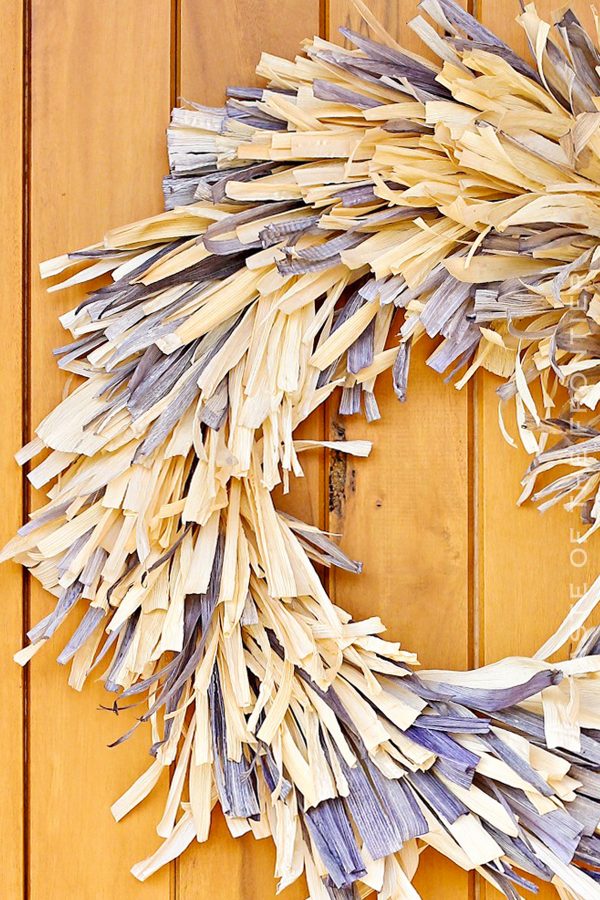
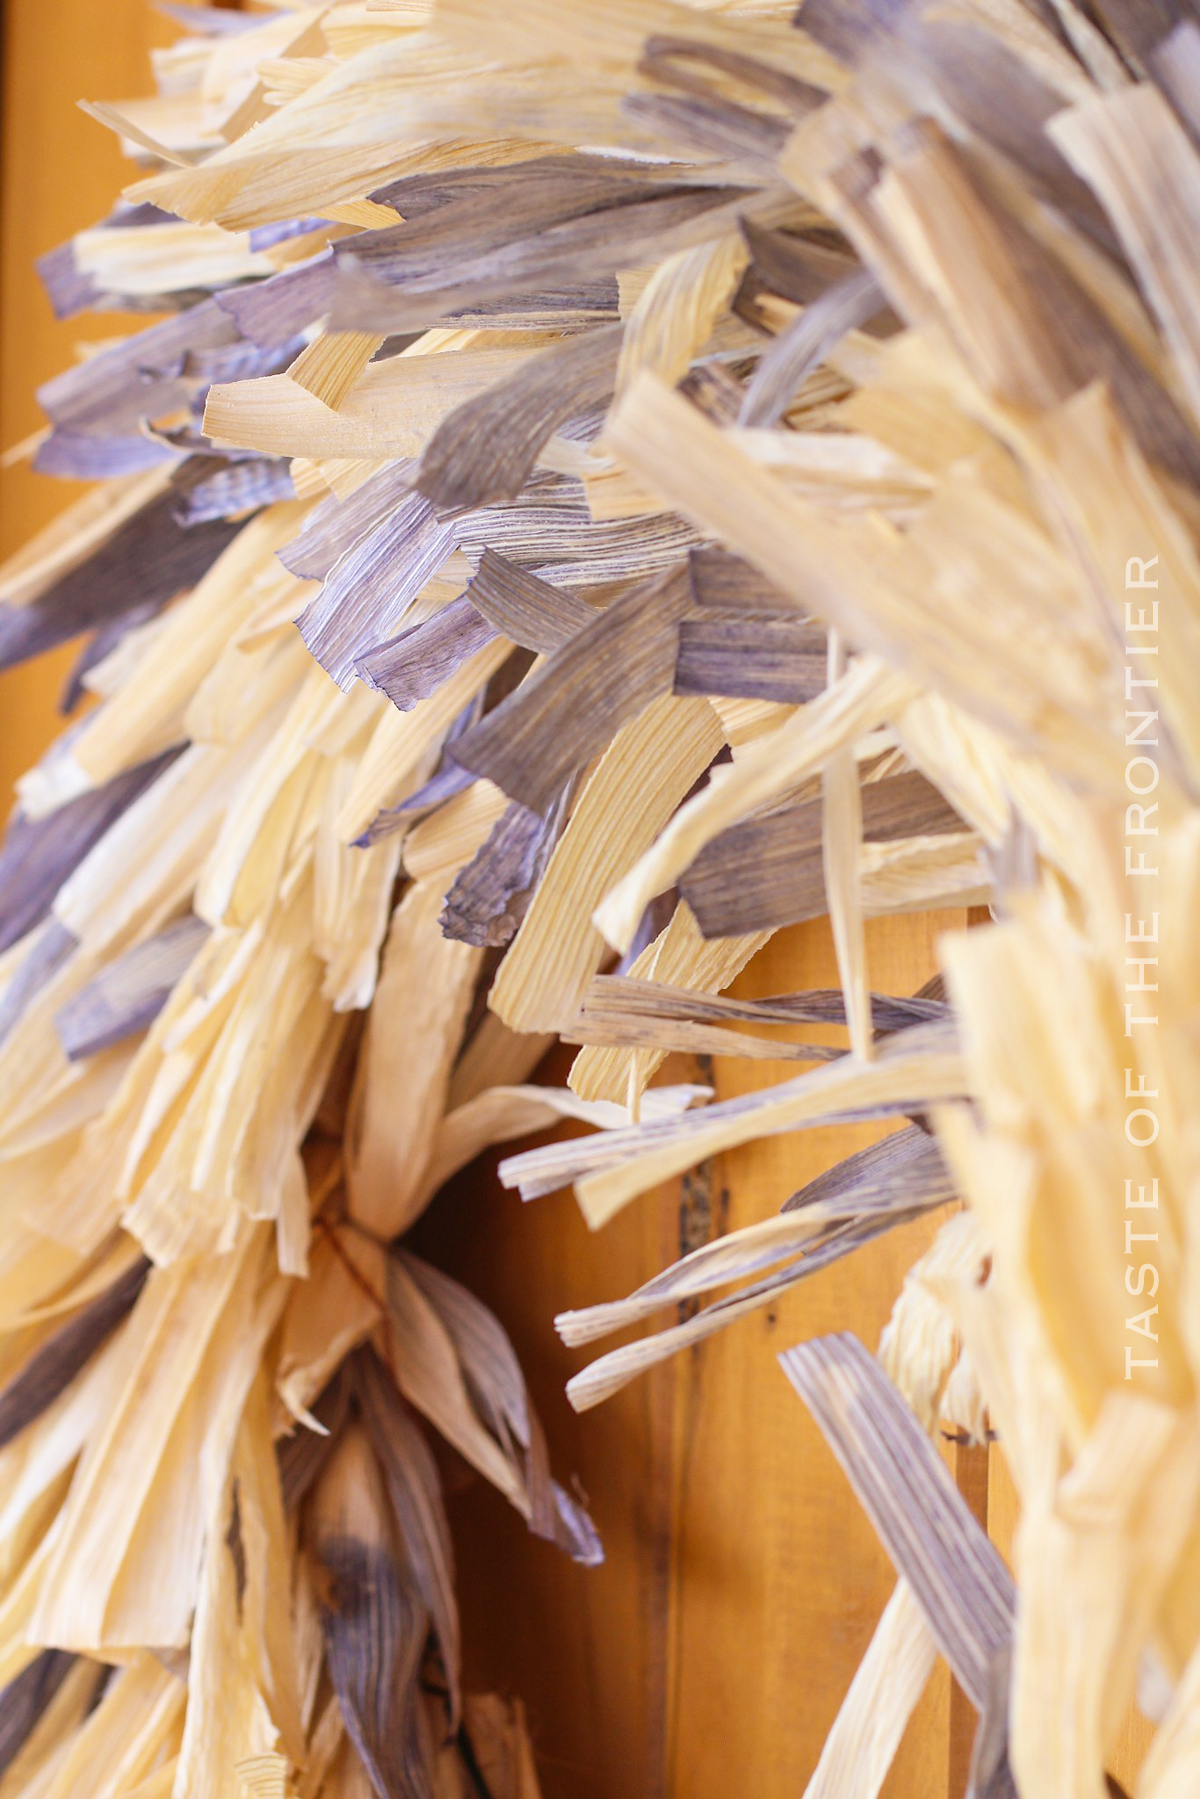
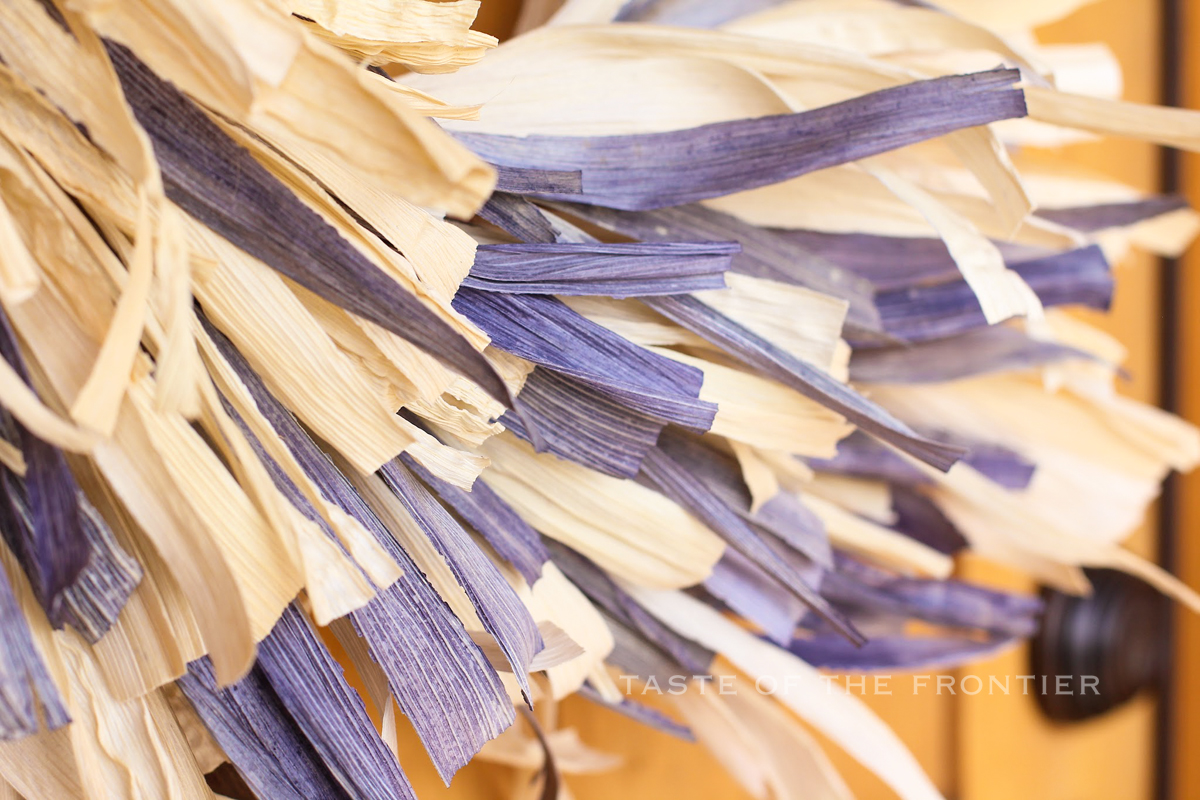
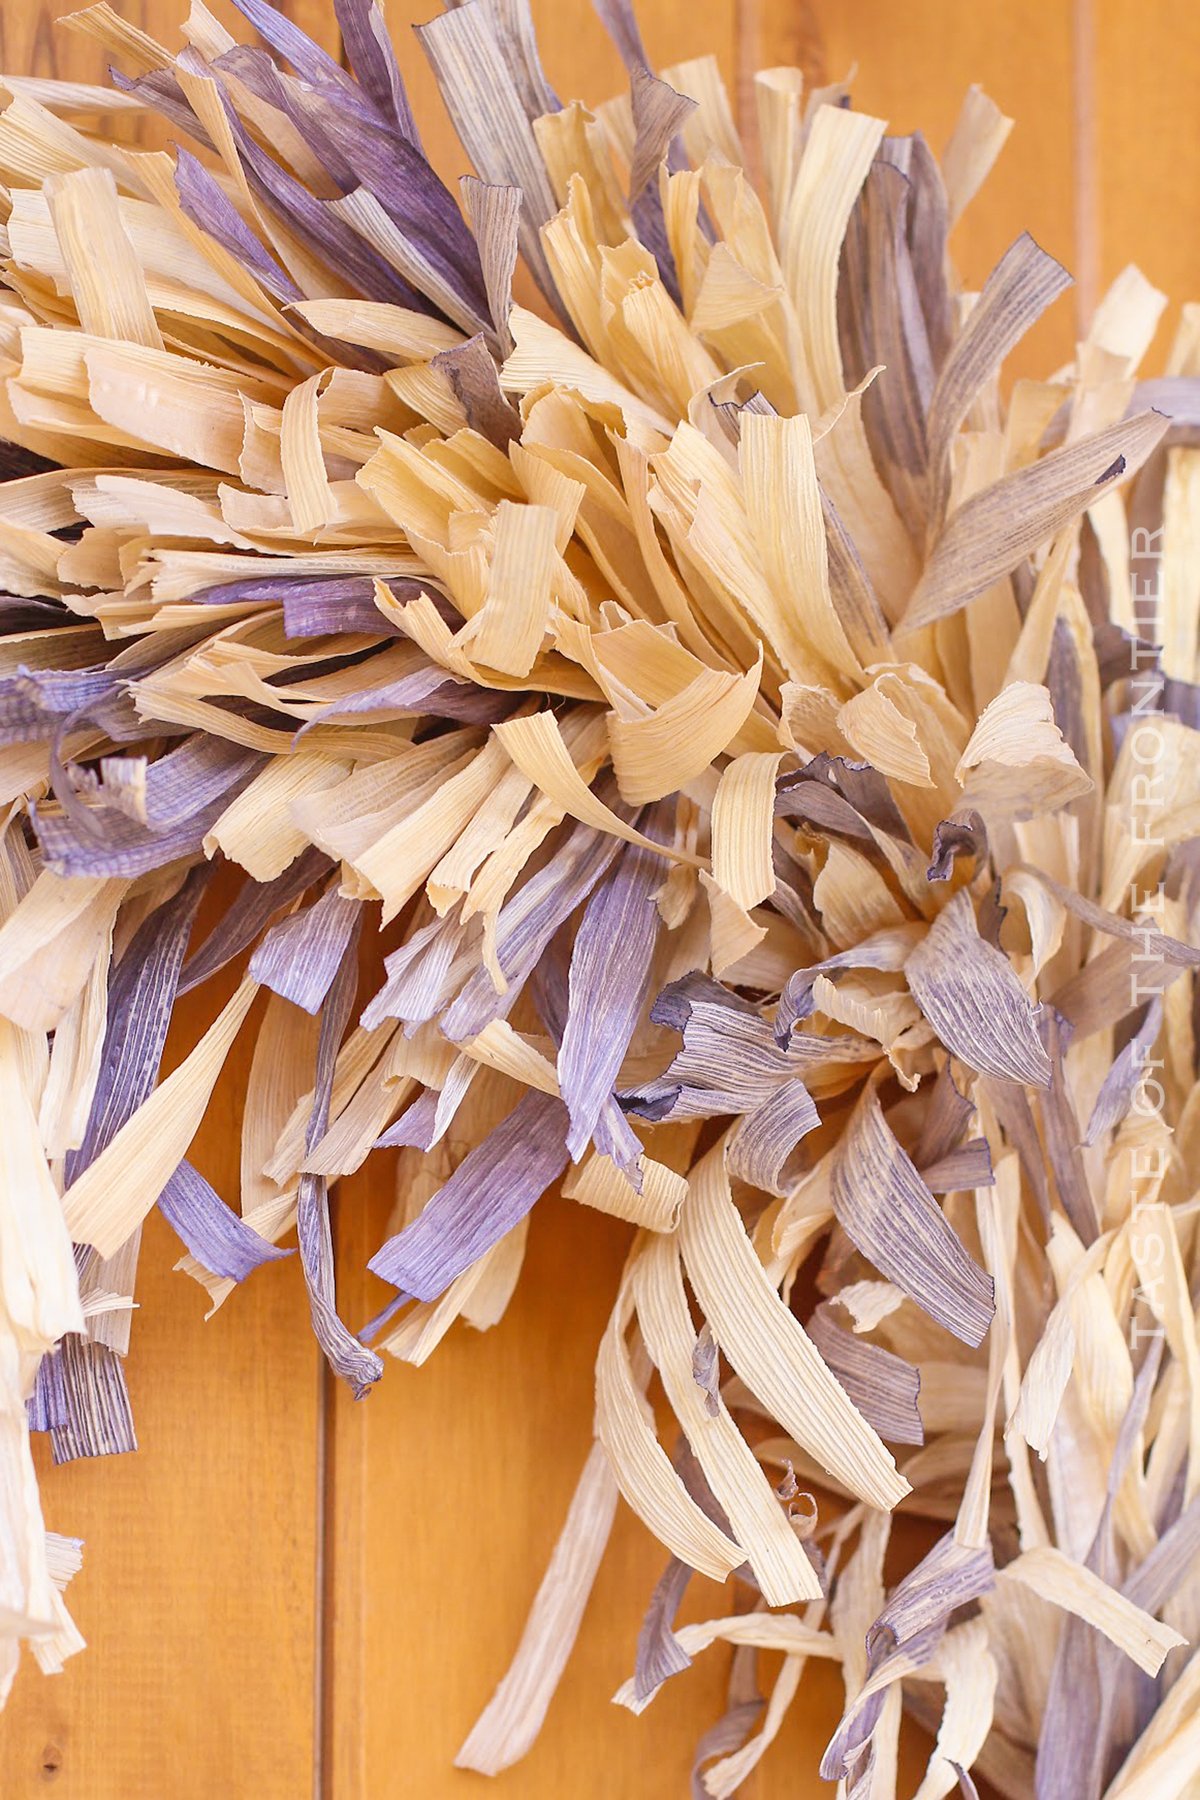
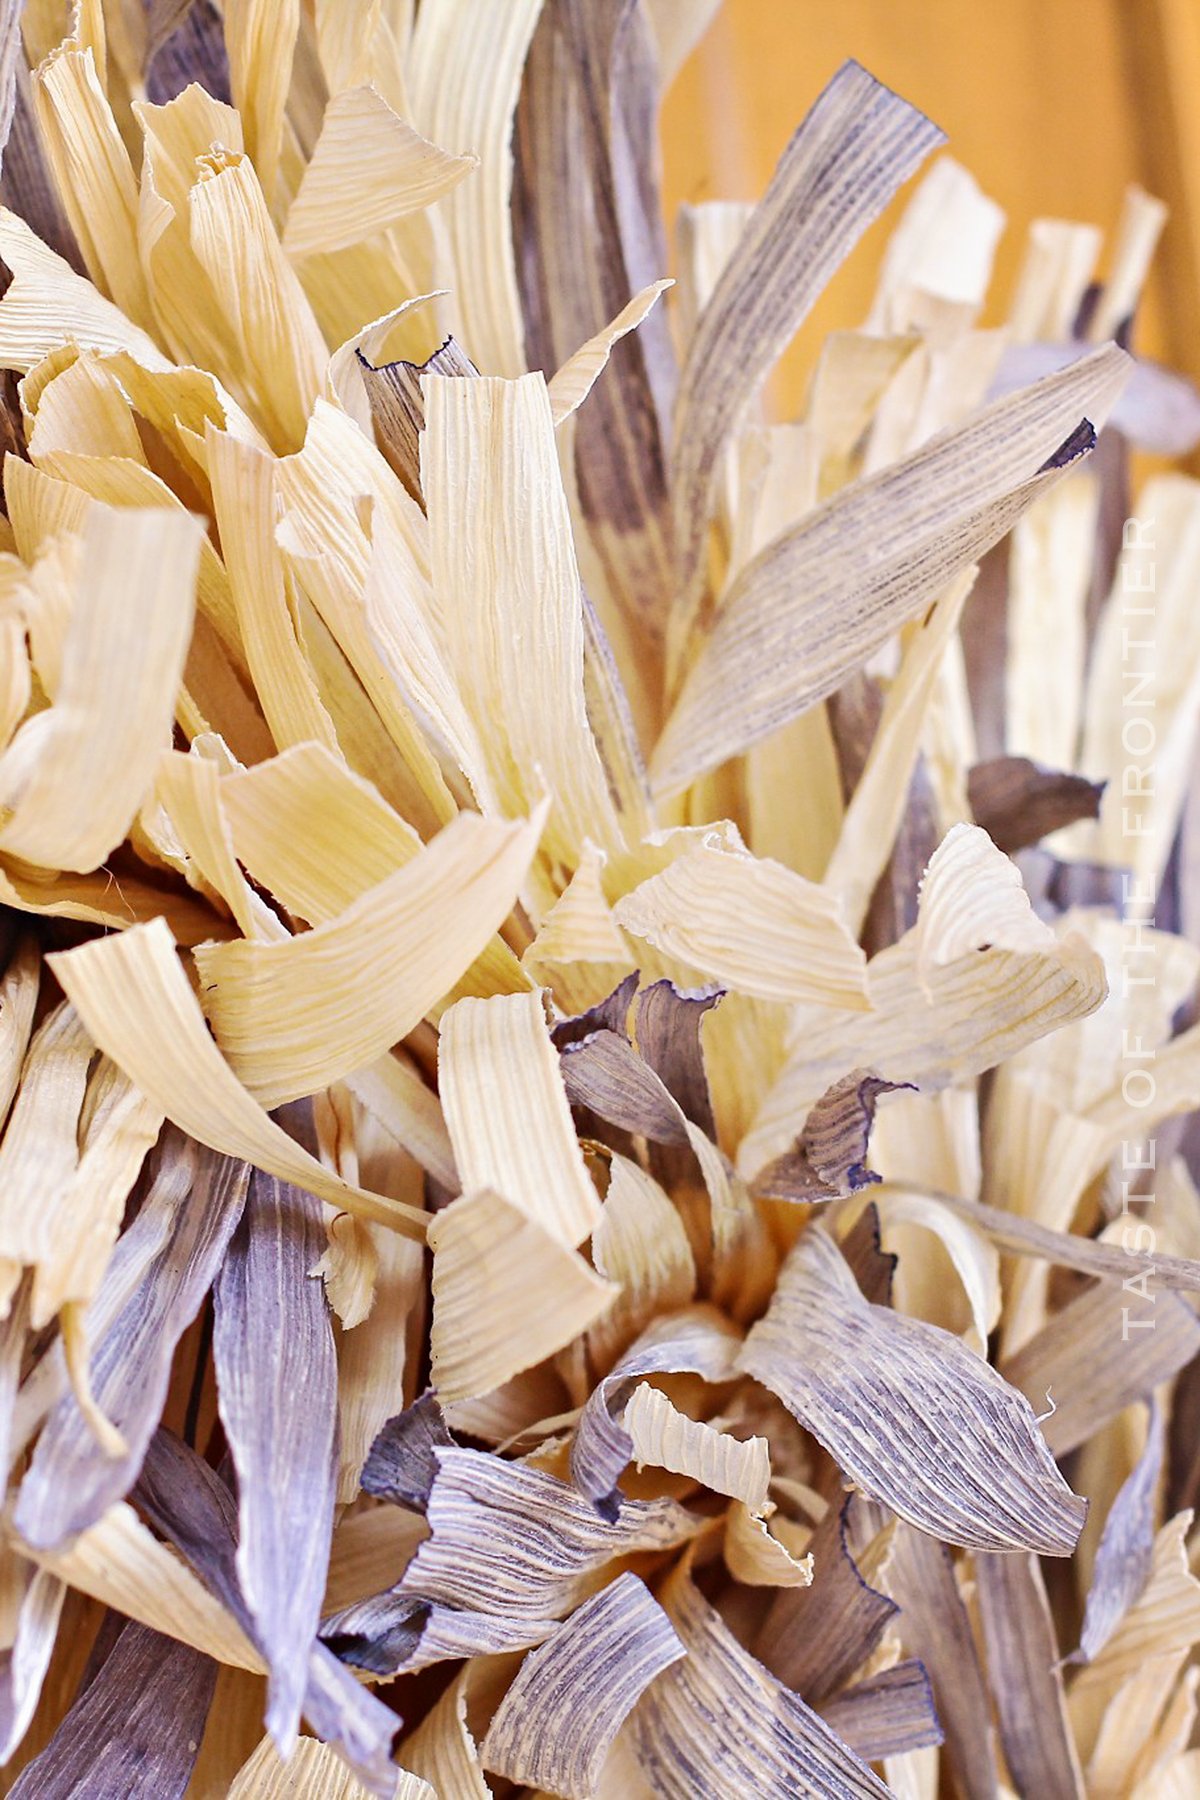
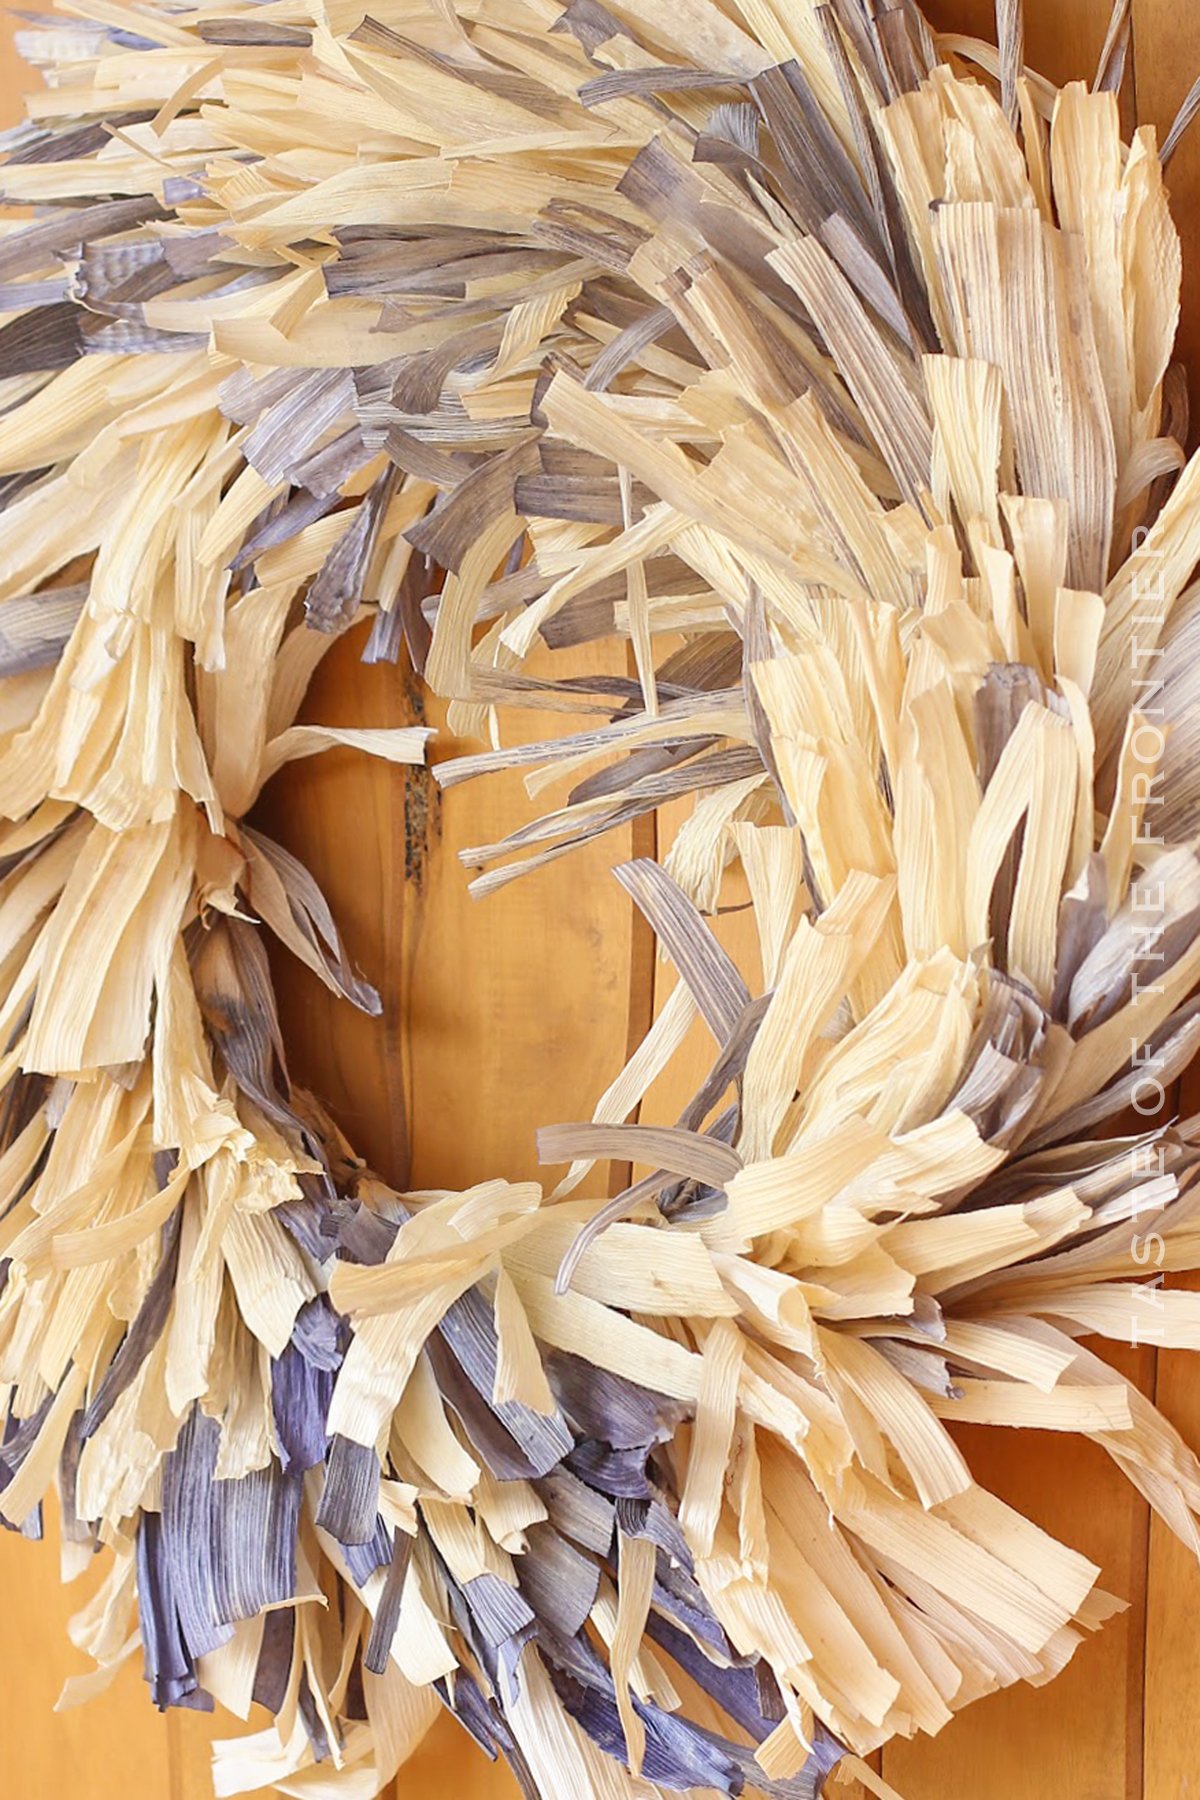
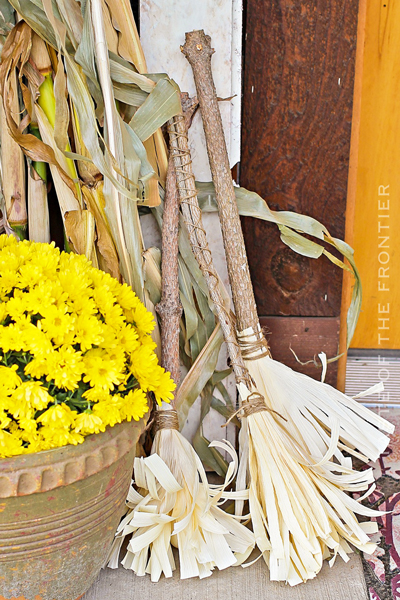
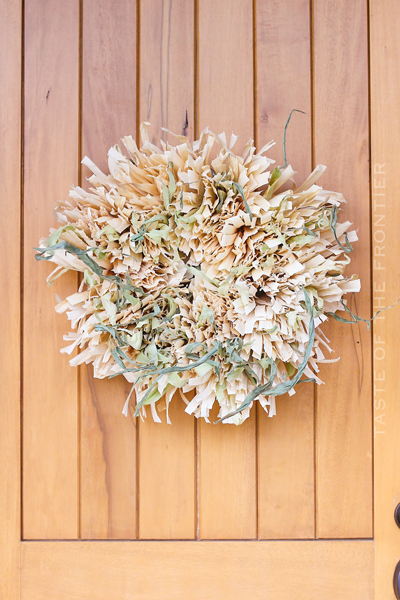
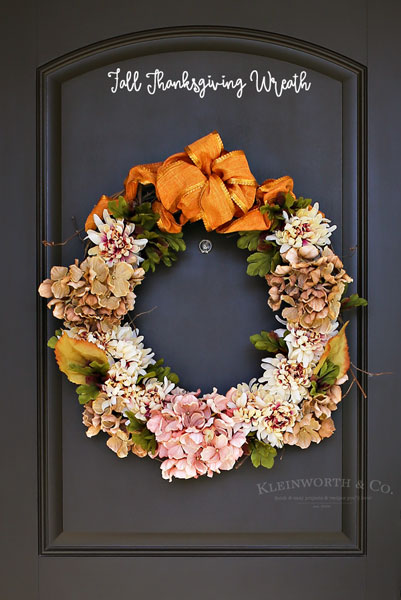
Frayed Corn Husk Wreath
This is a beautifully handmade Frayed Corn Husk Wreath that is the perfect addition to your home this fall. It will last for years to come.
Wreaths are a great way to add some extra warmth and charm to your front porch for the fall. This tutorial will show you how to make a wreath out of frayed corn husks, which is a fun, rustic alternative to traditional wreaths.
You’ll need just a few materials, and it’s easy enough that even beginners can do it! So go ahead and give it a try. Your friends and neighbors will be impressed.
PIN THIS TO SAVE FOR LATER
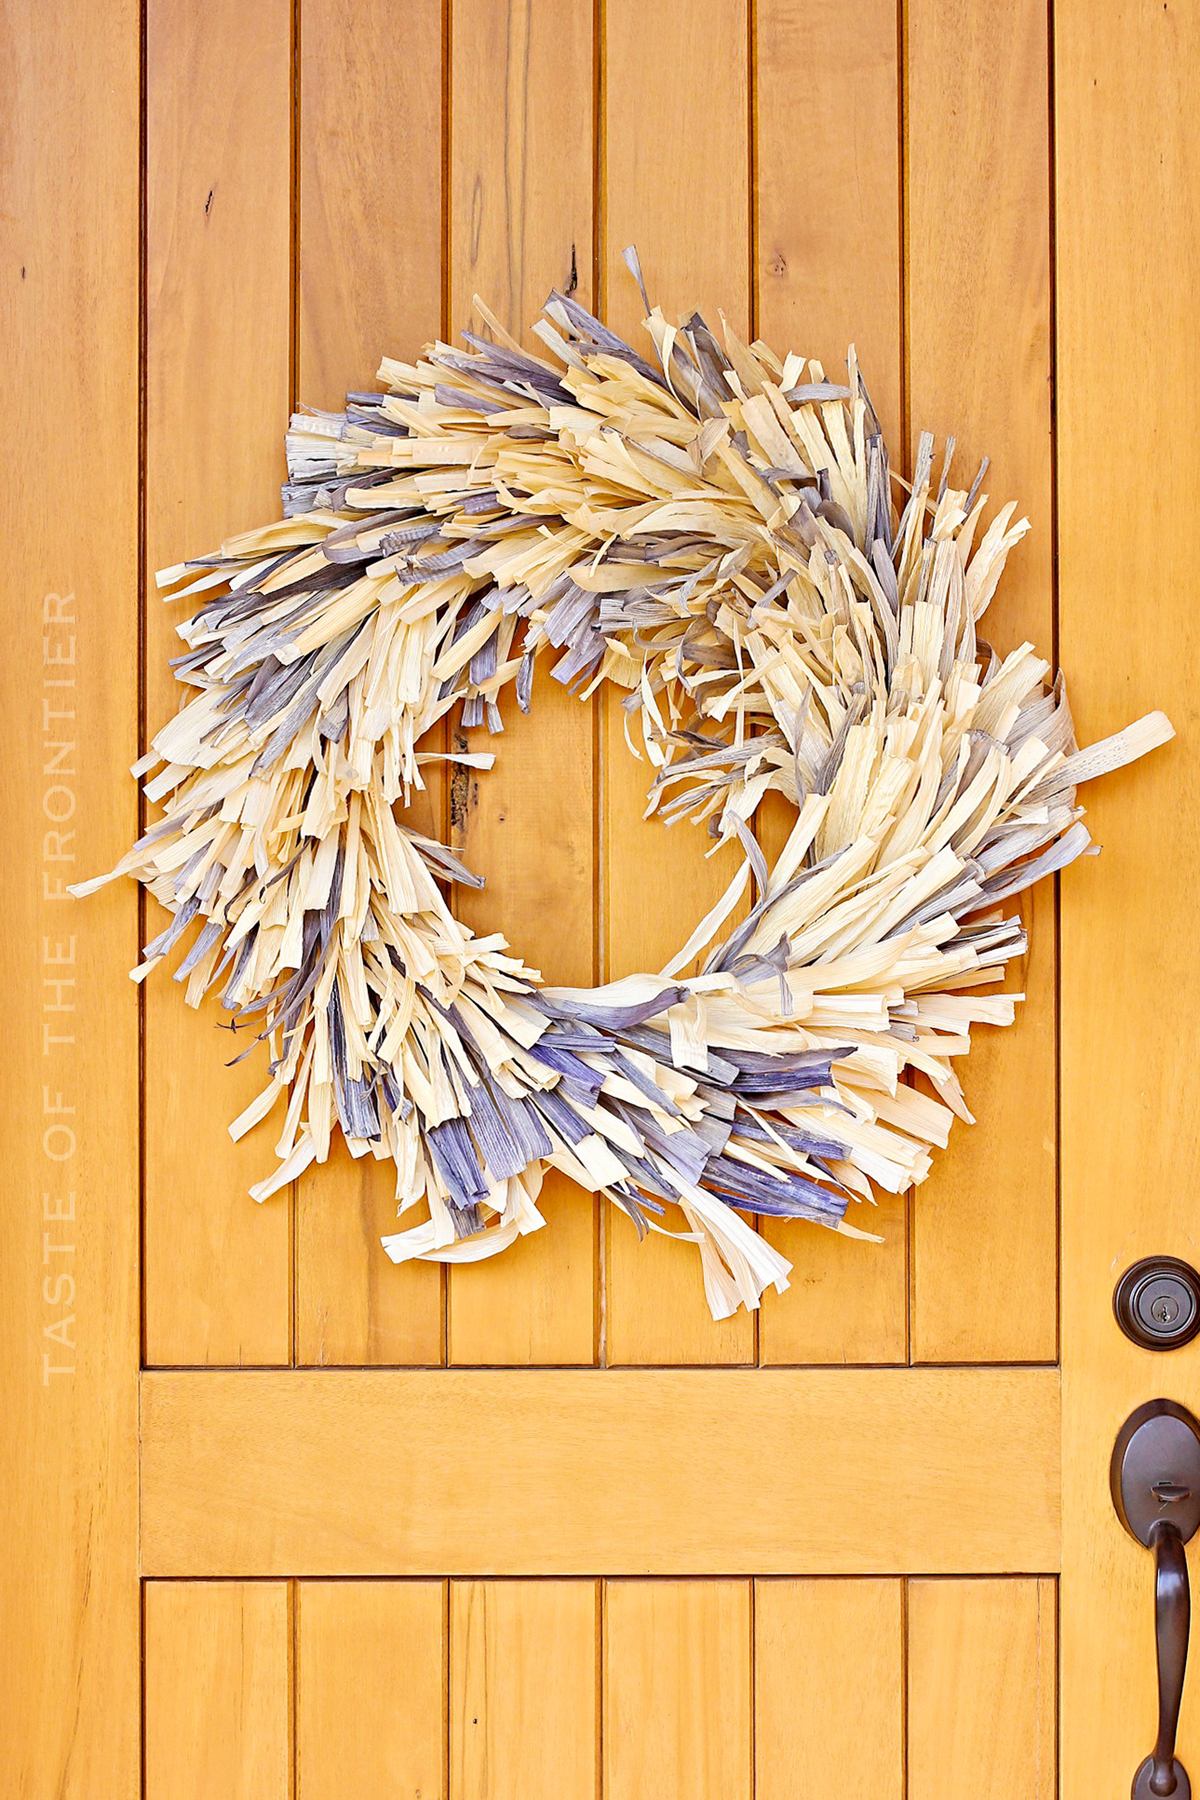
I seriously LOVE THE FALL. I love the weather, the colors & decorating for fall. One thing I try to do every year is make a new Corn Husk Wreath.
Something about the warm, earthy tones of the husks just screams fall decorating to me. This time I decided to play with the colors just a little & soak some in some navy blue fabric dye. It tinted them quite nicely & did exactly what I was hoping. I love the faded blue with the wheat-like tones.
Wreaths for Fall
Now for the moment, I’m showing this to you decorated on the front door. I think with its size I will actually be hanging it above the mantle.
But I wasn’t quite ready to completely decorate the mantle for fall. I’m still working on several things before that can happen. Soooooo- I hung it on the front door for photo purposes. I have some playing yet to do- so we will see where this ends up for the season.
This post contains some affiliate links. Click here to read my full disclosure policy.
I used a large wire wreath form I picked up at Michael’s. I won $100 gift card for them. You may remember me posting an image on Instagram of the creepy witch.
That was the day I went to spend my gift card. I have to say, I was so good. I actually- with tax came in at $100.19. Pretty good huh??!!!
I was very mindful about what I put in my cart & thought about just how I would use each thing. I had so much fun & really stocked my craft cabinet with all sorts of project staples that will last me through the season.
Here are some commonly asked questions
Where can I find corn husks?
Corn husks can be found in the international food section of the grocery store. I haven’t bought any in a while, but I used to be able to get a decently large bag for around $2-5. Now they run about $8 a bag – but you might be able to find them at the dollar store for so much less. You will need at least 2-3 bags to make this wreath, depending on how full you want the end result to be.
NOTE: TIE THE HUSKS AS TIGHT AS YOU CAN – THEY WILL SHRINK AS THEY DRY. If they are not secured really tightly they will eventually fall out of the twine.
SUPPLY LIST
How to hang the wreath
If you are using the wire form linked here, it should slide right onto a hook or nail to hang it up. If you choose another wreath form that doesn’t fit nicely onto a hook or nail – you can use the twine to tie a loop onto the back of the form to make it easier to hang the wreath.
How to Prepare the Corn Husks for Crafting
- Start with a large bowl and fill it with water.
- Add a few drops of the dye to the water and stir to disburse throughout.
- Place 1/3 of the husks in the tinted water and place something heavy on top of them to weigh them down. They will want to float.
- Let them sit in the dye for several hours, possibly overnight, or until they reach the desired color you are after.
- Once they have absorbed the dye, remove them and pat them dry with paper towels – taking care to not let any of the dye drip onto other things or your clothes.
- Then soak the natural husks in a fresh bowl of clean water following the same procedure you did to keep them weighted down. The water will soften the husks and make them pliable and easier to work with.
- Once soft, remove from the water and pat any excess moisture off with paper towels.
How to Make a Corn Husk Wreath
- Working with 3 at a time- (1 blue in-between 2 natural husks) bunch them at one end.
- Then take a piece of twine & tie them to the inside wires of the 4 wire wreath form.
- Then repeat the process but attach the bundle to the outer wires.
- Once tied on- gently tear the ends of the husks into strips to fray them.
- Repeat steps 8-11 making sure to overlap the bundles of husks to make the wreath as thin or full as you desire.
- Once you have assembled the entire wreath, place it in a warm spot to allow the husks to dry completely. Be sure to lay it flat to dry as they tend to sag as they dry if you try to dry it while hanging. The ends will curl a bit as they dry too – which is really pretty!
If you love this easy-to-make wreath, you’re going to love these other crafts too. Check out the other fun ideas below!

Metallic Glam Halloween Porch Decor


CONNECT WITH YUMMI HAUS!
Be sure to follow me on my social media, so you never miss a post!
Brownie Chunk Frozen Yogurt
Brownie Chunk Frozen Yogurt -the perfect easy summer dessert. No-bake chocolate treats loaded with brownies makes this no-churn frozen yogurt pure heaven!
Indulge in the perfect balance of rich and refreshing with this Brownie Chunk Frozen Yogurt. Creamy, tangy yogurt meets fudgy brownie chunks in a frozen dessert that’s both satisfying and lighter than traditional ice cream.
It’s a dreamy summer treat that’s easy to make at home and packed with flavor in every bite.
View post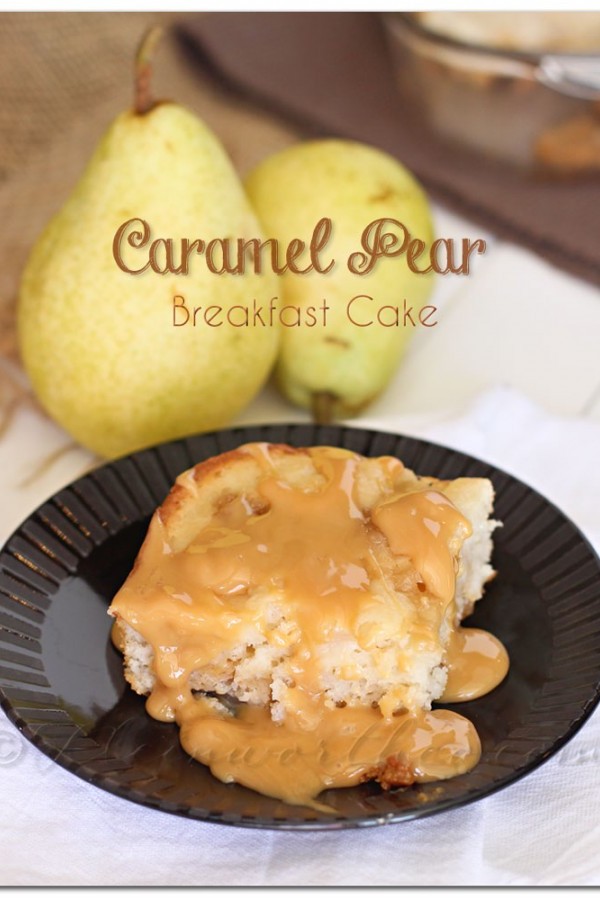
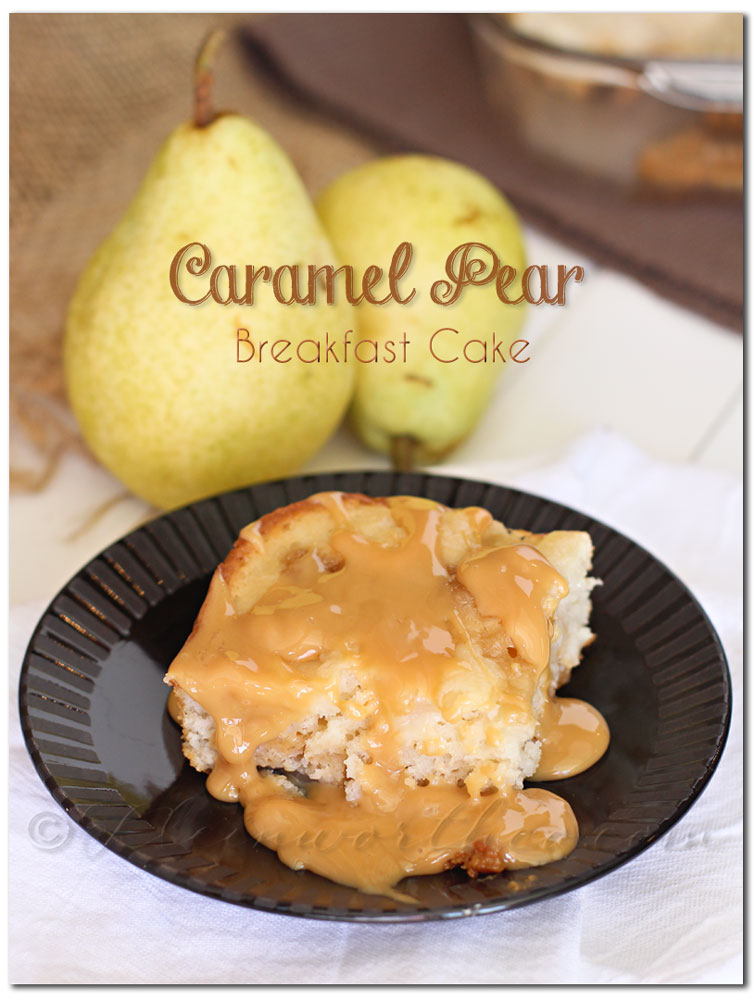
Caramel Pear Breakfast Cake
I participated in a campaign on behalf of Mom Central Consulting for Smart Balance.
I received product samples, and a promotional item as a thank you for participating.

I’m really loving the new square tub too. Smart Balance redesigned their round packaging to a square tub to save space in refrigerators & in the store. The 15 oz quantity is the same as before- but the new tub is eco-friendly. It reduces greenhouse gas emissions by 18% – that equals 6,487 newly planted trees each year. Very cool!! For more info on Smart Balances eco-friendly, space saving package redesign- check out their website.
I really do like the square tub- it’s amazing how just changing the shape can save me so much room in my fridge.
Caramel Pear Breakfast Cake
Ingredients
Cake
- 2 cups all-purpose flour
- 3/4 cup granulated sugar
- 1/4 cup Smart Balance
- 1-1/4 cup milk
- 1 tsp vanilla extract
- 2 tsp baking powder
- 1/2 tsp salt
- 1 egg
- 3 pears- peeled & diced
Streusel
- 3 tbsp Smart Balance
- 1/4 c all-purpose flour
- 1/4 cup brown sugar
Topping & Drizzle
- 1/2 cup Caramel/Dulce de Leche
- 1 pear peeled & sliced lengthwise
Instructions
- Preheat oven to 350 degrees.
- Spray 9x13 pan with cooking spray & set aside.
- Combine all cake ingredients (except diced pears) in mixer bowl & beat until smooth batter forms.
- Fold in diced pears.
- Spread into prepared pan.
- Take 1/4 cup of caramel & drop dollops on top of batter. Take a stick or knife & drag though to swirl. Reserve remaining 1/4 cup caramel for serving.
- Add sliced pears to top- laying out across - not overlapping.
- In separate small bowl combine streusel ingredients & mix with fork. This will be more of a creamy paste like consistency - not crumbly.
- Drop in small spoonfuls on top of batter. Do not mix in.
- Bake 45-50 minutes - until toothpick test is clean.
- Cool in pan 45-60 minutes.
- Drizzle remaining caramel over top when serving.
[jetpack_subscription_form]
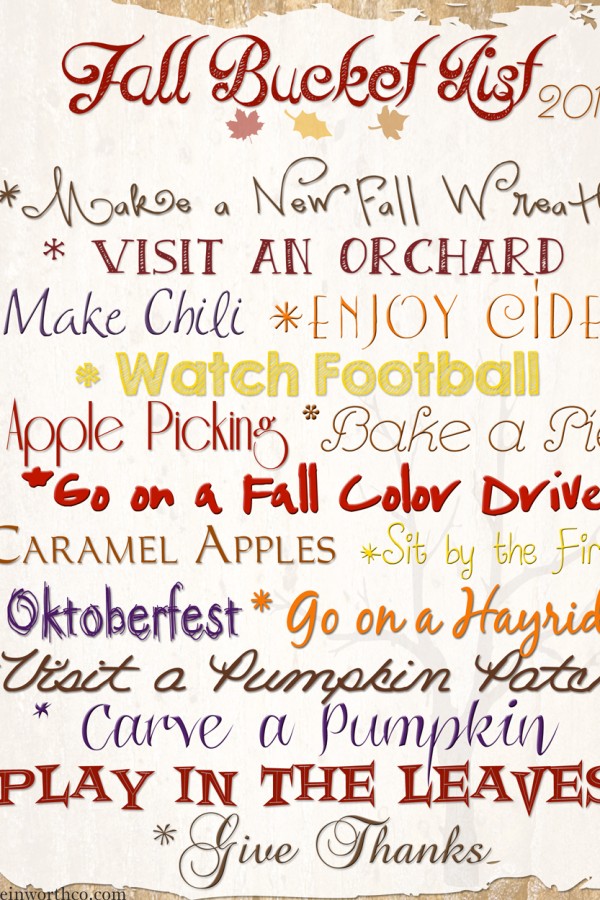
Fall Bucket List 2013 ~ Project 52 Week 34
Good Morning Everyone! Welcome to Project 52!
Hope you had a great weekend. We have been enjoying these last few August days around here. It’s so amazingly pleasant & we are so enjoying having our windows open & feeling that lovely mountain air here in Northern Idaho. I just can’t say enough great things about this place. It’s truly a treasure. We feel so blessed to have the opportunity to be here.

I captured this sunset the other evening. We don’t often get colorful sunsets here- partly because there are less dust particles in the atmosphere (which explains why we had such amazing sunsets in the desert nearly every night) so when they happen I do run out to get a couple snaps. I do love the view from our back yard- I love seeing the silhouettes of the pine trees. I longed for trees for all those years we lived in the desert- it’s such a welcome & amazing sight.

I was able to capture the Blue Moon last week. I don’t capture the moon as often as I used to. The hubs asked me why I used to run out every night to capture it & now I will pass on it more often than not. Well- I started thinking about it. I think it’s because I have so many other things to capture here. When we lived in the desert- there were only so many pictures I could take of sand & sand & well….more sand. I welcomed capturing other things- like the moon. So I did it quite a bit. Now – I have SO MANY pretty things all around me. I never yearn for something new to capture. It’s such a blessing & I am not taking it for granted. (Last Blue Moon images September of 2012 HERE & past super moon & lunar eclipse images HERE ) These pale in comparison to my images last year of the Lunar Eclipse- those & one super brilliant partial moon really are my best work to date on the moon. Sometimes it’s just not as clear & other times you can really get some awesome shots.

They came out okay & at least I documented the event.
As we are now consistently in the 80’s I’m feeling that fall is right around the corner & things are going to start rapidly changing here. I am SQUEALING I’m so excited about fall. It’s my favorite time of year & I’m sure it will show here on the blog as I jump in with both feet to all things fall. We picked up a MASSIVE basket of produce from our co-op this past weekend & I spent a fair amount of time preparing it all for some yummies that I will be making to share with you all as the season continues.
For now- you can print off this Fall Bucket List that I created.
Hopefully you will be able to cross some of these off along with me & share them on your own blogs.
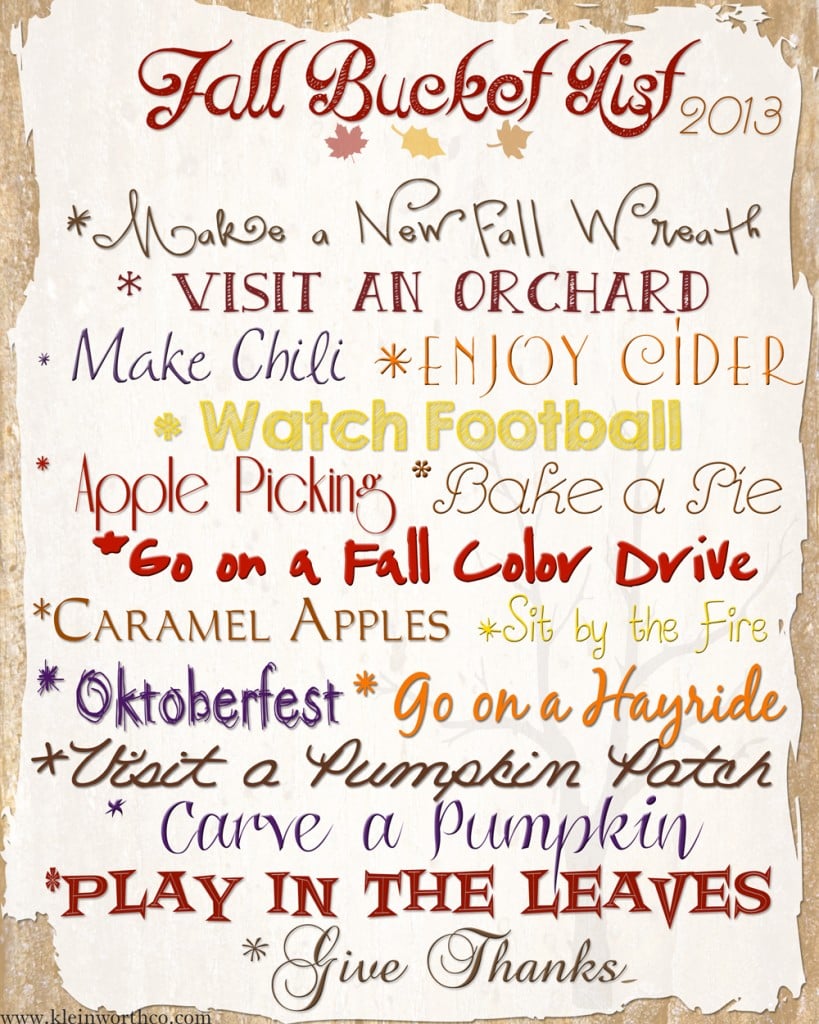
Download HERE
To see where I am linking today- visit HERE
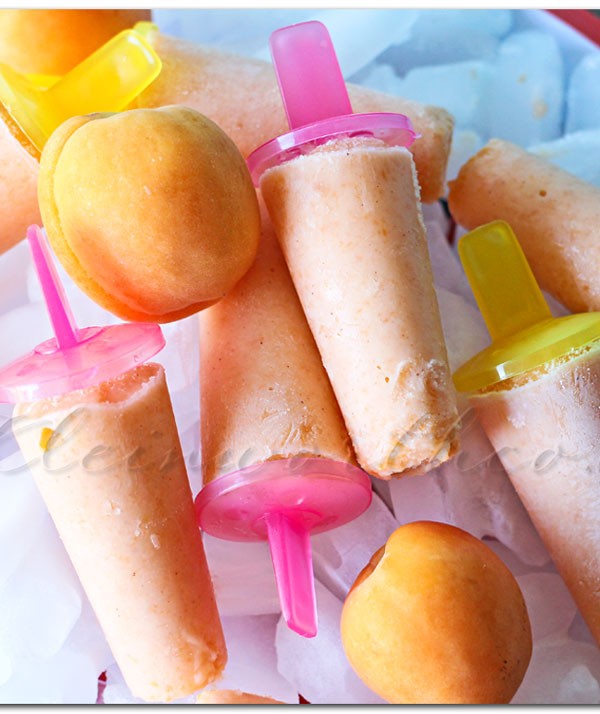
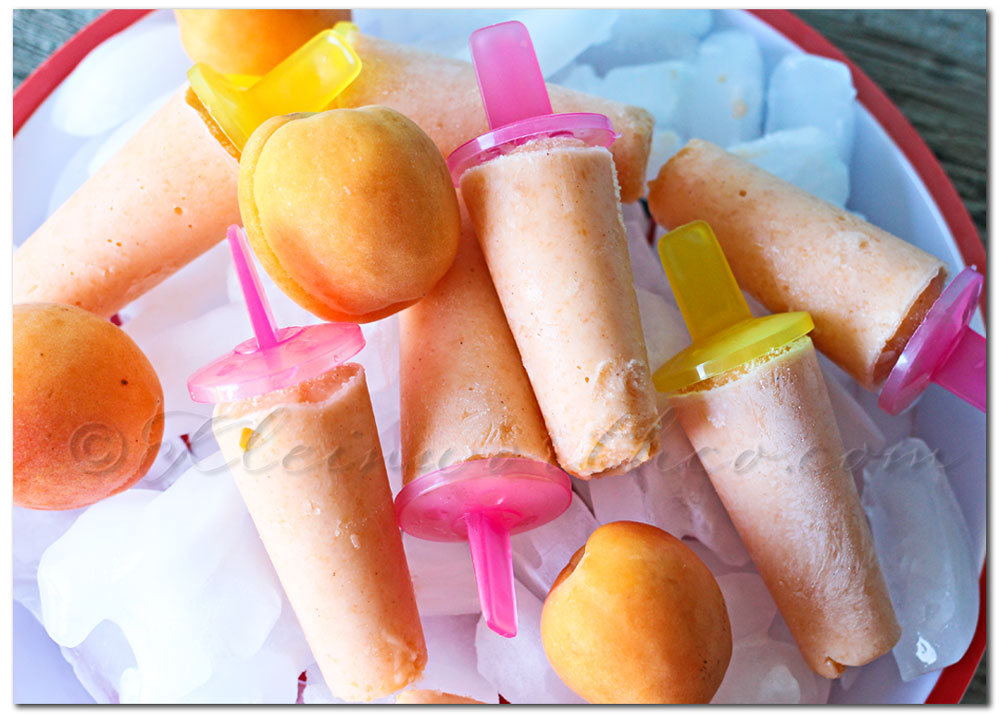
Spiced Apricot Fro Yo Pops
Hi Everyone!!
What a nutty week!! A while back I shared these Spiced Apricot Fro Yo Pops when I was contributing over at Reasons to Skip the Housework. I’m guessing that not all of you popped over to pick up the recipe – or missed the post that mentioned I was contributing over there that day- so I thought I would share it all with you today.
These were so easy & HEALTHY. I didn’t feel at all guilty about giving these to the kids with their lunch or after dinner. They loved them & didn’t mind at all that they were not loaded with sugar or sweeteners. My kids are pretty good about that anyway- they actually like things like broccoli & don’t even like soda. So I wasn’t shocked that they loved these. For my own peace of mind I felt so much better knowing I wasn’t loading them up on junk.
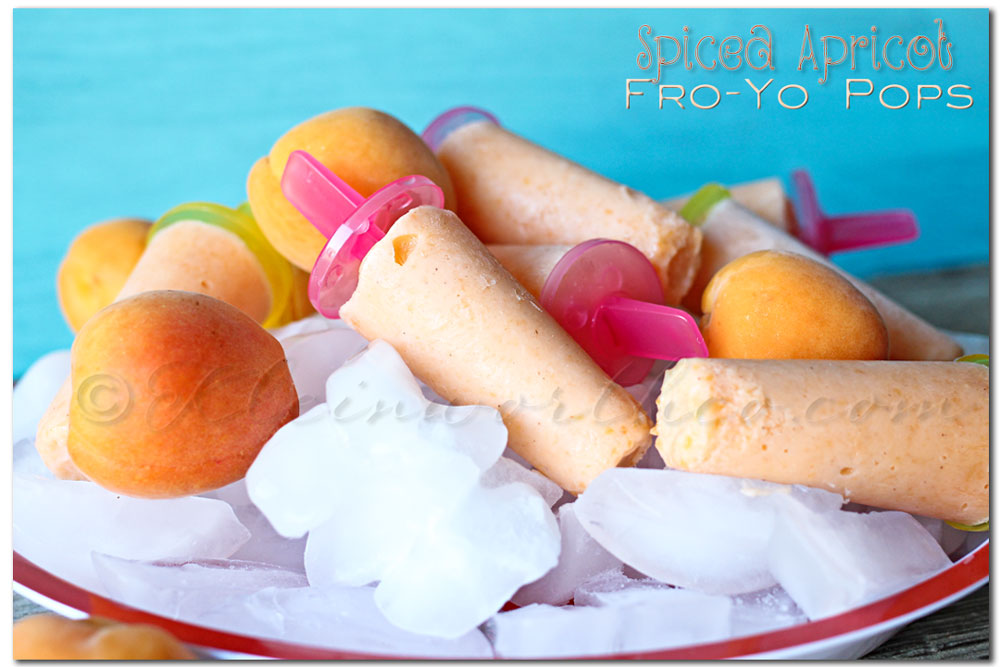

Spiced Apricot Fro Yo Pops
Ingredients
- 2 cups pitted & halved apricots
- 16 oz vanilla yogurt
- 1 tbsp cinnamon/sugar mix
Instructions
- Add all ingredients to blender & puree 1-2 minutes
- Add to pop molds
- Freeze at least 4 hours before serving.
As we move through August I am sure you will be seeing less & less frozen treats & more baked goods.
I have really missed baking & I am really looking forward to doing more of it as the weather cools in the coming weeks.
*Also- today I’m guest posting over at Baby Bump Bundle – head on over & check it out.
Don’t forget to come back & join me on Mondays for Project 52
To see where I am linking today- visit HERE
[jetpack_subscription_form]
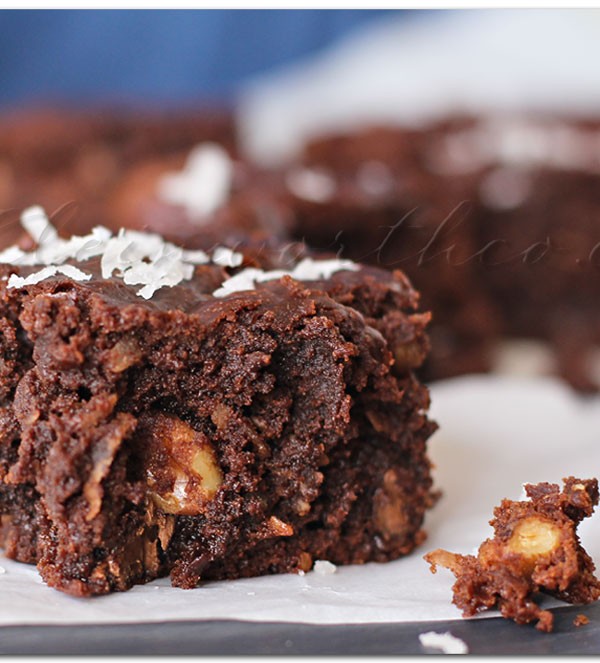
Game Day Crock Pot Brownies
Do you love game day?? Do you love football??
I absolutely LOVE football & game day is what we all look forward to all week long in our house. Whether it’s college or NFL we REALLY LOVE watching our favorite teams each weekend. I spend all week planning out just what we will make for snacks. Appetizers & munchy, snacky foods are in full spread here. I like to spend my Fridays preparing the house. That means decorating with our favorite team colors & inviting guests over for the game.
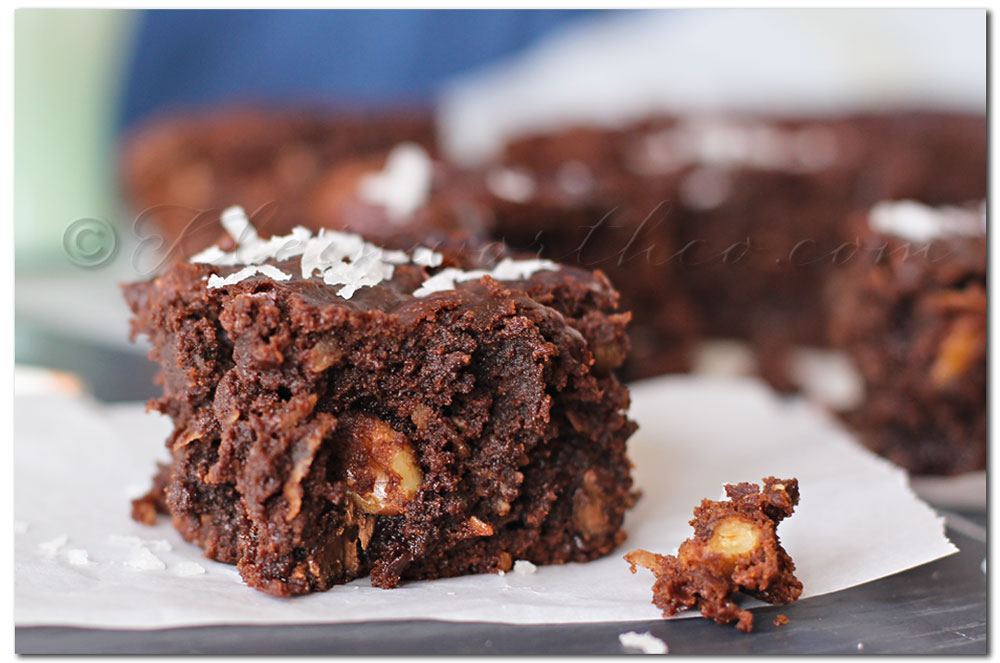 What’s on the menu this coming Game Day??
These Crock Pot Brownies. So simple- I can whip up the batter- pop them in the crock pot & let them cook while I work on the rest of the goodies.
I love that they cook in the crock pot so I have my oven available for the other things I’m preparing.
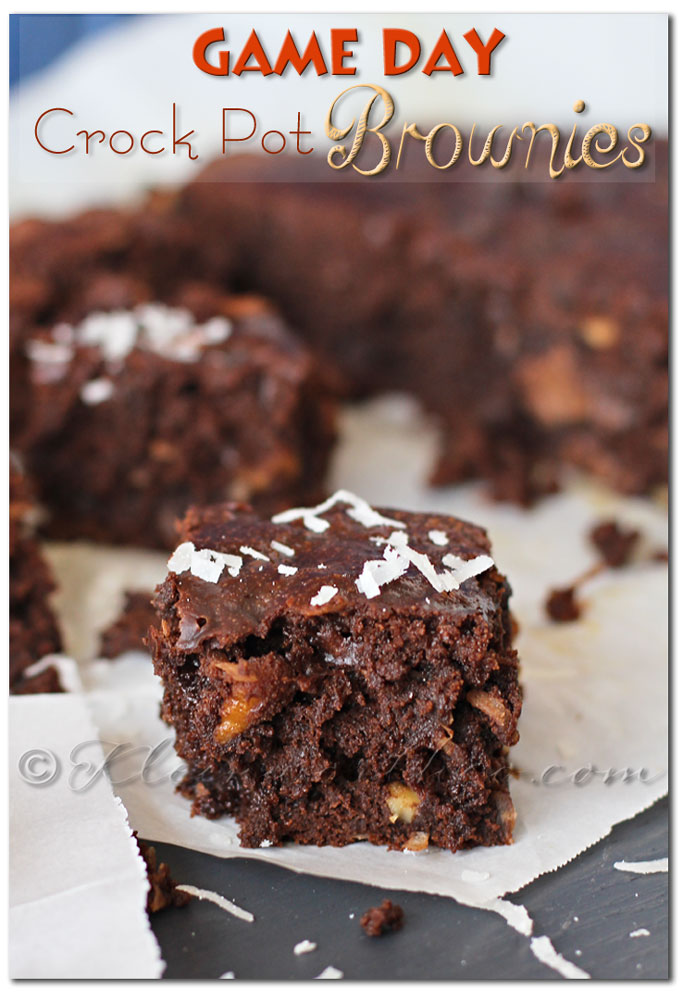

Game Day Crock Pot Brownies
Ingredients
- 1-1/4 cup all-purpose flour
- 1/4 cup unsweetened cocoa powder not Dutch processed
- 3/4 tsp baking powder
- 1/2 tsp salt
- 4 medium eggs or 3 large
- 1 cup granulated sugar
- 1 cup semi-sweet chocolate chips
- 1/2 cup 1 stick salted butter -cubed
- 1/2 cup walnuts opt
- 3/4 cup semi-sweet chocolate chunks roughly chopped
- 1/2 cup sweetened coconut
Instructions
- Line crock pot with parchment paper- spray with cooking spray
- In medium bowl- whisk flour, cocoa, baking powder & salt. Set aside.
- Place chocolate chips & butter in double boiler & heat & stir until melted.
- Remove from heat- stir in sugar until combined.
- Add eggs- whisk well.
- Pour into dry mixture & whisk until well combined.
- Fold in walnuts, coconut & chocolate chunks.
- Transfer to crock pot & smooth. (try to avoid pressing it right up against the sides of the cooker. It's okay to allow the parchment to keep it slightly pulled away from the edges. (this keeps the sides from over-cooking while the center cooks to done)
- Cook for 1 hour 45 min to about 2 hours. Check frequently at this point. Once it gets to a certain point (done in the middle) - burning can happen quickly around the edges.
- Pull out by the parchment & cool on wire rack at least 45 minutes. If you want to serve warm with a scoop of vanilla ice cream- it will still be warm enough in the center to do this. You just want to avoid it being too hot & falling apart when you try to cut into pieces.
*Note – Start cooking on high but reduce to low when you start seeing the sides looking more cooked. They will burn before the center has a chance to finish cooking if you leave it on high the whole time. Since all slow cookers cook a little different it’s hard to say exactly how long this will take or when you should do this. Just keep an eye on it – checking them periodically throughout the process.
As everyone is arriving I prepare the snacks while we chat & watch kick off. I like to put the brownies in the crockpot around kick off time. OMG-the smell through the house is heavenly & by the time we reach the really heated part of the game- the brownies are done & everyone is happy. You have got to give them a try. No one will believe they were cooked in your crock pot.
So that’s how we spend our weekends in the fall.
What’s a creative way you prepare for game day??
This post contains some affiliate links. Click here to read my full disclosure policy.
Looking for more yummy bar recipes like these Candy Bar Bites?
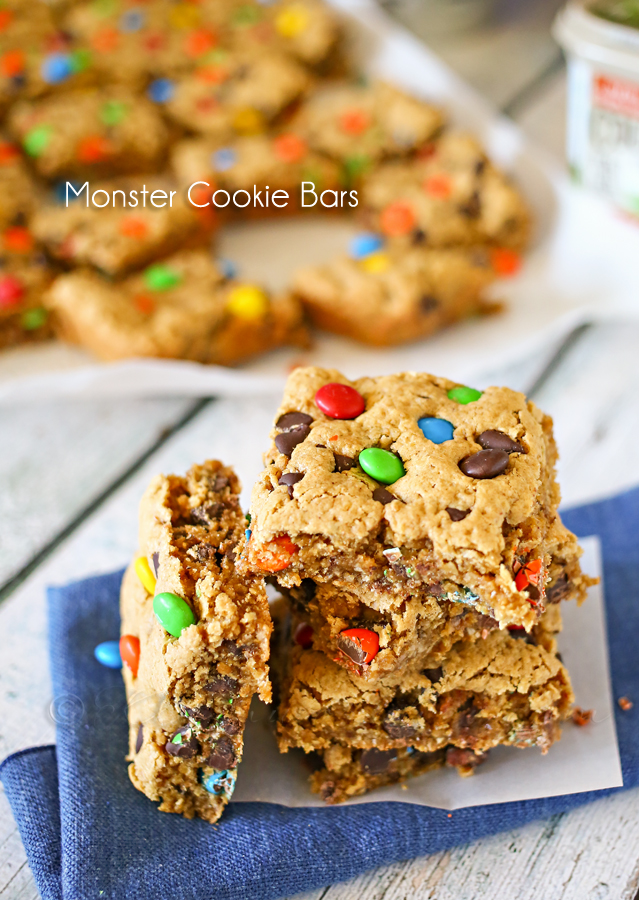
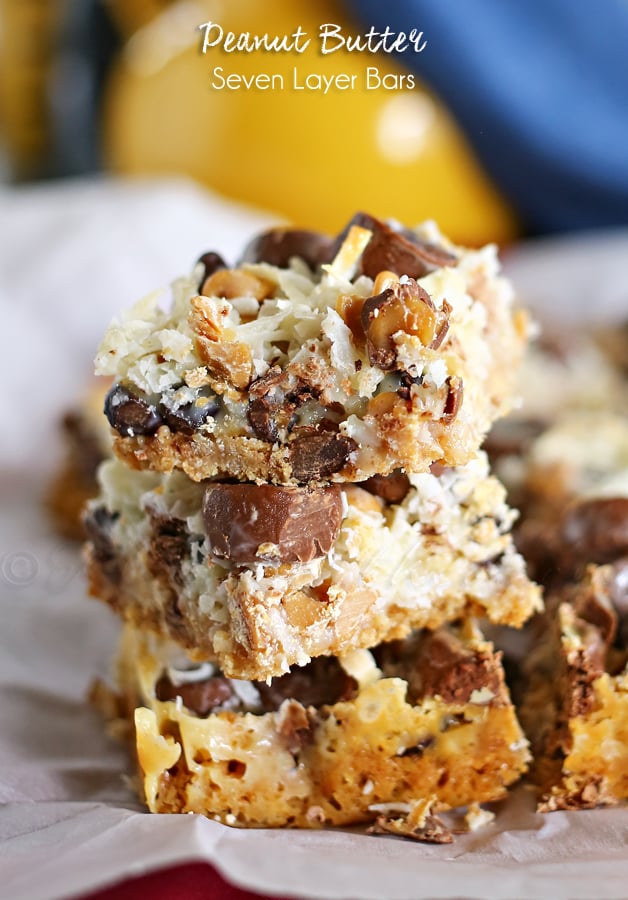
Peanut Butter Seven Layer Bars
Don’t miss these great ideas from these bloggers….
Six Sisters’ Stuff – Cake Mix Peanut Butter Bars
Chef in Training – Ooey Gooey Cake Mix Bars
**Disclosure: This post was originally sponsored by Tide through their partnership with Circle of Moms.
While I was compensated to write a post about Tide Plus Febreze Freshness Sport, all opinions are my own.
To see where I am linking today- visit HERE
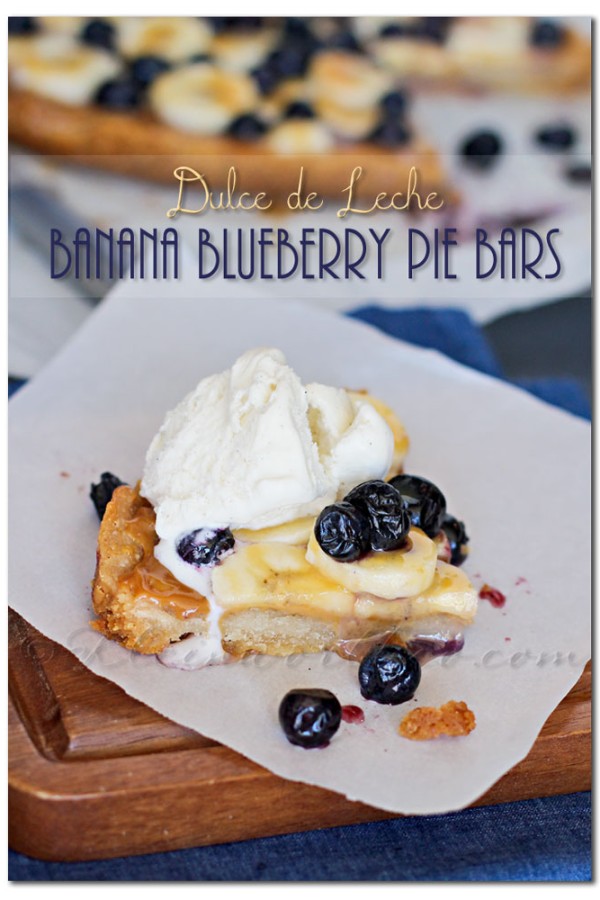
Dulce de Leche Banana Blueberry Pie Bars
*Disclosure: This post is sponsored by Pillsbury & Linqia. All opinions are truthful & my own.
I have been meaning to do more recipes with blueberries all season. I love Yummy Bar Recipes!
I had one more Pillsbury product to try out – the pie crust. But you know the problem- I’m trying to not run the oven while it’s hot outside. Sooooo- I decided to see how this Pillsbury Gluten Free pie crust would do in the slow cooker. You know- for not having a recipe to follow- I was actually really happy by how great it turned out. Good thing I wrote down what I did so I can do it again- because the family loved these Dulce de Leche Banana Blueberry Pie bars.
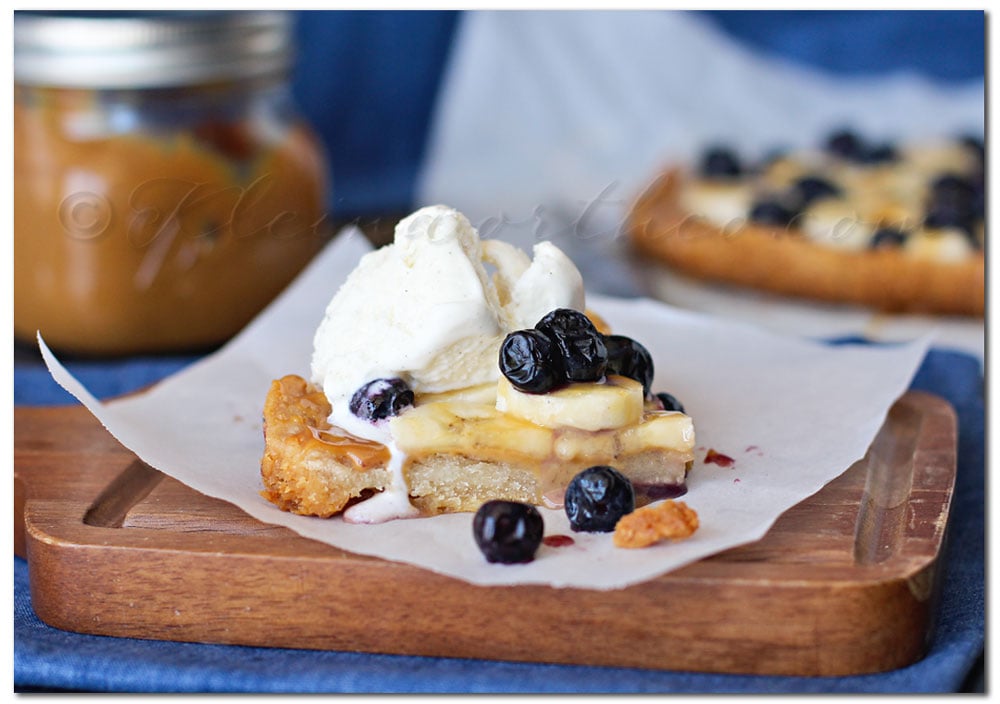 The crust was so buttery & flavorful.
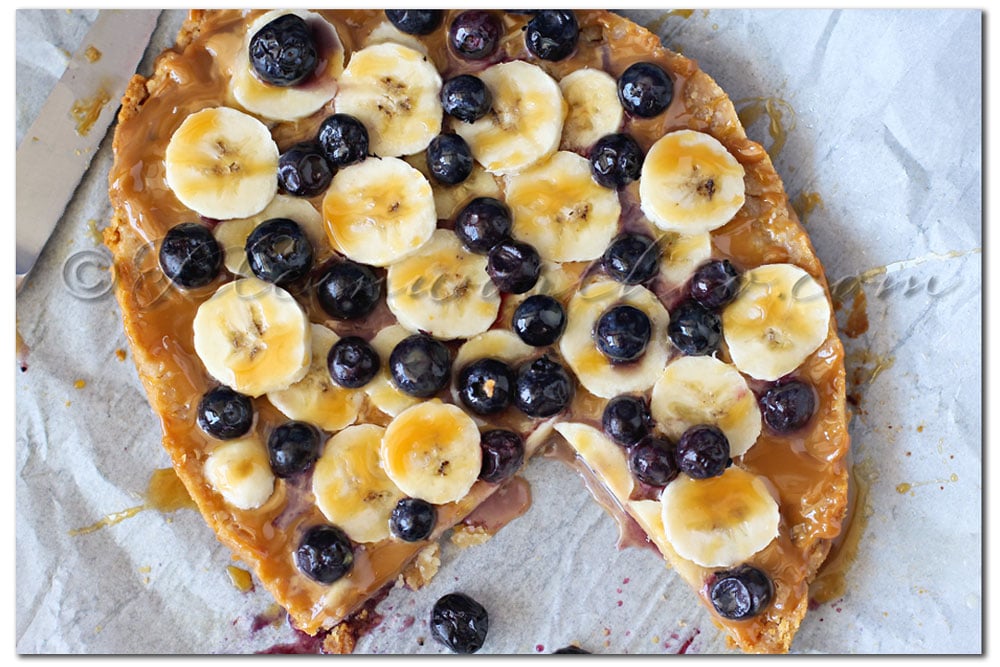 Oh yes- it was ooooey, gooey goodness all over the place.
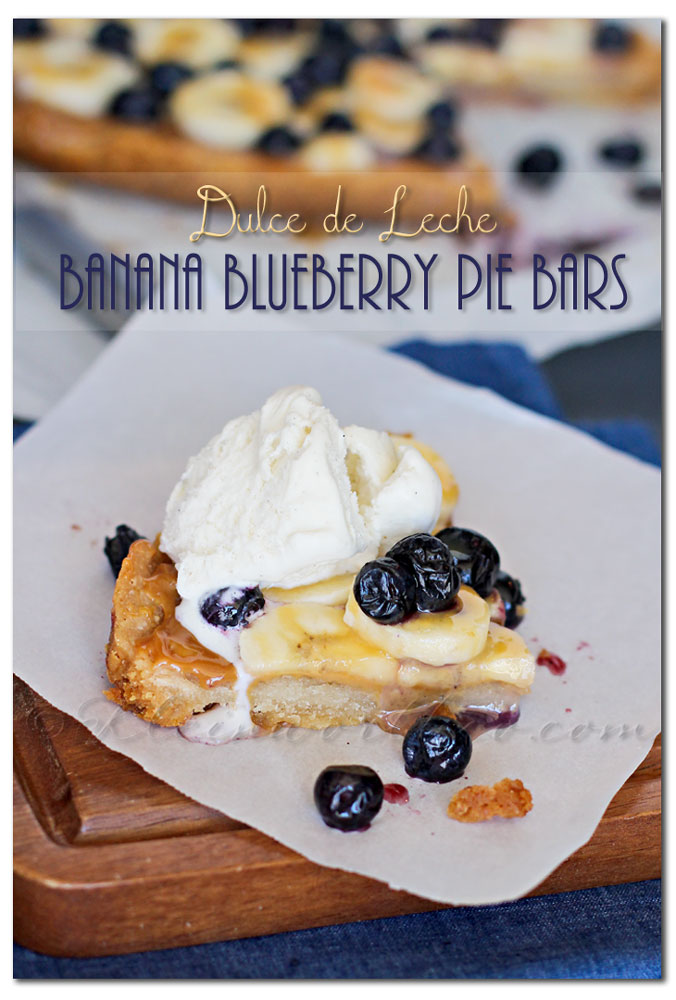

Dulce de Leche - Slow Cooker Method
Ingredients
- 1 can Sweetened Condensed Milk
- Canning Jar
Instructions
- Transfer your sweetened condensed milk into whatever size canning jar you desire-
- (1 can + 1 mid-sized jar or 1 can + 2 small jam jars)
- Place lids on tight!
- Place in slow cooker & cover with water.
- Cook on high 4-6 hours or until it becomes the desired color you are after.
- Remove carefully & Allow to cool on wire rack 1 hour.
- Serve hot or store in refrigerator for 2 weeks.
Don’t forget I’m giving away a premium baking set from Pillsbury.
Click on this image for more Pillsbury Info
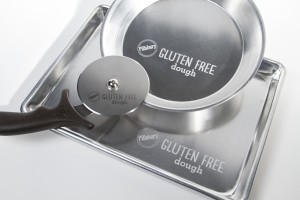
Use this to try my SUPER SIMPLE gluten free recipe using this Pillsbury Pie Crust
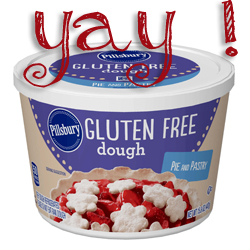
Click on Image for more info on this pie crust.
Excited to start baking, but need a few recipes to get going??
Check out the Pillsbury Gluten Free Dough site for delicious & easy recipes to make with all three varieties of gluten free dough.
TO ENTER: Visit Pillsbury for gluten free recipe inspiration.
Then come back & leave a comment below or on one of my upcoming Pillsbury posts to be entered to win.
Just answer the question: What exciting possibilities will Pillsbury Gluten Free Dough bring to your life?
We want to hear your stories & recipe ideas!!
Good Luck!
Don’t miss my guest posts today
I’m sharing at Life n’ Reflection
and I’m also sharing these Watermelon Lime Sorbet Pops at Just us Four
Don’t forget to come back & join me on Mondays for Project 52
To see where I am linking today- visit HERE
[jetpack_subscription_form]

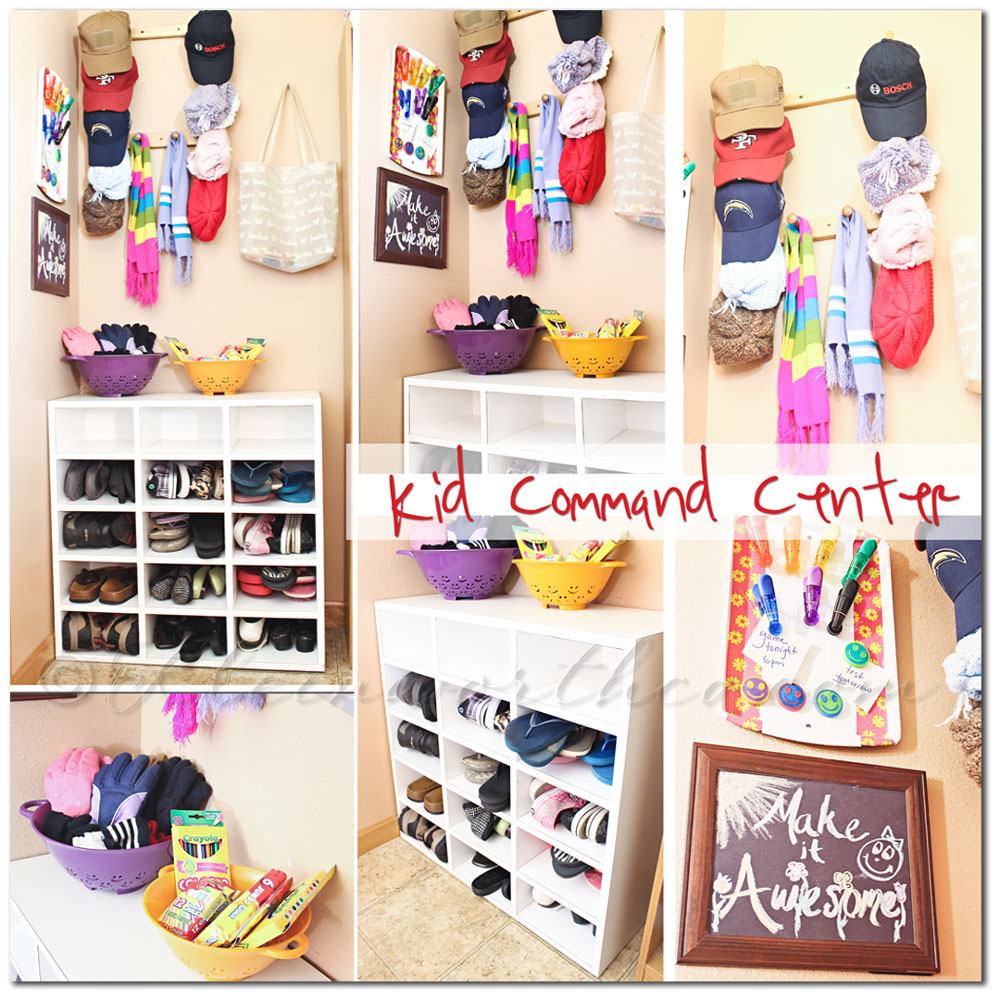
Kid Command Center #BacktoSchoolWeek
*Disclosure: Sponsored Post- I have been compensated for this post either monetarily or with product. All opinions are truthful & my own.
Seems like life just seems to pick up speed these days- doesn’t it??!! I have been winding down with the school days here but my days are increasingly nutty. So as you can imagine- being organized is a must for me. I’m completely taking advantage of this back to school season & getting some things in order around here. As most of you know- when we moved here back in December- we downsized out house by 1000 sf. So things have been tight & I’m always looking for ways to free up space & feel less mental clutter by finding tidy homes for things.
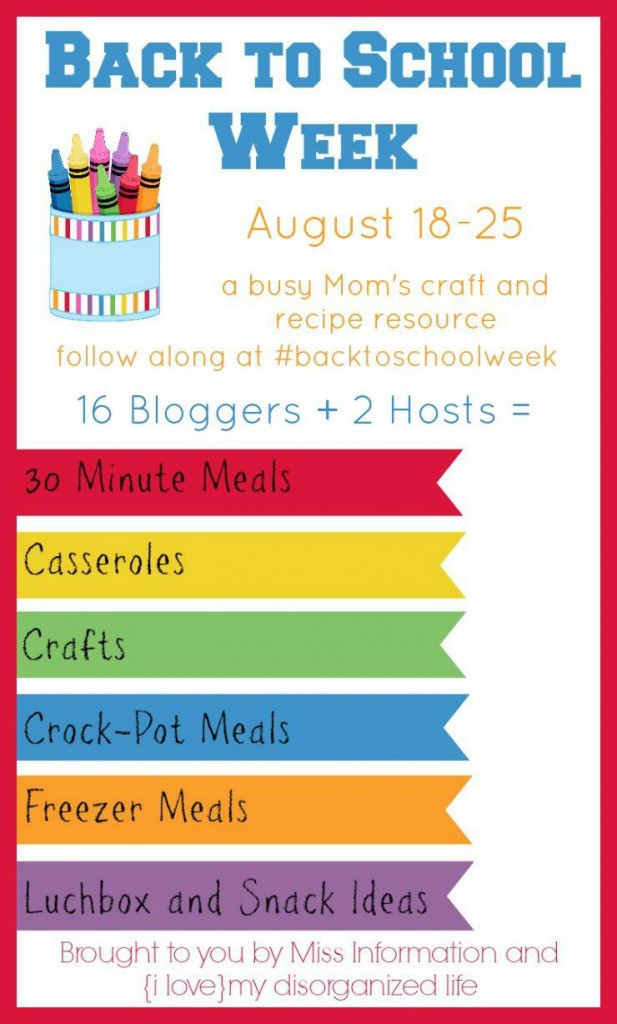
So as part of my participation in this week’s Back to School week with all my bloggy friends-
I decided to take a corner in our mud room & make a Kid Command Center.
When we make our house purchase I will be doing something similar- but more cohesively colored & permanent.
But for now- in this temporary rental- it’s really helping out.
When the fire department had their big annex sale to raise funds for the department- the hubs saw some things he knew I would really like to have. One of them was the big white mail sorter. This used to hang on the wall in the station. I picked it up for $2. It works perfectly for the kid’s shoes- they each have their own row.
He also picked up this baseball bat rack for $1. I decided to use all the pegs & slots to hold hats & scarves.
I added a nail for my “go-bag” which holds my sunscreen & outdoor supplies.
So if there is ever a chance of being outside for extended period of time- I’m ready.
I also added a little mini-chalkboard for notes & just random fun doodles.
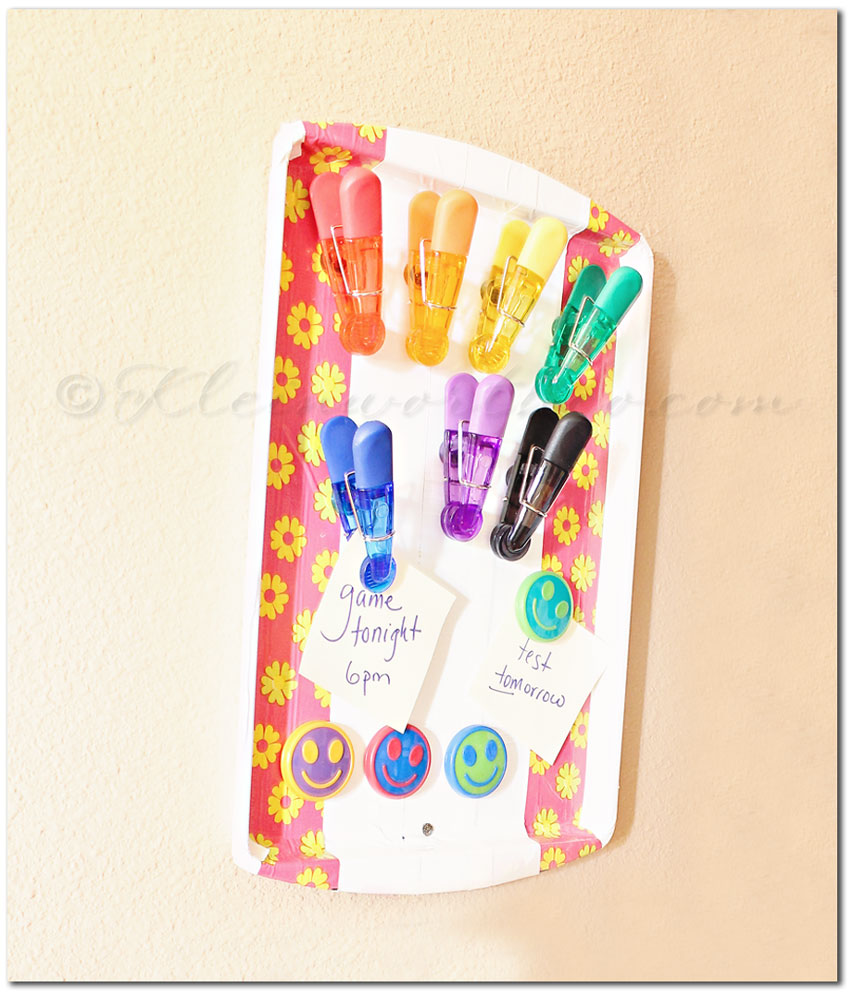
Then I made this magnetic board out of an old cookie sheet & some colored duct tape. Nailed it to the wall- works GREAT!!
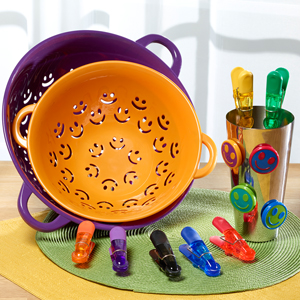
I recieved this AWESOME kit from Kizmos to complete my command center.
The magnets & clips for my magnetic board & these really cute colanders. As you can see I used the large one for corralling the gloves & mittens. The little one for extra art supplies when they need them on the fly. Love having everything in one place & easy to get to when running out the door.
Don’t miss entering the Back to School Week Giveaway I posted about on Sunday to enter to win your own Kizmos Kit.
ALSO be sure to join us on 8/25 for the Pin Chat
- Go to the #BacktoSchoolWeek pin board on Pinterest here. It will be full of fun Pin graphics with questions about back to school. You can re-pin the questions, answer questions in the comment section of the pins and pin crafts/recipes to the board as answers to questions {only the comments on the question pins count as entries to the PinChatLive giveaway} How fun is that?!? {**Only ONE comment per question pin per person, please. Pinterest views multiple comments from the same person on the same pin to be spam}
- Go to the YouTube video that will be happening during the PinChatLive from 6-7 pm EST Sunday Aug 25th. We’ll be chatting about back to school and doing a play-by-play of the pinning.You’ll be able to see and hear the hosts of #BacktoSchoolWeek and some of the participating bloggers! Comments on the video count as PinChatLive giveaway entries!
- You’ll be able to watch/listen to the YouTube video while you see the PinChat unfold on Pinterest. Cool, right?
A special Thank You to Kizmos for providing this wonderful kit to help me complete my Kid Command Center.
Don’t forget to come back & join me on Mondays for Project 52
To see where I am linking today- visit HERE
[jetpack_subscription_form]
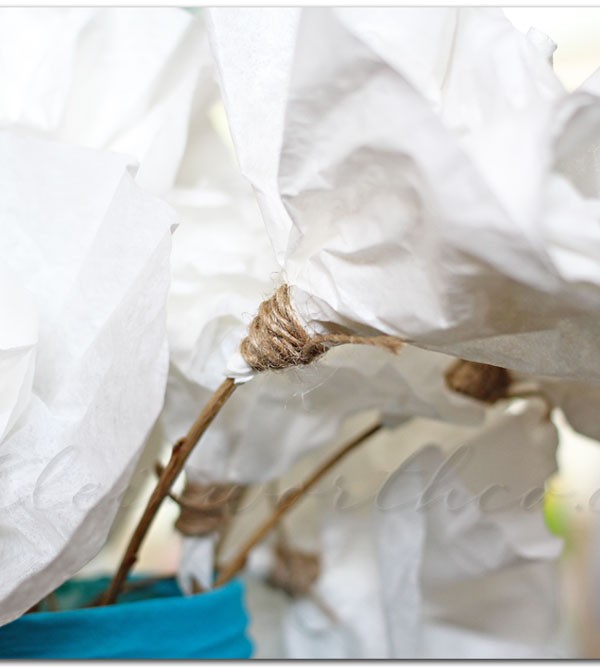
Simple Coffee Filter Flowers
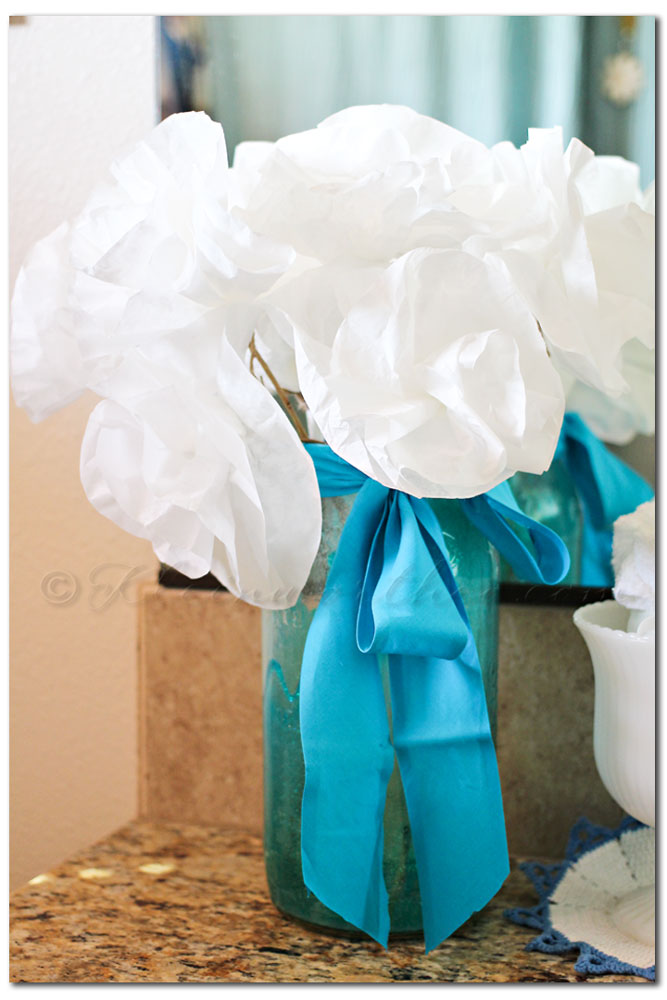
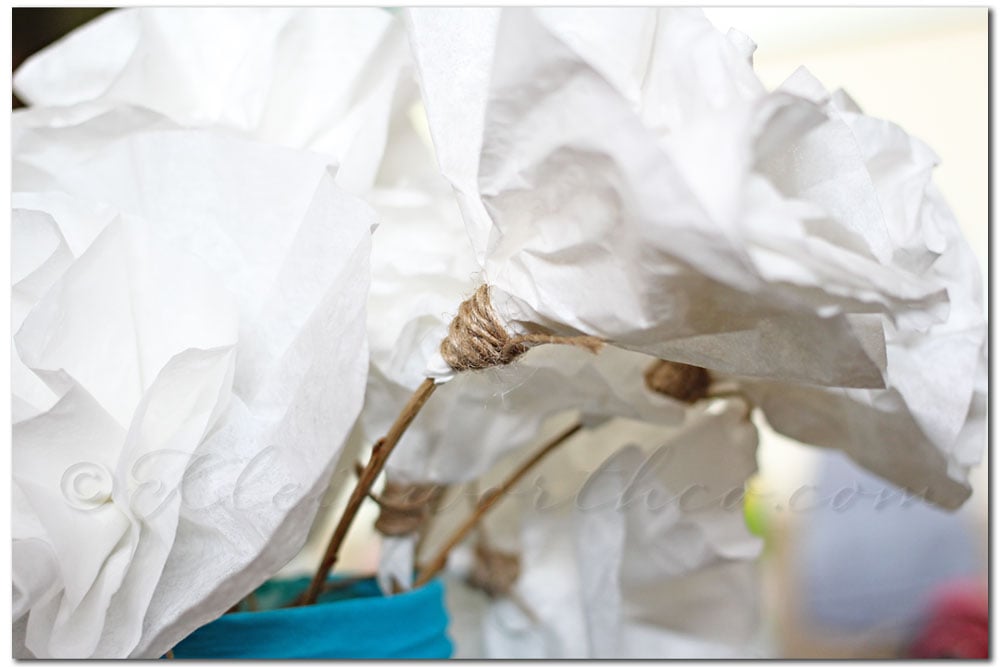
This is another one of those things that helped me put to use all those branches I saved from when we trimmed our tree in the front yard. The hubs thought I was insane for hanging on to them & thought for sure I would never use them. So – I did it & now look at it. 🙂 Hmmmmm!
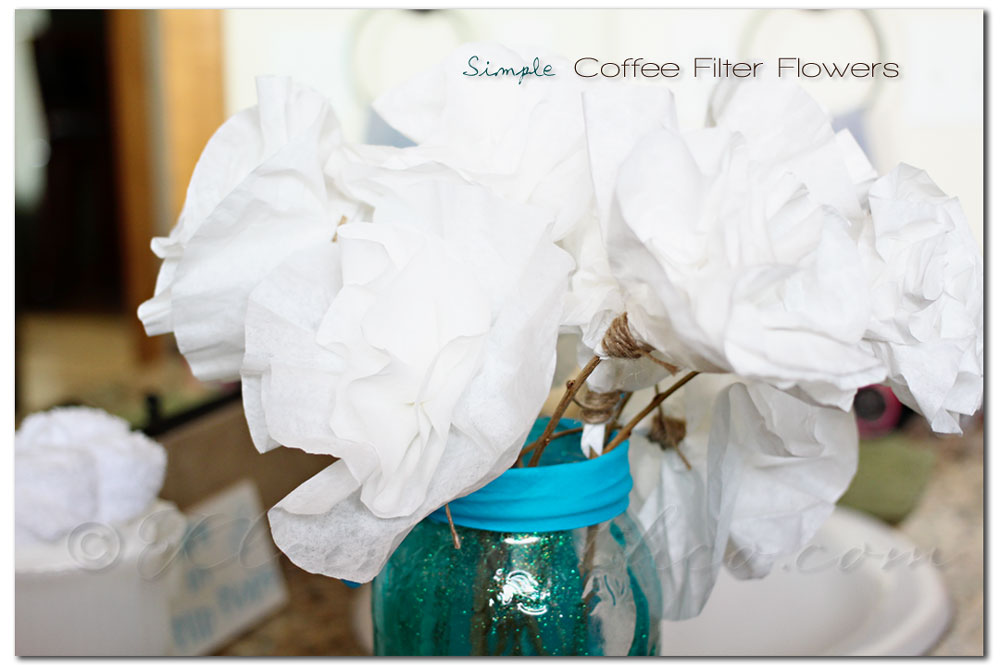
Another decorating project using things I had on hand- total cost ZERO. YAY!
Don’t forget to come back & join me on Mondays for Project 52
To see where I am linking today- visit HERE
[jetpack_subscription_form]
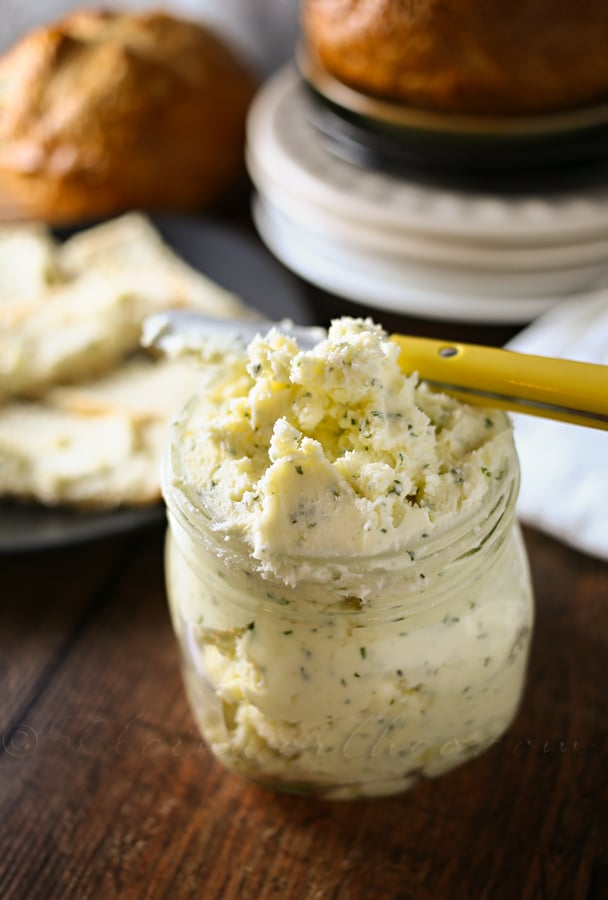
Slow Cooker Gluten Free Garlic Bread
Slow Cooker Gluten Free Garlic Bread, is a simple bread recipe you can make in the Crockpot. So easy and delicious too.
Last week when I shared with you my Gluten Free Chocolate Strawberry Gooey Bars I mentioned that I would be sharing more easy recipes made with Pillsbury’s gluten-free line of products.
I was sent all the varieties to try out & so this time I decided to work with the pizza dough. The kicker here is that we have been in the low to mid 90’s & there was NO WAY I was going to turn on my oven when we don’t have AC.
View post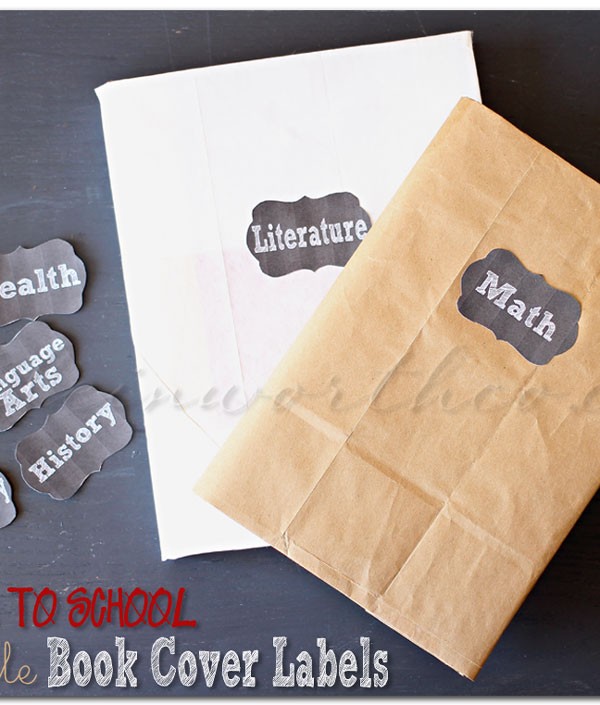
Printable Book Cover Labels
 Even though we decorated our book covers- I would have loved having the ability to print off some cute little labels to make my covers more personal yet stylish. If my kids were going back to school they would definitely be using these.
 Download HERE
To help kick off these crazy back to school days- a large group of us came together to offer you all this AWESOME giveaway.
This “End of Summer Giveaway Event” is sponsored by Tip Hero.
With summer soon drawing to a close, we thought a great big giveaway event would be the perfect pick-me-up!
Download HERE
To help kick off these crazy back to school days- a large group of us came together to offer you all this AWESOME giveaway.
This “End of Summer Giveaway Event” is sponsored by Tip Hero.
With summer soon drawing to a close, we thought a great big giveaway event would be the perfect pick-me-up!
 There are some great opportunities to score deals at the end of the summer.
One lucky winner will win a $100 Walmart gift card to potentially use while shopping those end of the season sales.
There are some great opportunities to score deals at the end of the summer.
One lucky winner will win a $100 Walmart gift card to potentially use while shopping those end of the season sales.
This giveaway begins on August 15th and will run until August 29th at 11:59pm US Eastern time. It will be open to residents of the US only, 18+. Use the PromoSimple form below to enter, and make sure that you take advantage of the many entries you can gain. Also, be sure to come back daily for more chances to win. Best of luck!
Disclosure: Kleinworth & Co. is not responsible for prize distribution. If you have any questions or concerns, please send an email to kira@tiphero.com. All entries are optional, but if the winner task is a task that you did not complete, a second winner will be chosen. Winners will be notified via email. If a winner does not respond within 48 hours of the time when the email is sent, another winner will be chosen.
Don’t forget to come back & join me on Mondays for Project 52 To see where I am linking today- visit HERE
[jetpack_subscription_form]

Organized for Back to School ~ Hair Accessories
Hi Everyone!!! Are you ready for Back to School???
Before I share my latest project for getting the kids organized I wanted to share with you a little info I was given regarding kids & the use of smartphones. As my kids do more & more tech related things they constantly want to use my phone- navigating it without any help. Two of them are already at the age where they are asking for their own smartphone! I know that I’m not the only parent who has concerns about their kids’ mobile device usage. The team at Zact conducted a survey to find out what’s behind parents concerns. Did you know 73% of U.S. parents are concerned about the lack of parental control of a child’s activities on mobile devices?
What are your biggest concerns for your kids when they have a smartphone? How do you talk to them about it?
See the Zact infographic below for other great statistics on kids and mobile usage!
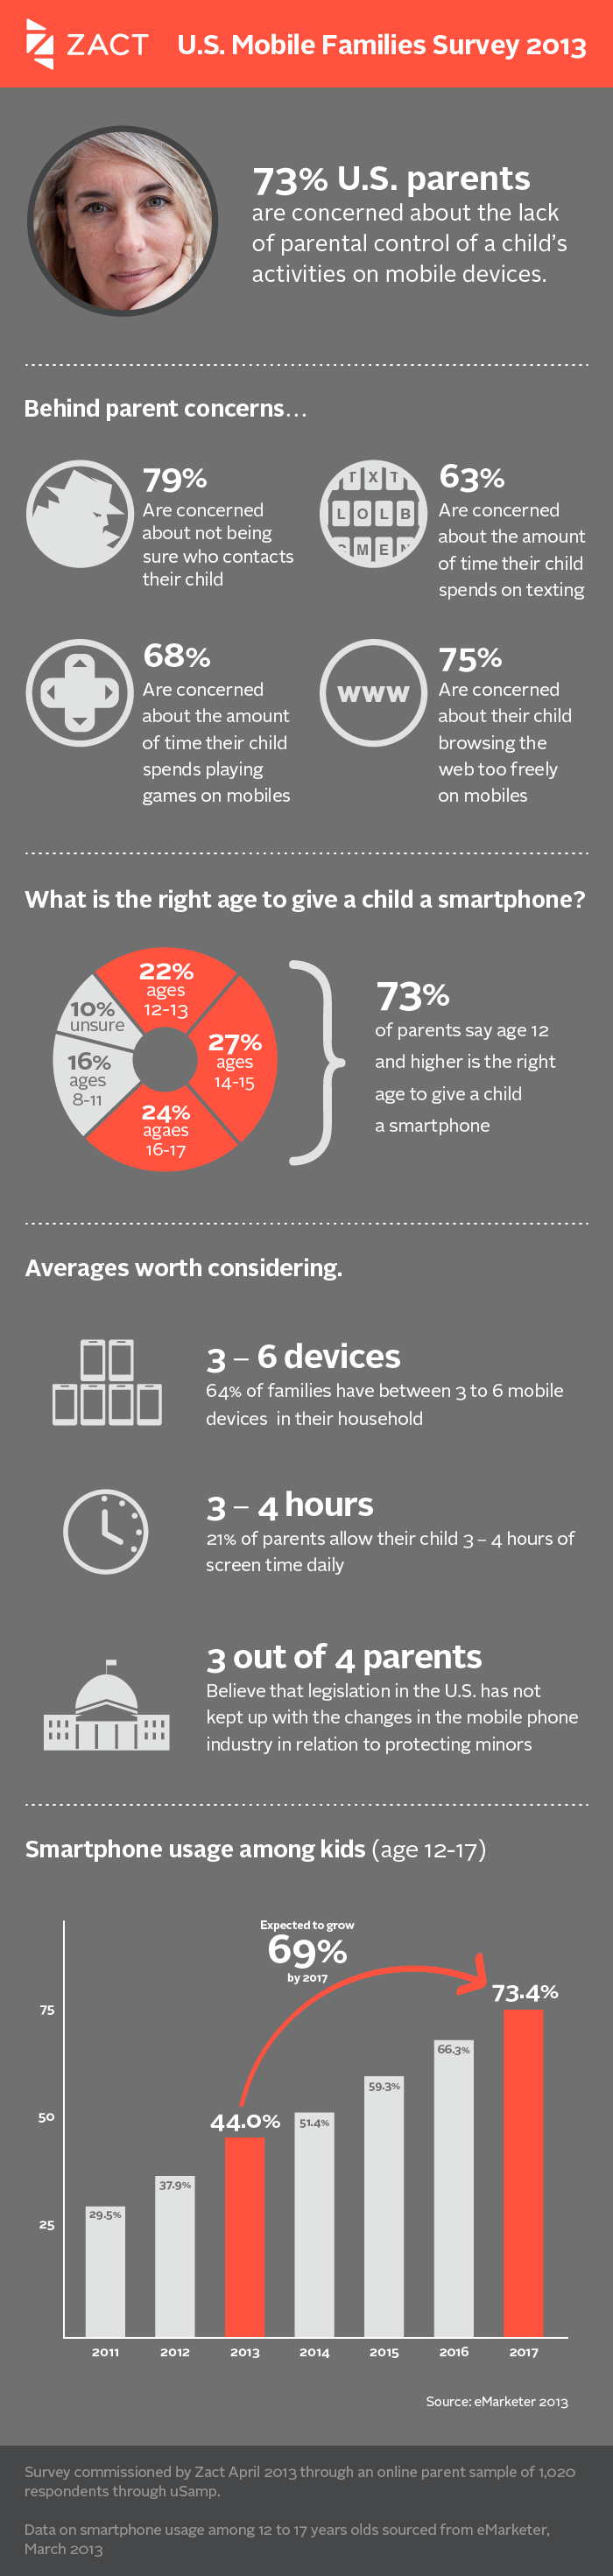
For more information on Zact mobile services and a chance to win 3 smartphones in 3 days, please click here!
My kids are in the final couple days of school because we work on a calendar year- instead of a traditional school year. So I am nearing our off time- which I am so looking forward to. Life around here gets pretty nutty from here until New Year’s – so while we may not be following everyone else’s schedule- taking advantage of this time to get get organized is key for keeping my sanity.
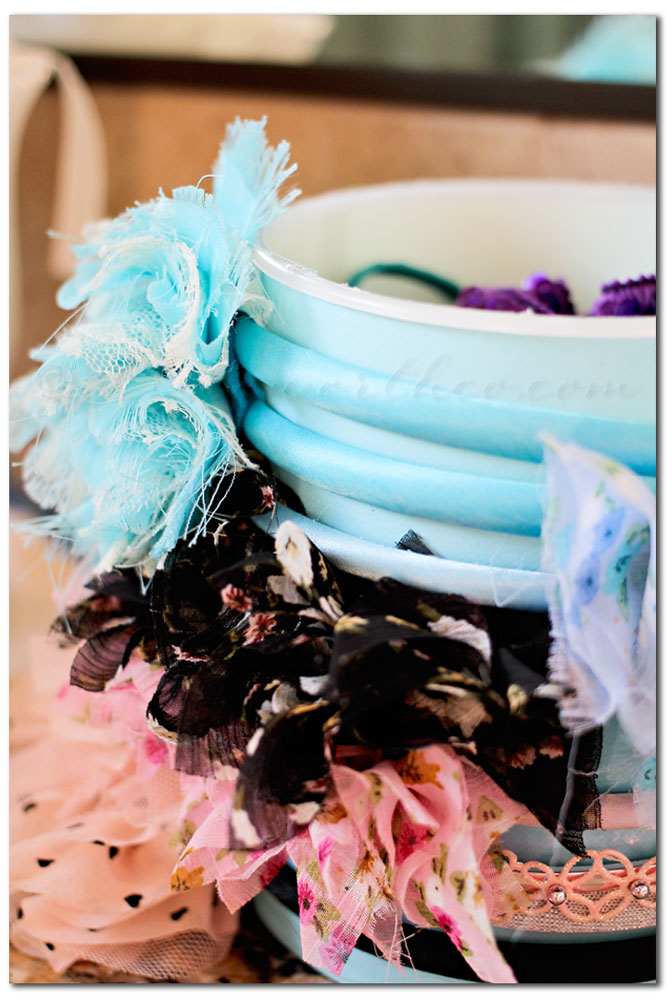
On thing we HAD TO get a handle on was the girls hair accessories. Nearly ever gift giving event that happens they receive more hair accessories. I love it- I think it’s great. But keeping the bathroom organized was becoming a bit difficult with the over-abundance of items in there. Sooooo- we made an organizer. It was literally 5 minutes & we were done. I wish I could take credit for it- but it was actually mini-me’s idea. Yay!! I have created another re-purposer in the house. Everyone is pretty good about looking at something & seeing if it can be re-purposed for something else before tossing it. We save just about every yogurt, margarine & whip topping container because they work well for when I make homemade frozen yogurt or when we shop in the bulk section at Win-Co & need containers for all our food when we get it home. So this container was actually re-purposed from the shortening. She looked at it once I washed it & asked if we could make it cute for their hair stuff. SURE!! What a great idea!
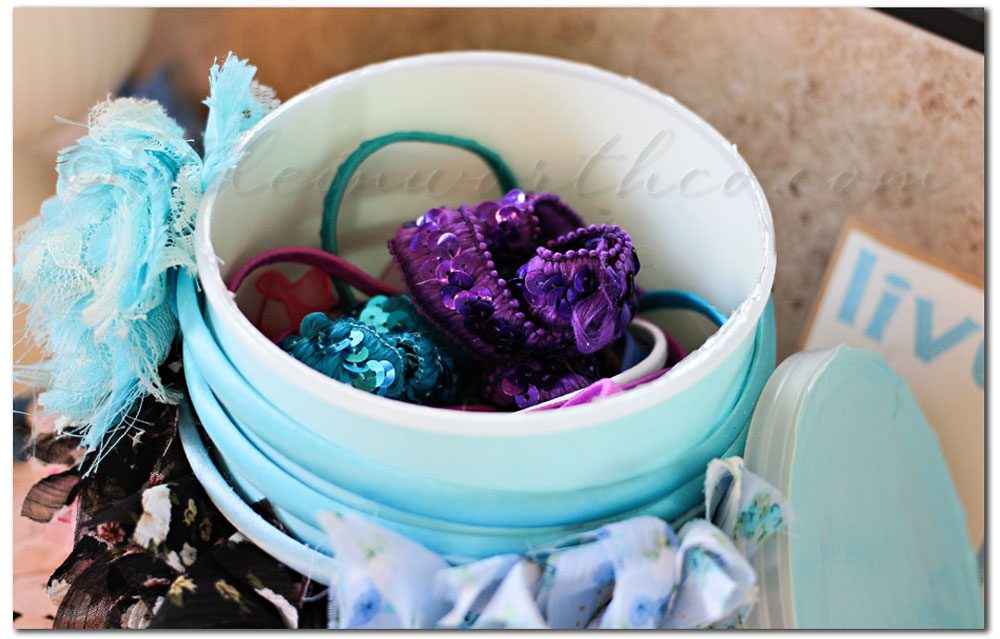
It holds all of their rubber bands, clips & soft head bands inside- & has a lid so the cat can’t steal them for toys.
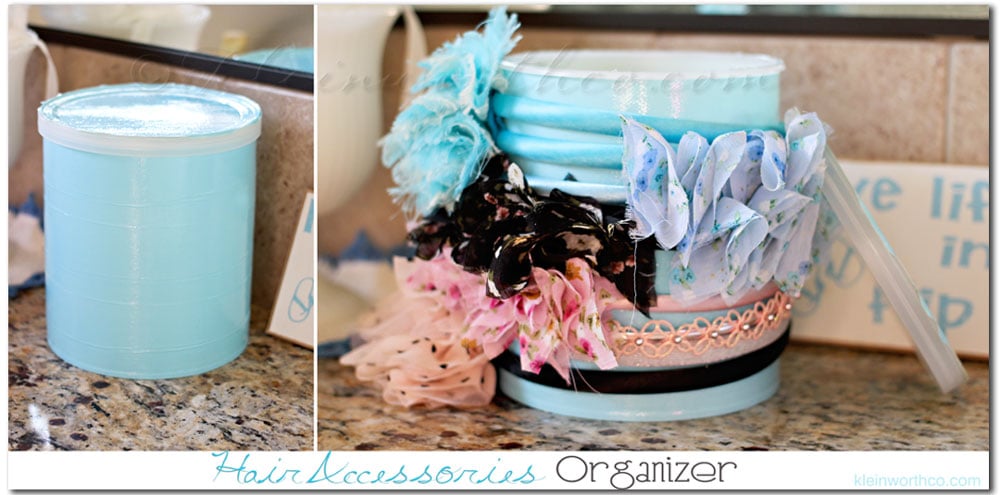
Beyond simple- I just found this ocean blue decorative duct tape at the store in the hardware section for $1.
A few wraps around & some strips across the top of the lid. Done!!
They can wrap their headbands around the outside & the color of the tape matches the bathroom decor colors- nothing obnoxious. 🙂
I can’t tell you how happy it makes me to have a little less mental clutter by having things tidy in there.
Don’t forget to come back & join me on Mondays for Project 52
To see where I am linking today- visit HERE
[jetpack_subscription_form]
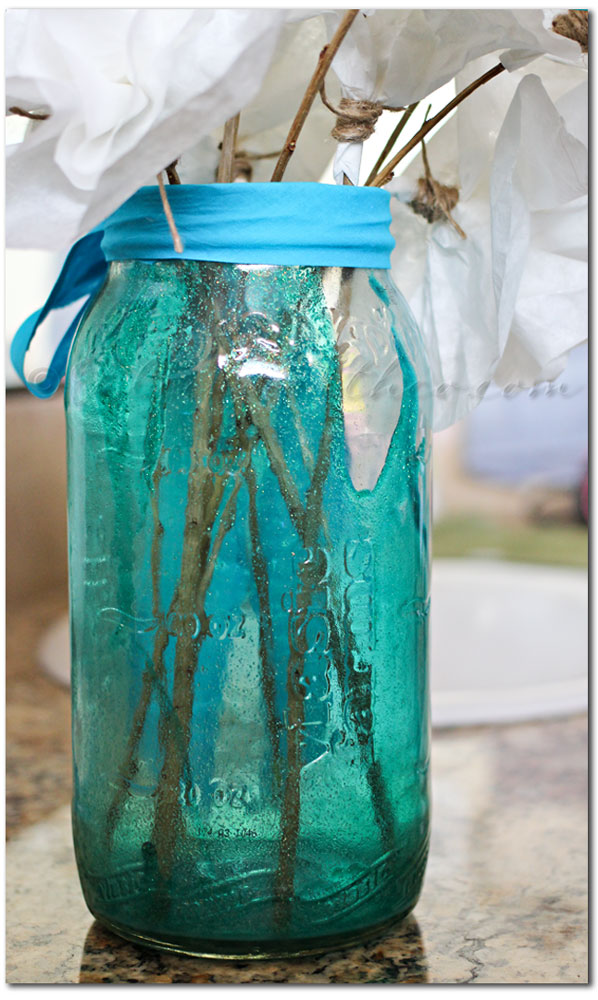
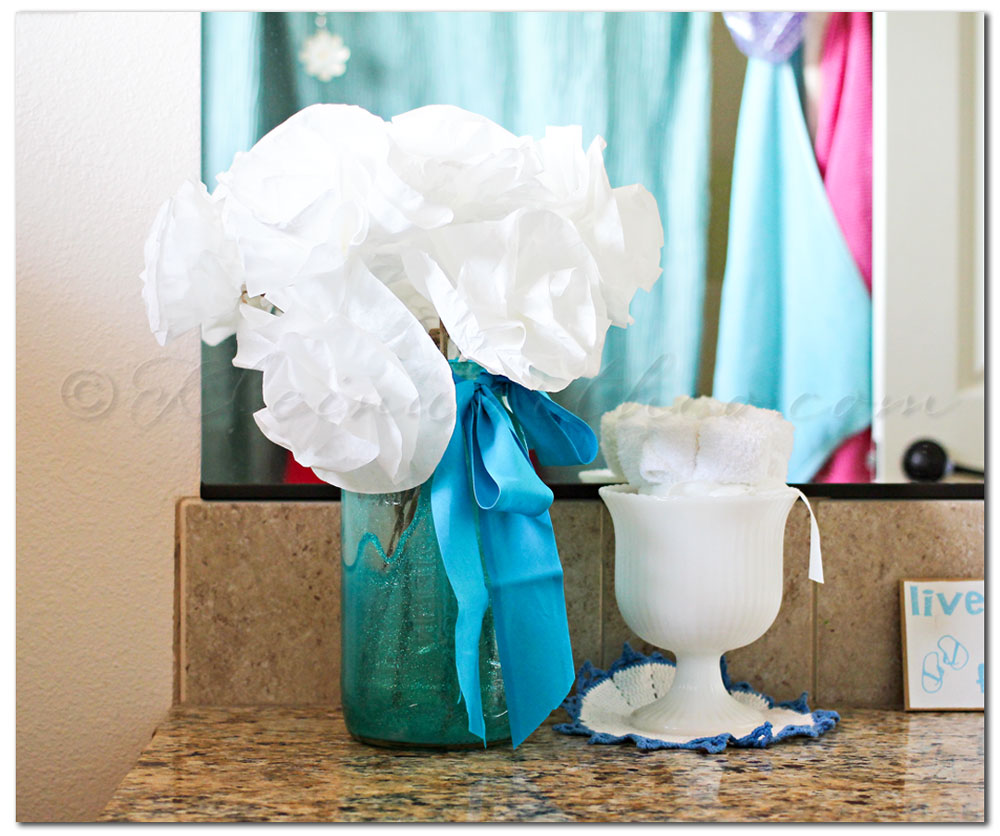
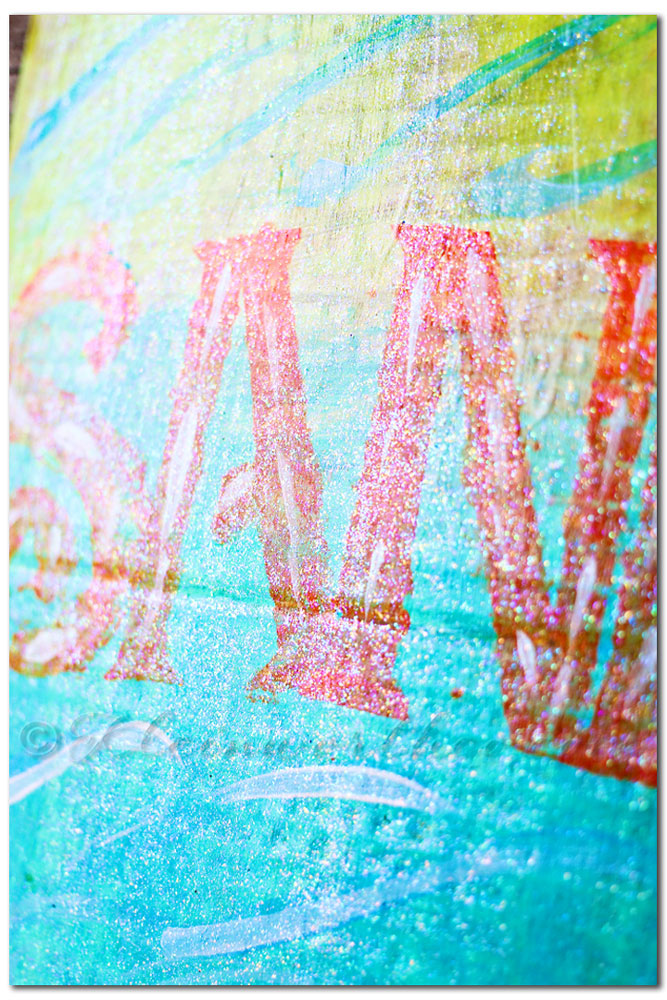
Ocean Waves Glitter Vase
A while back we did a big stock up trip to Win-Co. I love that store!!! I can buy just about anything I want in bulk & it’s SUPER affordable – all I have to do is bag it all myself. I will totally do that to save what I do by shopping there. So anyhow….while we were there the hubs picked up this MASSIVE jar of pickles. I really wasn’t thrilled about it until I realized that this jar was ginormous. I knew exactly what I would do with it when it was empty. I made this Ocean Waves Glitter Vase for the kid’s bathroom. I have been wanting to spruce things up in there just a bit more & this was exactly what I wanted.
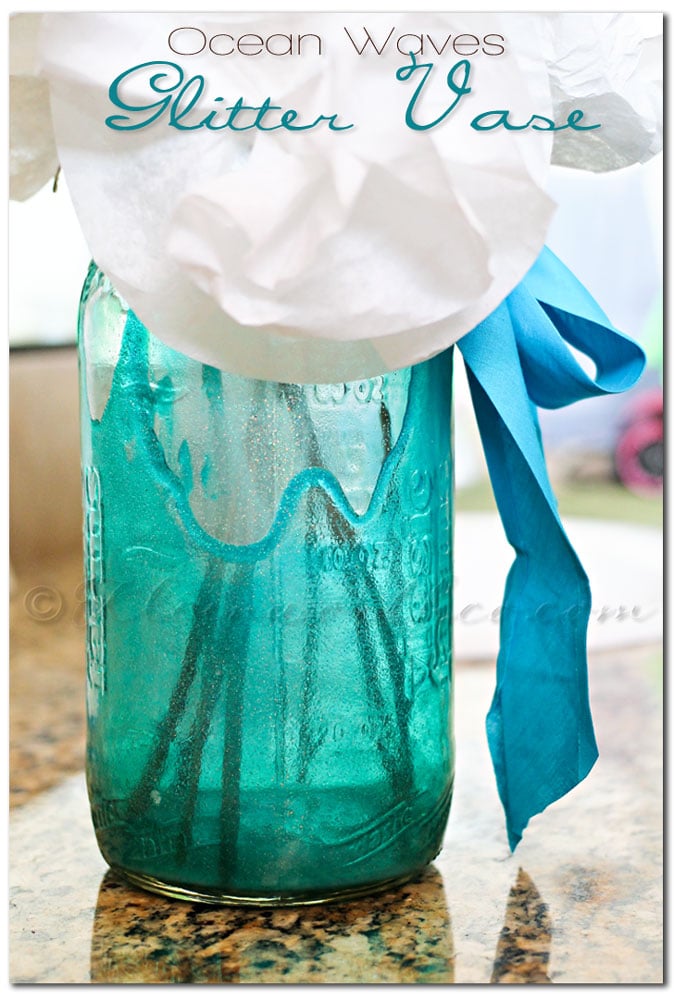 This was 3 tbsp Mod Podge Extreme Glitter & a couple drops of green & blue gloss paint.
I purposely didn’t mix it all together. I wanted a swirly look to it.
I poured it into the jar & swirled it around to coat the bottom & turned it upside-down to drip.
The next day it was a very light blue. I wanted a bit more.
So I did the whole thing again- only instead of paint I used food coloring.
It was a very bright & vivid color. Swirled it around again & turned upside-down to drip.
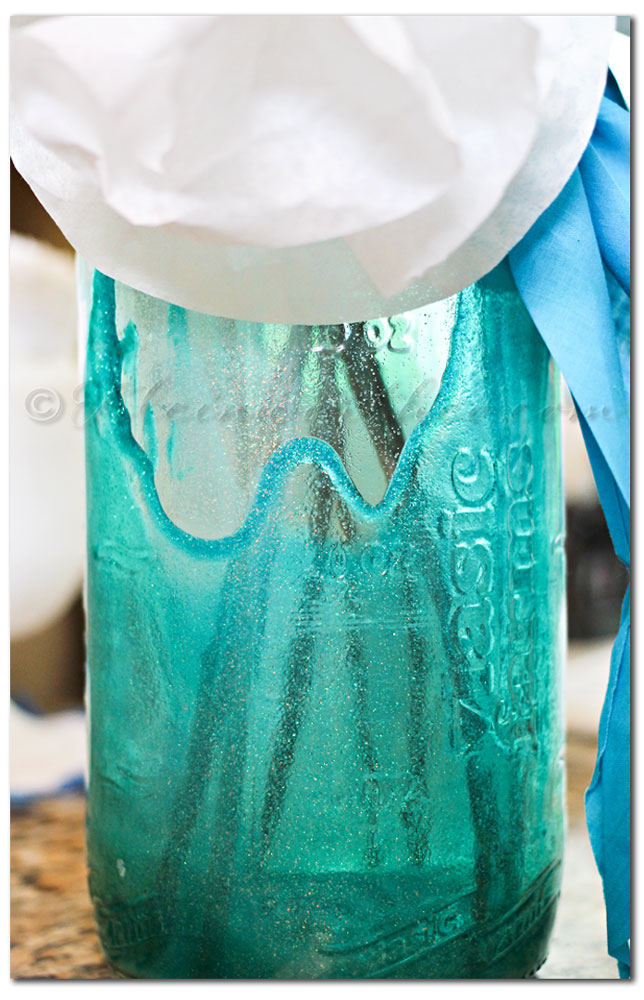
As you can see it the darker coat didn’t drip all the way down on one part. That’s okay with me- it adds to the ocean feel I have going on in that room. I then baked it for 40 minutes at 250 degrees. Then I allowed it to cool & it was ready to use. That simple. The hardest part was waiting for it to drip. I have issues with wanting it NOW. But I just LOVE the Mod Podge Extreme Glitter. I told you on the last project that I was in love & you would be seeing me use it again & again. I’m already half way through my bottle. I will be sharing later this week how we made the flowers- so stay tuned.
Don’t miss my Mocha Java Chip Ice Cream post today over at Reasons to Skip the Housework

Don’t forget to come back & join me on Mondays for Project 52
To see where I am linking today- visit HERE
[jetpack_subscription_form]
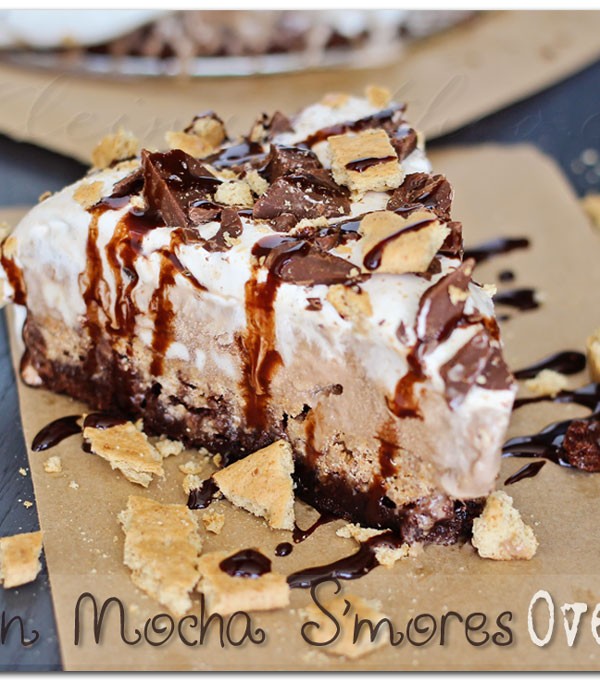
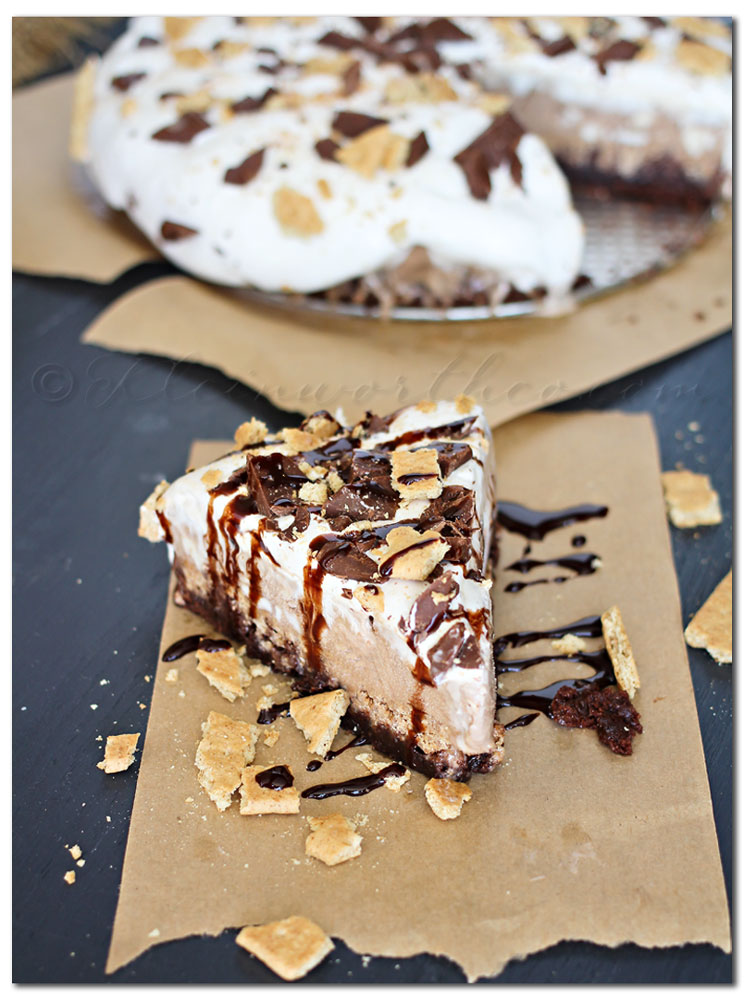
Frozen Mocha S’Mores Overload
Happy National S’Mores Day!!!
I have been meaning to make s’mores literally ALL SUMMER LONG!! I kept putting it off until I was asking Jessica what she thought about for the theme for our August Recipe Round-Up. She mentioned that today would be National S’Mores Day so I figured that was the perfect excuse I needed to make something s’mores related. Most of the time I try to not go completely over the top with my recipes. I don’t like to add too much usually. But this one was just calling me to do go overboard. So I created…
Frozen Mocha S’Mores Overload
It’s certainly overload & Ah-Maz-Ing. One of those things that you want to be sure to have a lot of people around to help you eat it because you don’t want this sitting in your house with only you to eat it. Yep- 100% sinful. But OH SO worth it!
 I will be sharing my recipe for this mocha ice cream soon- stay tuned.
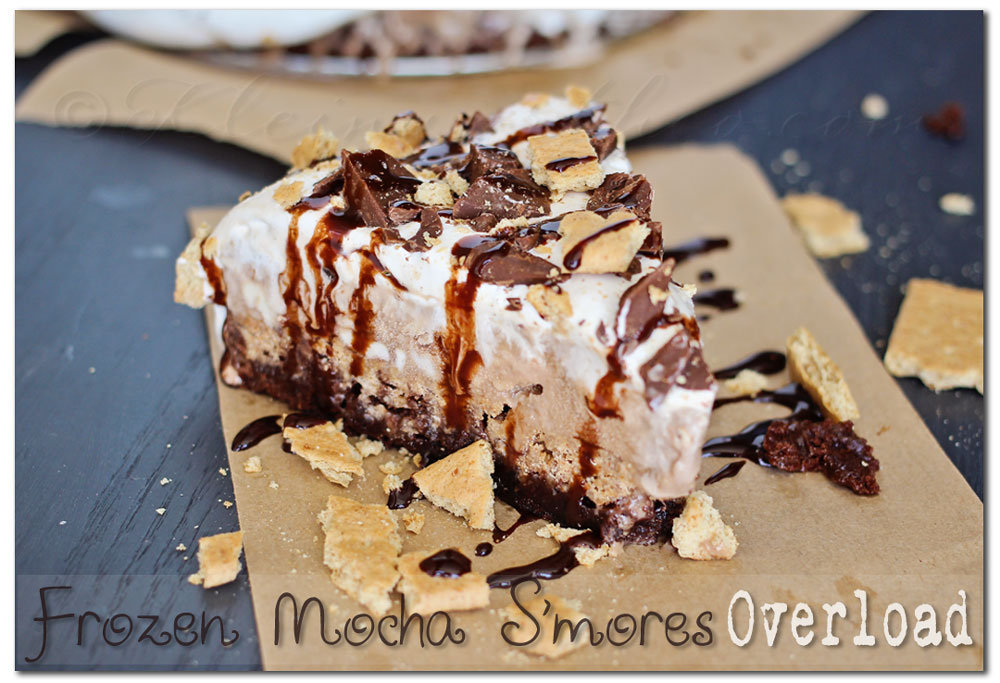
Frozen Mocha S’Mores Overload
Ingredients
- 1 brownie mix- prepared to pkg instructions
- 2 qts mocha ice cream
- 1 sleeve graham crackers + more for sprinkles
- 1 stick butter
- 2 jars marshmallow creme
- 2 oz block chocolate - roughly chopped
Instructions
- Prepare brownie mix & pour into greased 10" spring form pan.
- Melt butter in glass dish & add crumbled graham cracker- mix until butter is absorbed & moist.
- Add to top of brownie batter & spread out.
- Bake brownies to pkg instructions- remove & cool completely.
- Once brownies are cooled- scoop mocha ice cream on top- smooth out & press to combine scoops.
- Top with marshmallow creme- spread to cover.
- Sprinkle with roughly cut chocolate pieces & additional graham cracker pieces
- Freeze overnight to firm up.
- When serving- cut with a hot blade knife.
- Drizzle chocolate syrup over top before serving each piece.
This really is something you have to try at least once in your life- I promise you that.
I’m sharing this as part of our August Recipe Round-Up. Want more S’Mores Recipes???
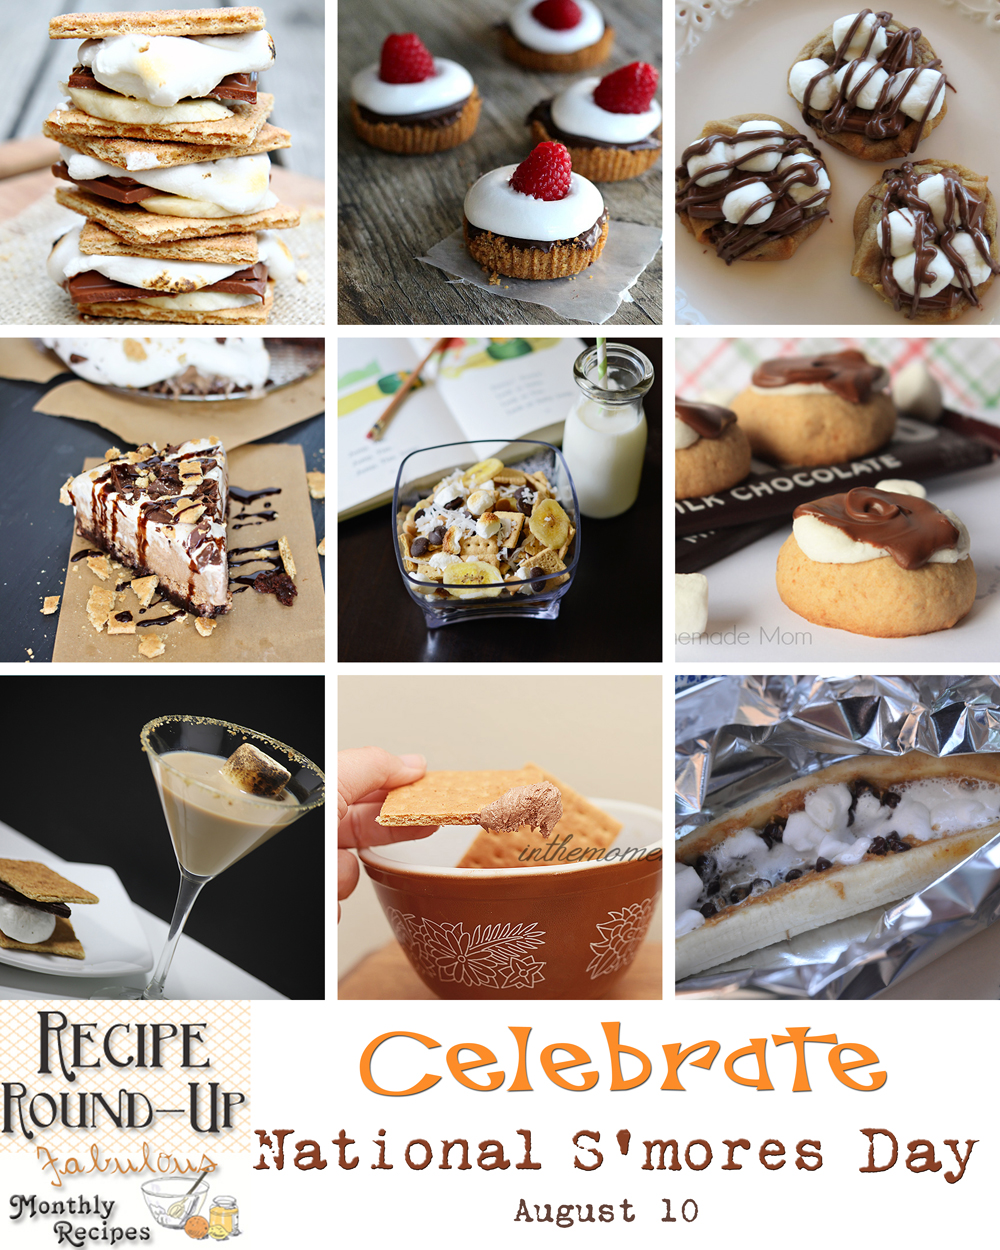

Chocolate Bananas Foster S’Mores from Let’s Dish
S’Mores Chocolate Chip Cookies from The Taylor House
S’Mores Martini from One Martini at a Time
Frozen Mocha S’Mores Overload from Kleinworth & Co.
Peanut Butter S’Mores Spread from In the Moment With
Peanut Butter & Banana Boat S’Mores from Random-osity
Mini S’Mores Cups topped with Raspberries from Joyful Healthy Eats
S’Mores Monkey Mix from Little by Little
S’Mores Cookies from Mostly-Homemade Mom
Do you want to participate in future Recipe Round-Up’s & join in on the fun??
email Gina at Kleinworth & Co (chichomeschoolmama{at}att{dot}net) for details.
Don’t forget to come back & join me on Mondays for Project 52
To see where I am linking today- visit HERE
[jetpack_subscription_form]
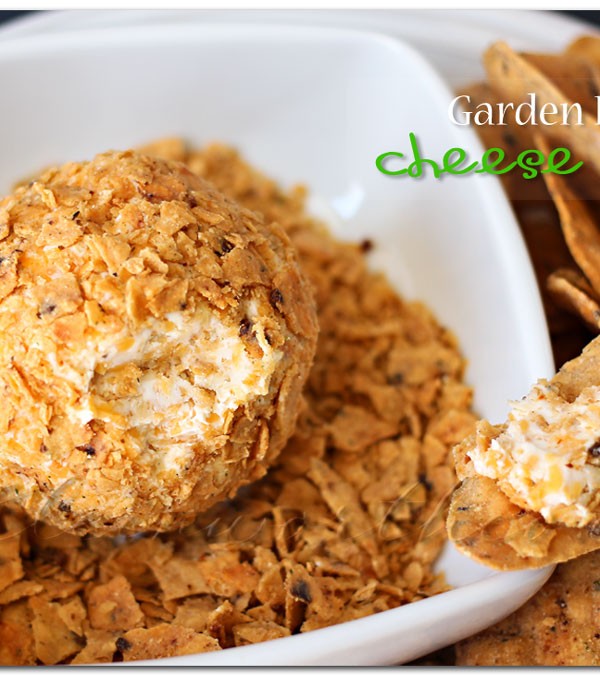
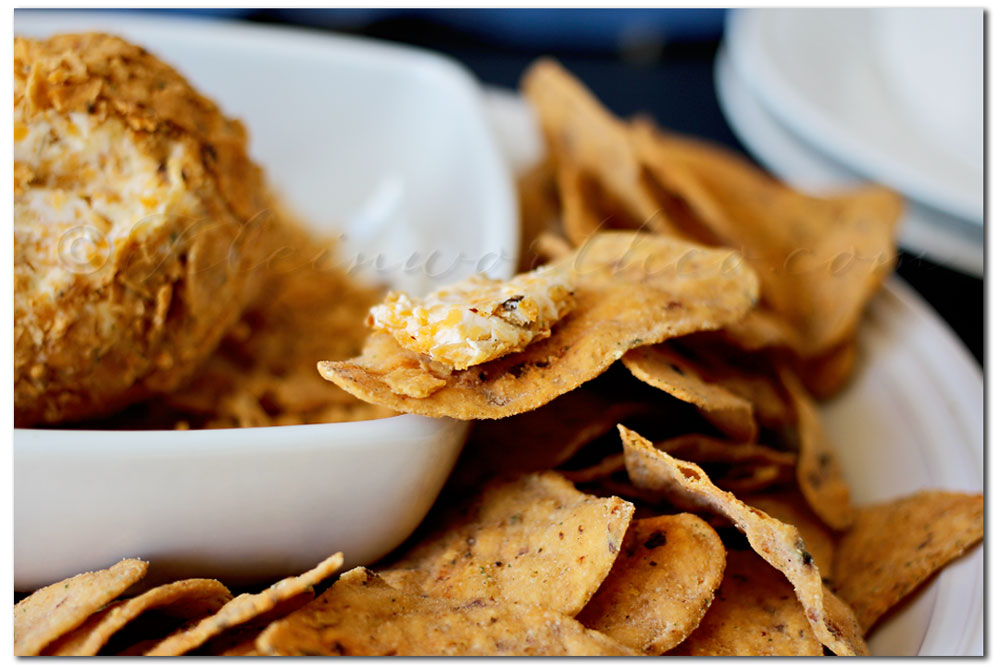
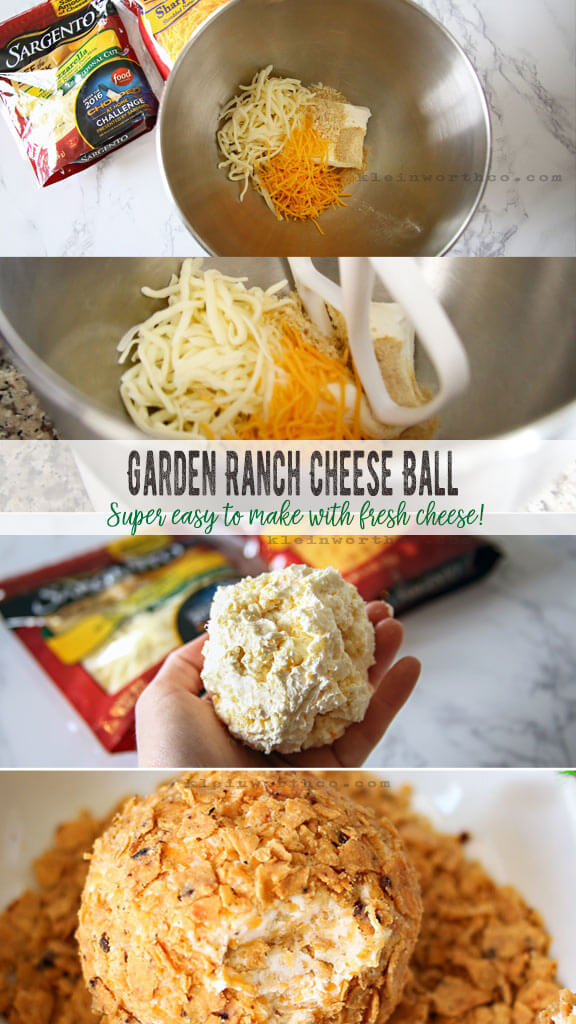
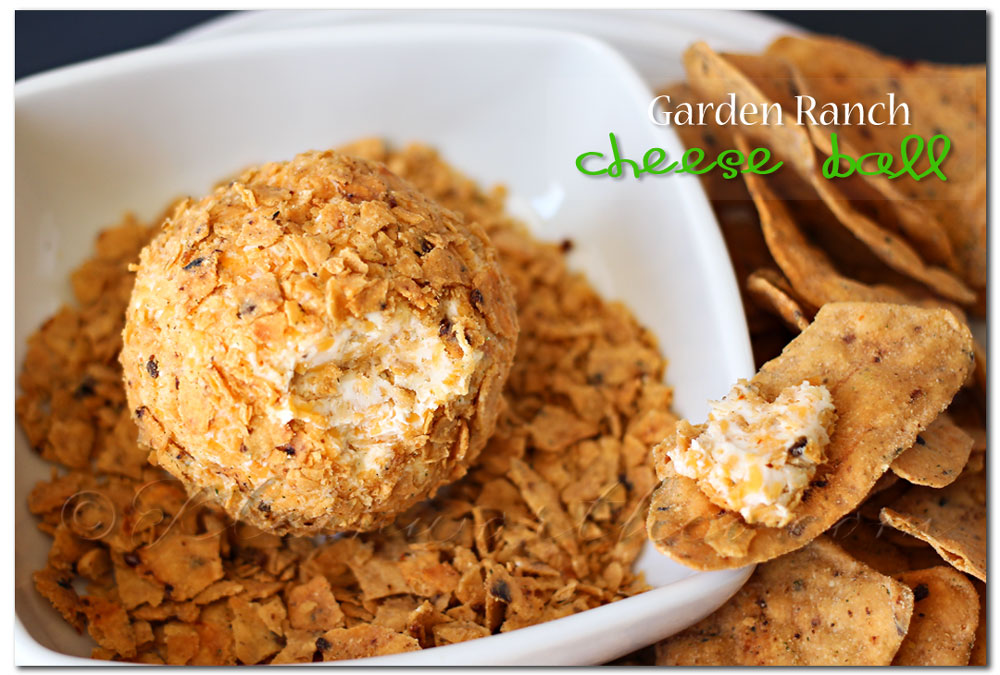
Garden Ranch Cheese Ball
Garden Ranch Cheese Ball is an easy cream cheese ball loaded with fresh cheese, seasonings & packed with chips. Great for parties- mmm!
Garden Ranch Cheese Ball
I really enjoyed taking a little bit of the cheese ball & adding it to another Garden Ranch chip. Oh so tasty.
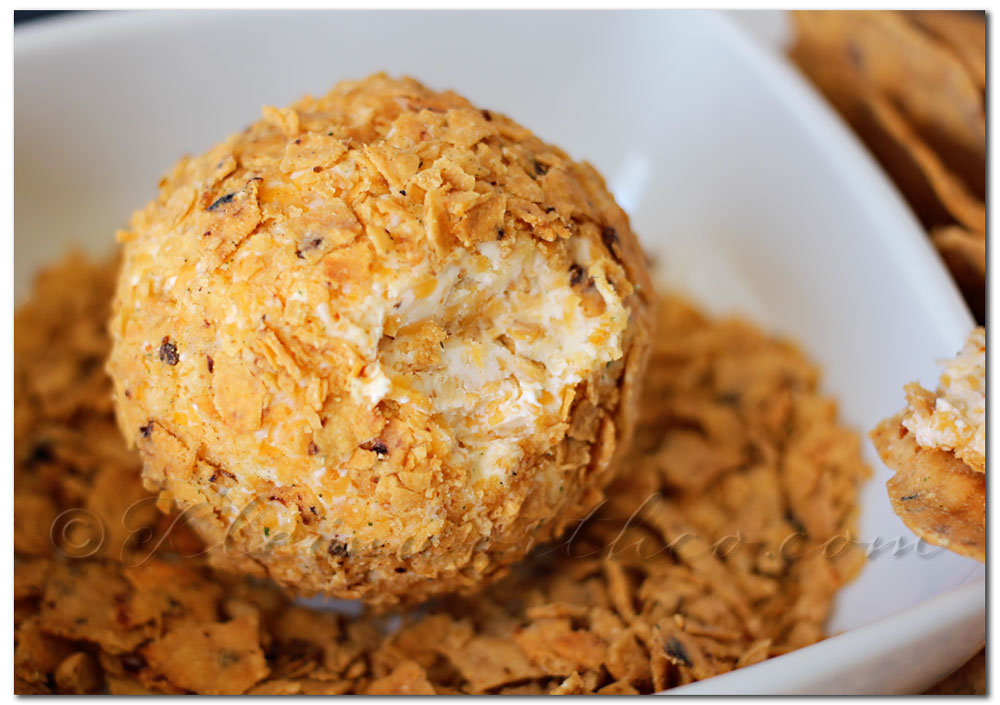
You can just see all the seasonings & flavors in there. Plus this was SO SIMPLE. I can’t figure out why this was my first one. It won’t be my last.
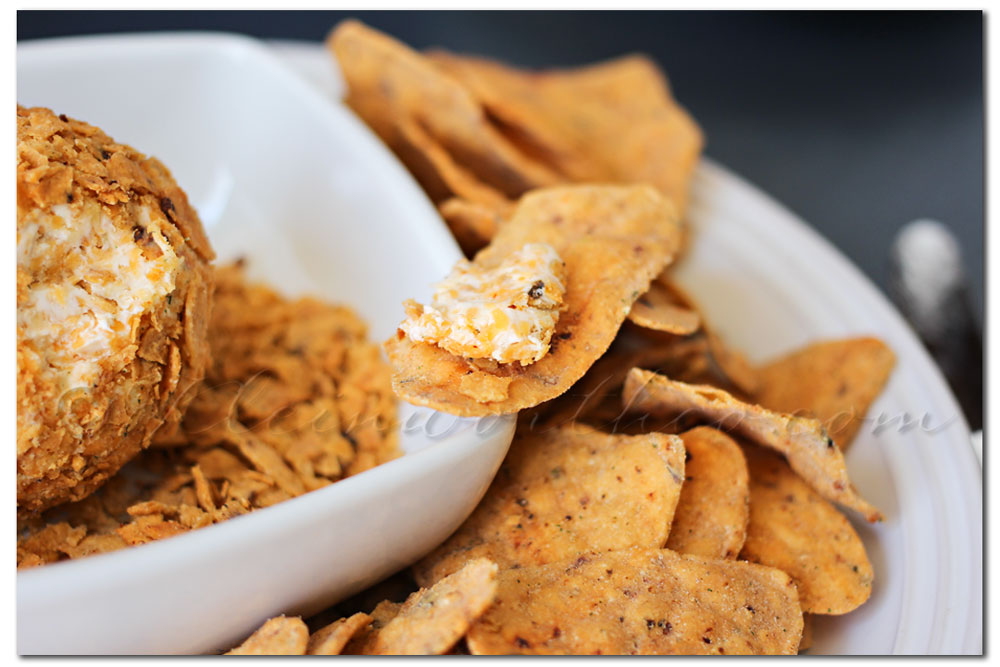
We will be making this for every football party this year for sure.

Garden Ranch Cheese Ball
Ingredients
- 4 oz cream cheese
- 1/4 cup shredded sharp cheddar cheese
- 1/4 cup shredded mozarella cheese
- 1/2 tbsp garlic powder
- sprinkle of salt
- 1 tsp dried minced onions
- 1 tsp tequila lime seasoning
- 1/4 cup crunched ranch tortilla or potato chips
- 1/2 cup crunched ranch tortilla or potato chips for coating
Instructions
- Add all ingredients except last 1/2 cup of crunched chips to mixer bowl & combine with whip attachment until all ingredients are well combined.
- Scrape together with spatula & then pull it all into your hands & shape in to a ball.
- Drop in bowl of remaining crunched up chips & roll around. Grab chips into your hand & press into ball to give it a good even coating.
- Chill in refrigerator at least 2 hours before serving.
You really have to give this a try. We are big on the snack “football” foods in this house. My late mother-in-law was the queen of party food. I have to carry on that fun for the hubs & this is just one recipe to help do that. I think she would love it & would be so proud of me for creating something so good yet easy to make.
If you love this – you don’t want to miss our latest book!
If you make this recipe- please leave a link or tag me on Instagram @KleinworthCo
Use this to make these biscuits – Italian Garlic Butter

Don’t miss these great ideas from these bloggers….
Cooking Classy – Lasagna Roll Ups
Diethood – Chicken-Broccoli Shells and Cheese
To see where I am linking today- visit HERE

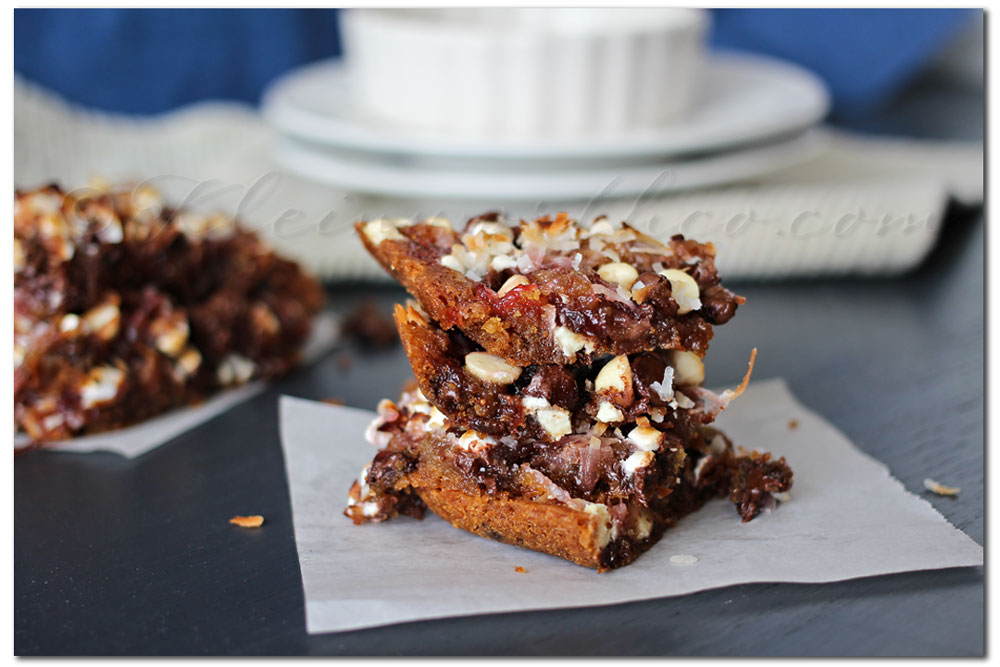
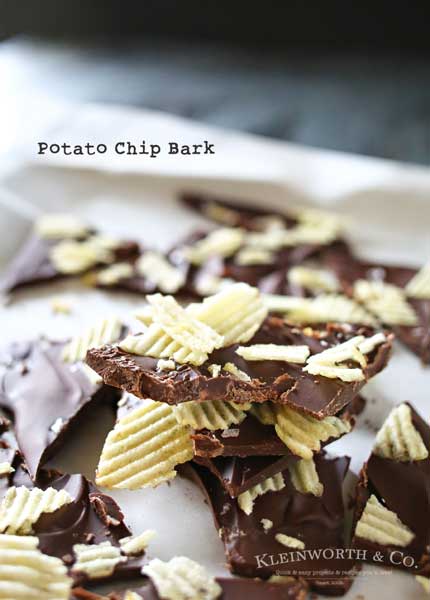
Gluten Free Chocolate Strawberry Gooey Bars
*This post is sponsored by Pillsbury & Linqia. All thoughts & opinions are my own.
I love Yummy Bar Recipes! I don’t know about you but it seems like everyone I talk to has an issue with gluten. It’s more & more prevalent & there are more & more products on the market that are gluten free. I know that while I don’t always cook gluten free- when I do, we all feel better around here. So I have been doing my best to be more conscious about what our foods have in them – which is part of why I have been so focused on making the kids breakfast for so long now.
But lately I have been really wanting to make more desserts that are gluten free in hopes that the hubs will want to eat more of what I make instead of having to pass on all the goodies. So this time I made Gluten Free Chocolate Strawberry Gooey Bars. Oh they turned out so tasty & you would never know they are gluten free. Just goes to show you that gluten free doesn’t mean flavor free or no dessert.
Did you know that Pillsbury now has it’s first-ever gluten free cookie dough, pizza dough & pastry/pie dough?? I was pretty stoked to find that out & even more thrilled to try it out. I know that many moms don’t have time to make cookies & other treas from scratch & often buy the ready made doughs & crusts. Before now that meant that those with a gluten intolerance couldn’t eat them. Now they can. So many people now are looking for gluten free solutions for their families & Pillsbury has made eating gluten free easy convenient & delicious. These are all found in the refrigerated aisle of your store. These are so quick & easy to use – virtually no prep time at all.
So to celebrate these new gluten free products from Pillsbury I’m giving away a premium baking set.
Click on this image for more Pillsbury Info
Today I wanted to share my gluten free recipe using this Pillsbury Cookie Dough

Click on Image for more info on this cookie dough.
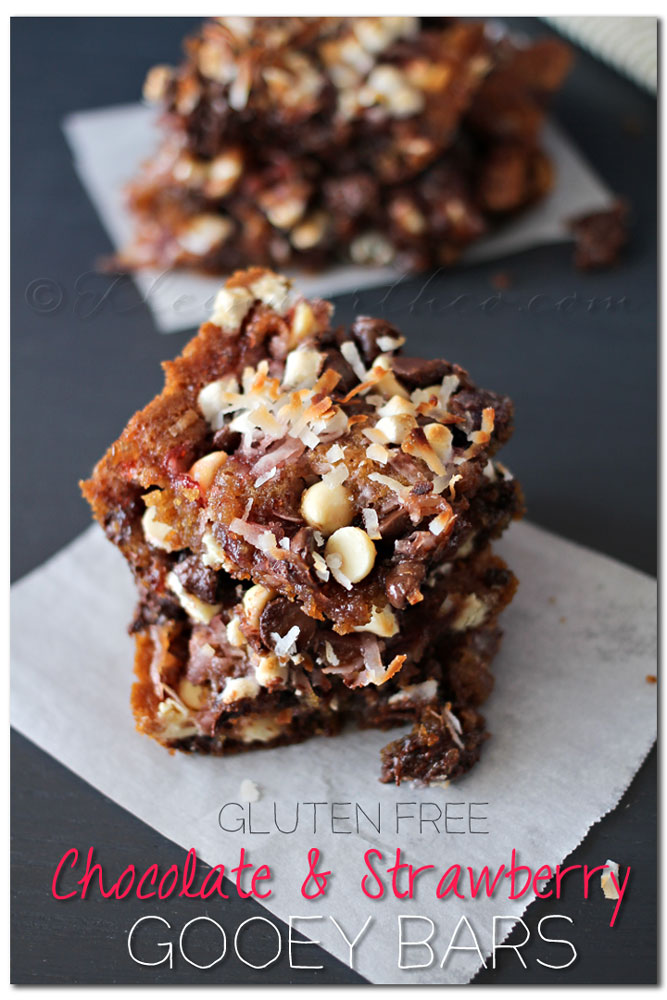
Gluten Free Chocolate Strawberry Gooey Bars
Ingredients
- 1- 14.3 oz container of Gluten Free Pillsbury Cookie Dough
- 1 cup strawberry preserves (I used the strawberry version of my raspberry marmalade
- 1/2 cup coconut
- 1/4 cup white chocolate chips
- 1/2 cup semi-sweet chocolate chips
- 1/4 cup mini marshmallows
Instructions
- Preheat oven to 350.
- Spray glass 9x13 pan with cooking spray
- Add cookie dough to pan & press around to flatten & cover bottom
- Add preserves & spread out in thin even layer
- add coconut, then chocolate chips (both), then marshmallows
- Bake 25-30 minutes until brown on bottom.
- If it's not quite toasted enough on top- broil for a couple minutes.
- Store in air tight container for 2 days in refrigerator.
The homemade preserves are gluten free, coconut, chocolate chips & marshmallows are all naturally gluten free as well. Yippee!!
Excited to start baking, but need a few recipes to get going??
Check out the Pillsbury Gluten Free Dough site for delicious & easy recipes to make with all three varieties of gluten free dough.
Over the next couple weeks I will be sharing more gluten free recipes using the new Pillsbury doughs.
TO ENTER: Visit Pillsbury for gluten free recipe inspiration.
Then come back & leave a comment below or on one of my upcoming Pillsbury posts to be entered to win.
Just answer the question: What exciting possibilities will Pillsbury Gluten Free Dough bring to your life?
We want to hear your stories & recipe ideas!!
Plus you will have 2 more chances to enter to win that AWESOME premium baking set.
Good Luck!
Be sure to check out my guest post today over at Baby Bump Bundle Blog.
Don’t forget to come back & join me on Mondays for Project 52
To see where I am linking today- visit HERE
[jetpack_subscription_form]
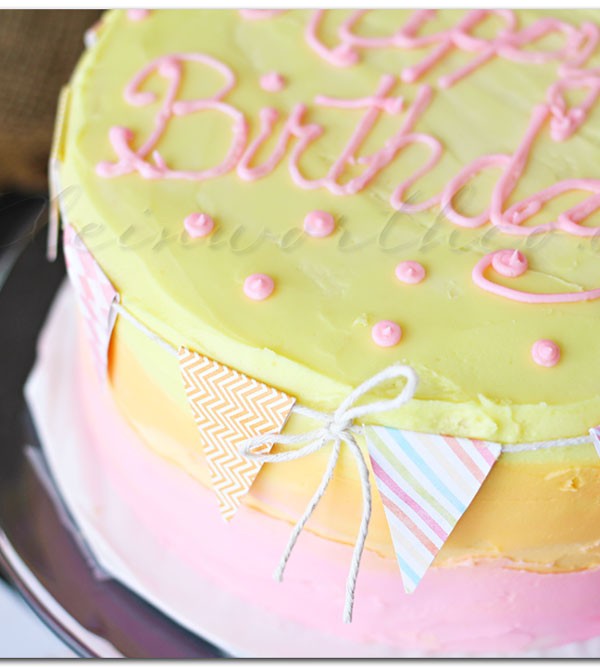
Buttercream Frosting Recipe
So I finally have pictures to show you of the munchkin’s birthday cake. I kept it low key because I really didn’t have an excuse to go over the top like we did last year. I mean I had all sorts of help when we did the pink ombre cake. Plus I had company to help eat it. This year no company for the party- so I kept this to a simple 2-layer 8″ round cake. A lot more manageable than what we have done in the past which was great because I really didn’t have the time, resources or desire to make this into a huge deal. Sometimes less is more and lately I have been going to that more & more.

Once I decided on the colors I knew what I would do for the cake. All the party decorations that I shared with you last week were all centered around the idea for the cake. I wanted it all to scream summer birthday party & I just love the tones in it all. Reminds me of rainbow sherbet. The blending of colors is so simple (a huge plus in my book) but still gives that girly feel- perfect for a girls birthday cake.

I used my FAVORITE Buttercream Frosting Recipe because it is just the perfect amount of sweet- without being over the top. I love it because it forms the perfect crust layer on the top while being ever so perfectly creamy on the inside. I love that it’s made with butter- no shortening. I used to make a meringue frosting that used margarine & shortening- both left a greasy film not only on my utensils & decorating supplies that was hard to get off- but also in my mouth. While the flavor was great- the fact that their was margarine & shortening in it always bothered me. So I LOVE this recipe for it’s lack of those two ingredients.


Buttercream Frosting Recipe
Ingredients
- 2 sticks salted butter - softened the salted helps cut the sweetness
- 8 cups 1- 2lb bag confectioners sugar (no sifting)
- 2 tsp vanilla extract if making pure white frosting- use the clear imitation vanilla to keep your frosting from turning off white
- 1/3 - 1/2 cup milk depending on how thick you want the frosting & how warm your room is
Instructions
- Cream softened butter in stand mixer with whip attachment until smooth.
- Blend in vanilla.
- Add 1/2 the confectioners sugar & most of the milk - stir slowly until moist- then whip until well combined.
- Add remaining confectioners sugar & milk.
- Beat on med-high about 3-4 minutes scraping sides of the bowl occasionally.
- Texture will become very smooth.
- Use immediately or store in airtight container for up to 2 weeks in refrigerator or 3 months in freezer.
I used one batch to fill, crumb coat, frost & decorate this 2-layer, 8″ round cake. I still have a little left in the fridge which would have been plenty for piping around the bottom or any other decorating if I had chosen to do so. This recipe is easily cut in half or doubled depending on your project.
This is so yummy. Seriously- it’s this frosting with my mom’s cake that makes me just swoon. I could have eaten this entire 8″ cake BY MYSELF. I don’t like to share cake. Don’t judge- I may have done it before- with a larger cake. (on my wedding day) Cake is my #1 weakness – especially this one.
Don’t miss my guest post tomorrow over at Baby Bump Bundle– I’m sharing my Cream Watermelon Lime Chiller.
Don’t forget to come back & join me on Mondays for Project 52
To see where I am linking today- visit HERE
[jetpack_subscription_form]
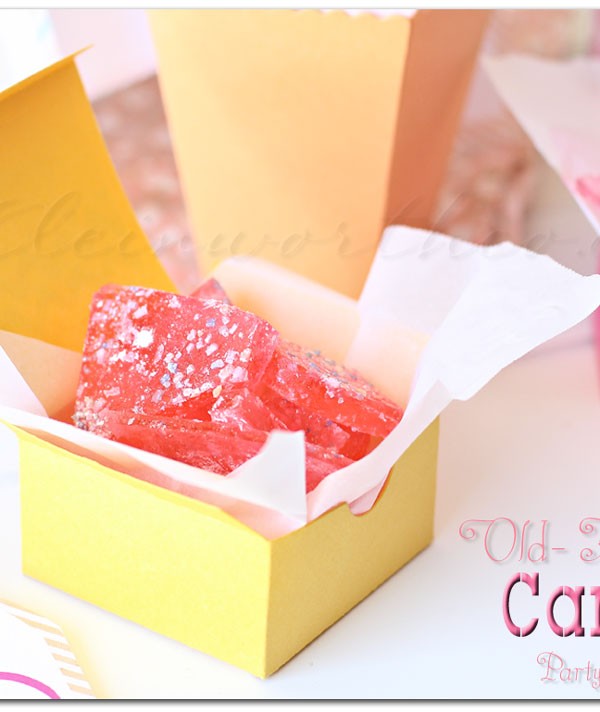
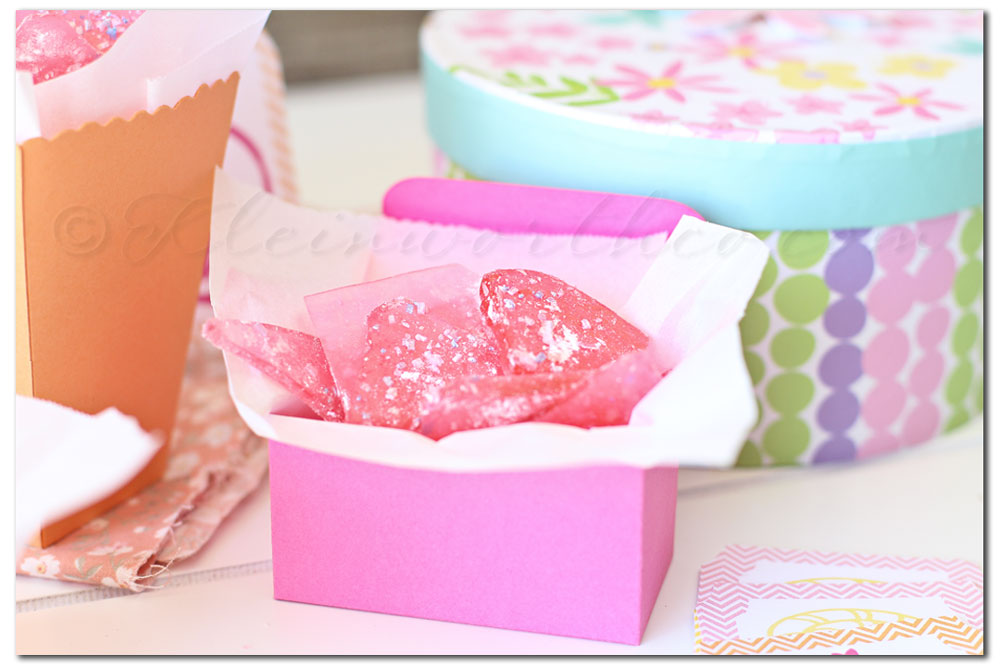
Easy Candy Recipe ~ Old Fashioned Party Favors
This Easy Candy Recipe is perfect for party favors.
 The kids are loving it & asking when I will make more.
Fortunately I can do that as often as I like because it took hardly any time at all.
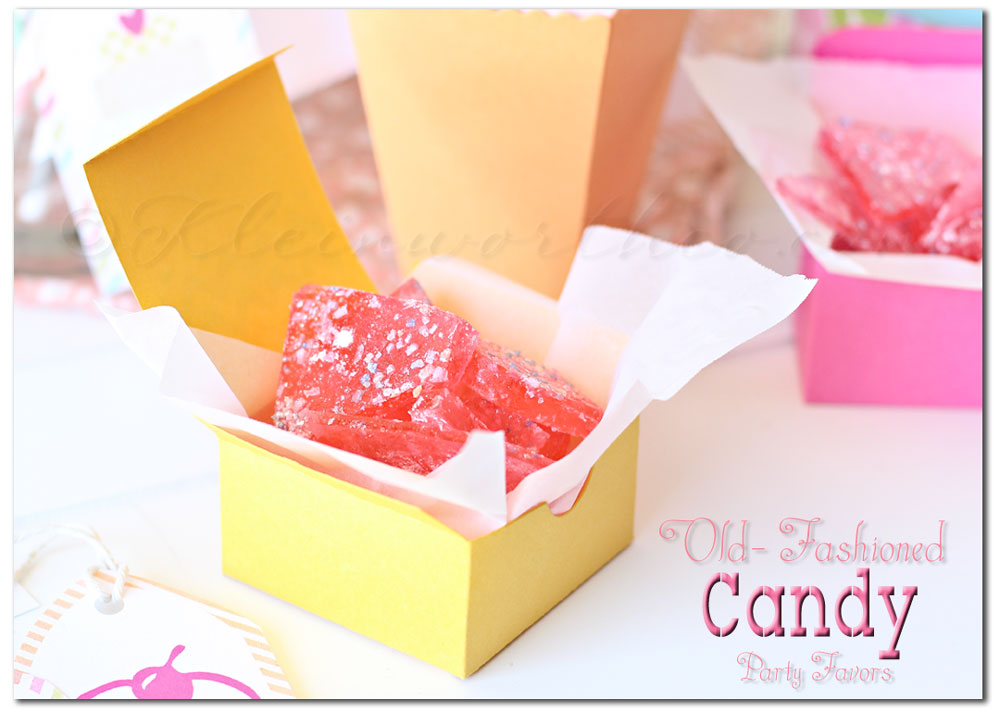

Easy Candy Recipe
Ingredients
- 2 cups granulated sugar
- 1/2 cup water
- 2/3 cup white corn syrup
- 3 drops food color of desired color
- 1 tsp candy flavoring of your choice
- 1/4 cup confectioners sugar
Instructions
- Coat baking sheet or jelly roll pan with cooking spray. Set aside.
- Combine water, granulated sugar & corn syrup in 2qt saucepan.
- Bring to a boil stirring constantly.
- Continue to boil until you reach 300 degrees- hard crack temp.
- Remove from heat & quickly add in your food coloring & candy flavor. Stir.
- Immediately pour into your prepared pan. Sprinkle with any decorations desired at this time.
- Cool in refrigerator 30-60 minutes to harden.
- Remove from refrigerator & press a fork into the candy to crack into pieces. (some of the thicker parts may need a little tap with a hammer)
- Transfer to a bowl & add confectioners sugar. Toss to coat (this keeps it from sticking to itself)
- Store in an airtight container.
You have to give this a try. I think I will be seeking out a whole variety of candy flavors now.
Have a great weekend everyone!
Don’t forget to come back & join me on Mondays for Project 52
To see where I am linking today- visit HERE
[jetpack_subscription_form]
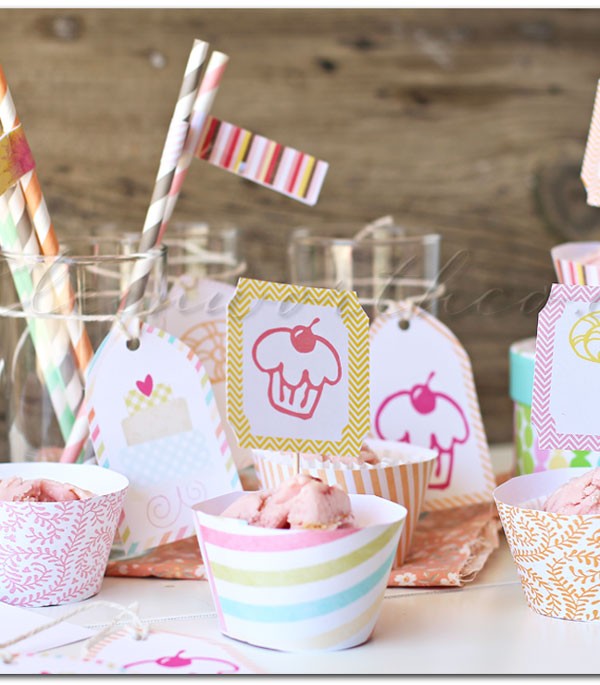
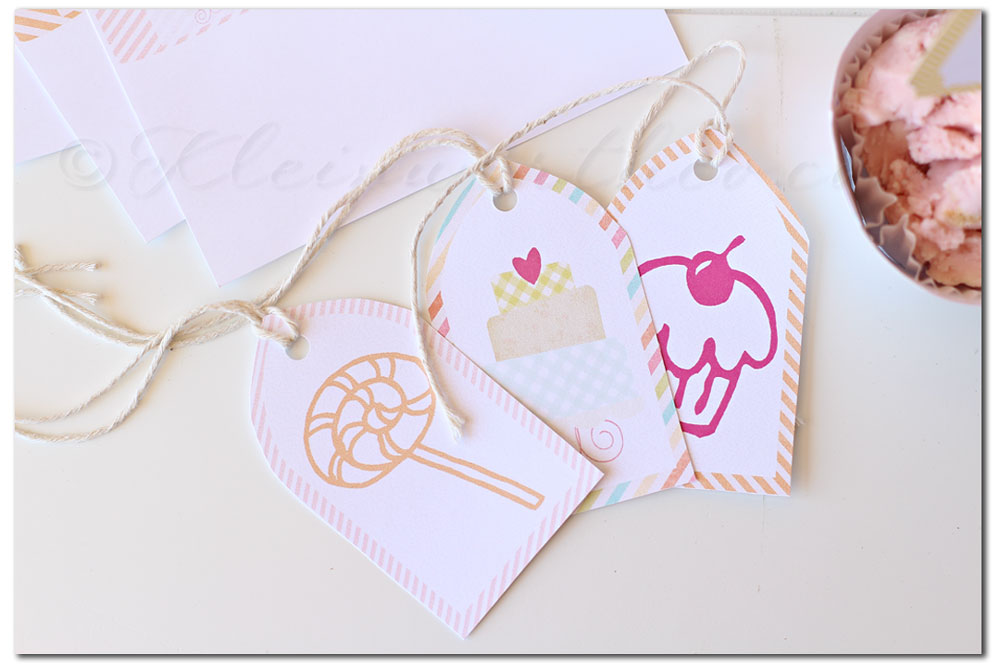
Sorbet Party Printables
Sorbet Party Printables
I just love printables in general & it’s just so much fun pushing that creativity to make some of my own from time to time. Yes there are times when I don’t have the time & I just want a quick download. Thank goodness there are lots of other really creative people out there that offer free printables when I need them. For those of you that want & need that quick download- today is your lucky day. I have them all here & ready for printing.
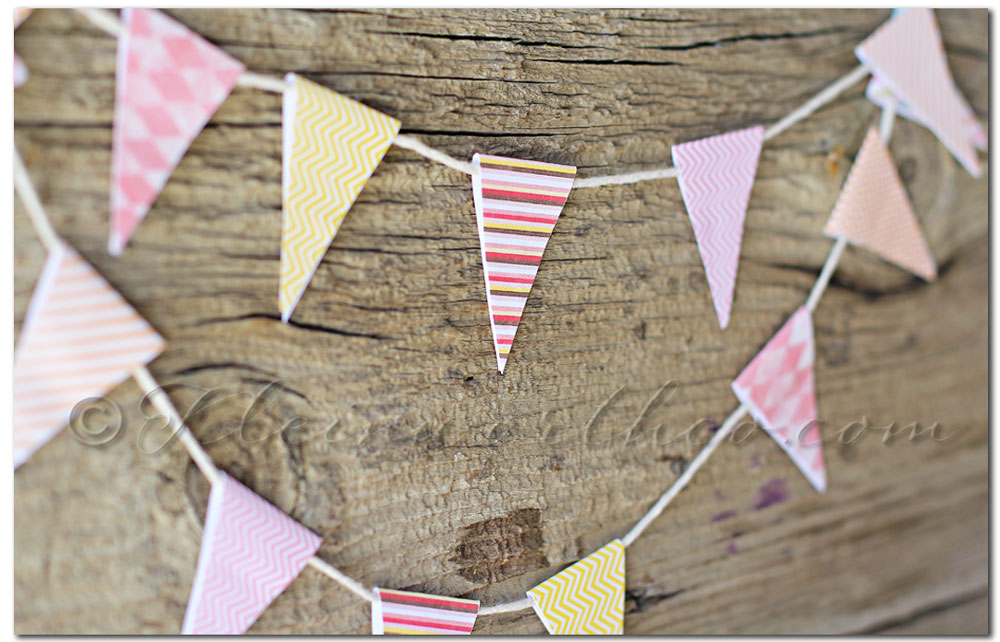 There is this banner- I think I will be using this on her cake.
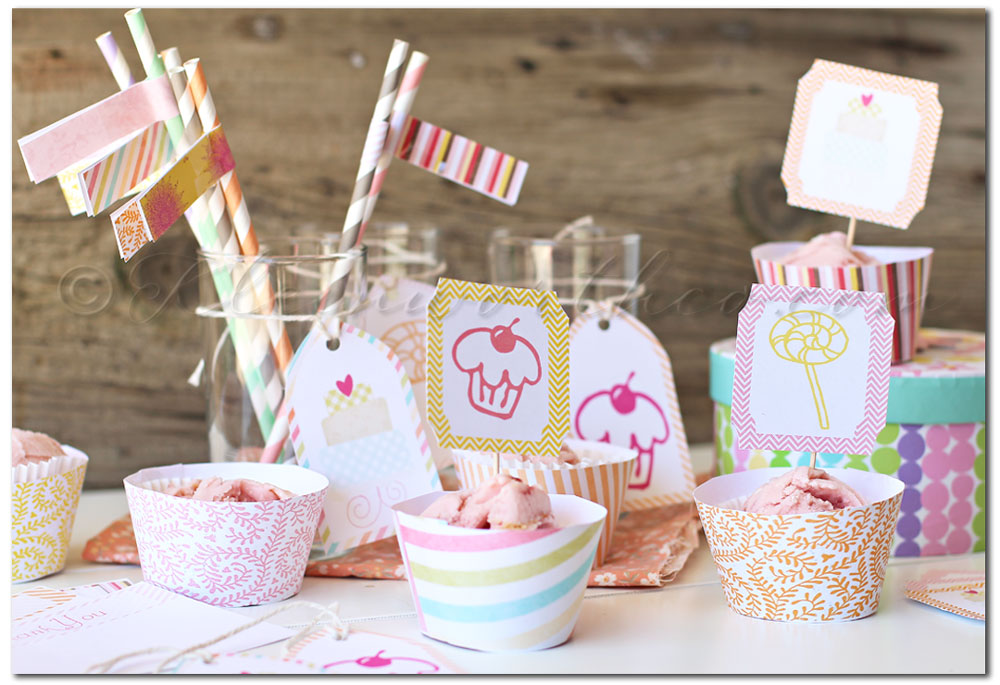
It was way too hot to do cupcakes-
so a scoop of the Double Berry Cheesecake Frozen Yogurt in a cupcake liner worked well in the cupcake wrappers & then decorated with the cupcake toppers.

I love straw flags- they really make it more fun.
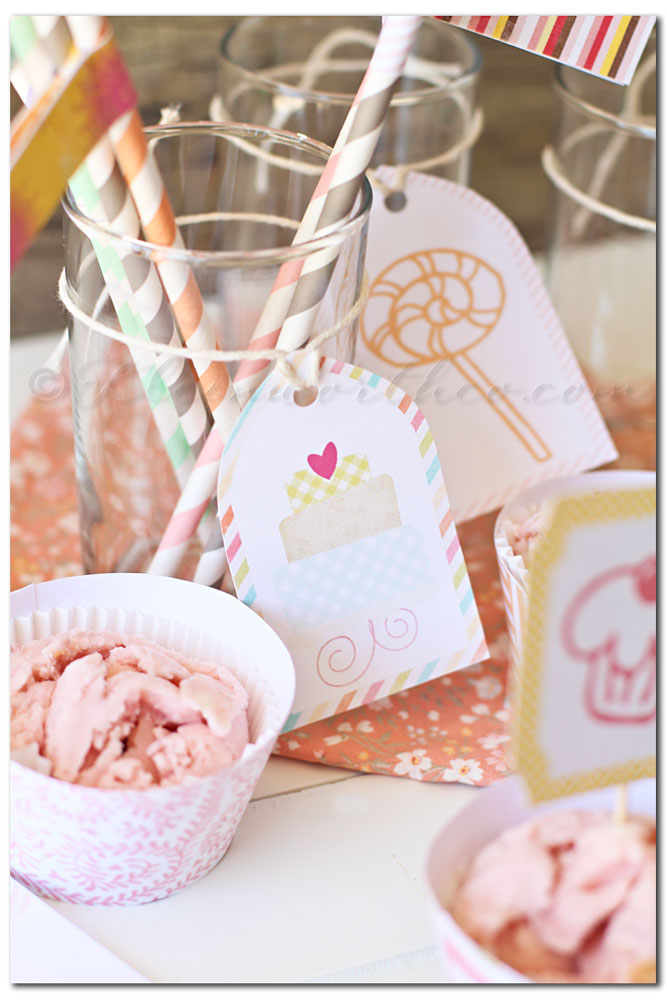
Tag decorations- you could put these on just about anything.
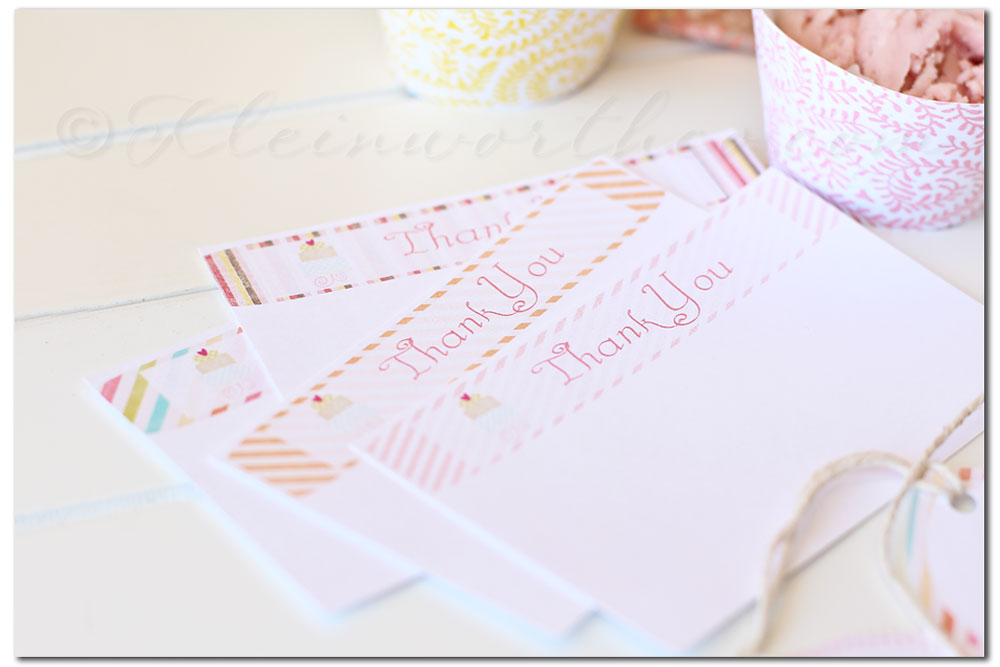
And then the Thank You cards. I actually did these in 2 sheets of different patterns. Thank You’s are so important.
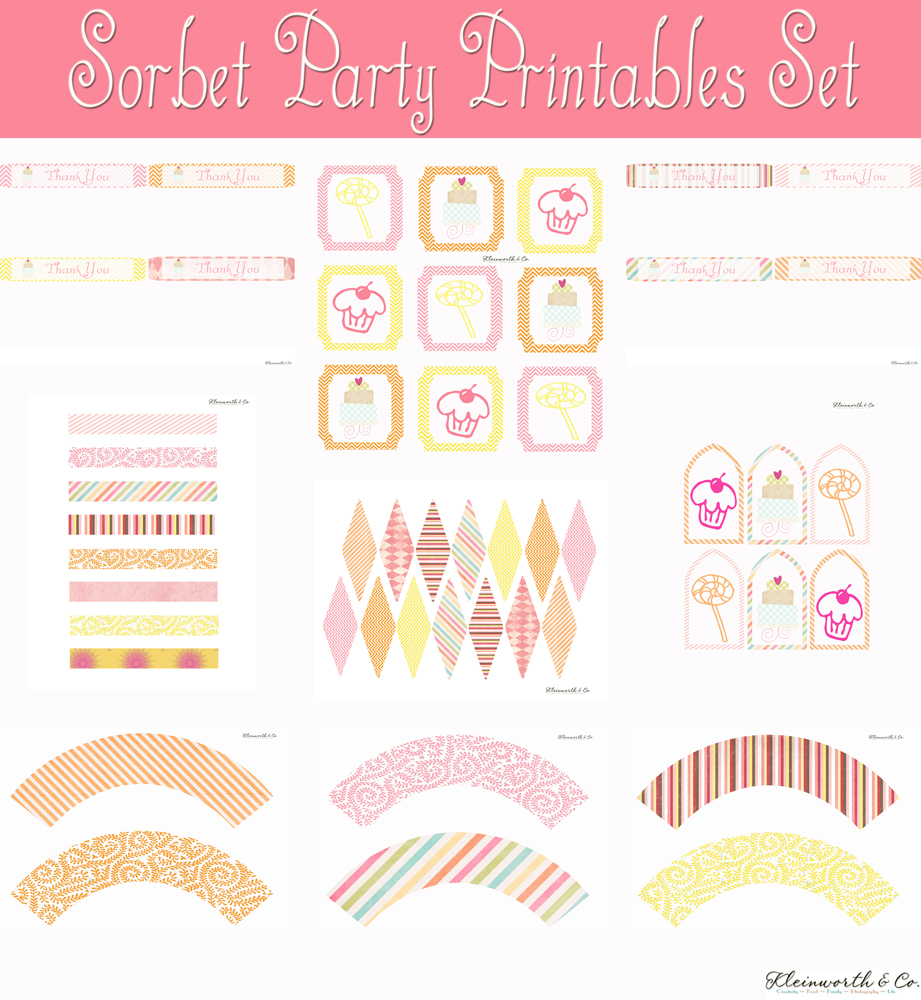
So here you can see all the printables available in this set. Download HERE.
Enjoy & make your next party happy!!
Don’t forget to come back & join me on Mondays for Project 52
To see where I am linking today- visit HERE
[jetpack_subscription_form]
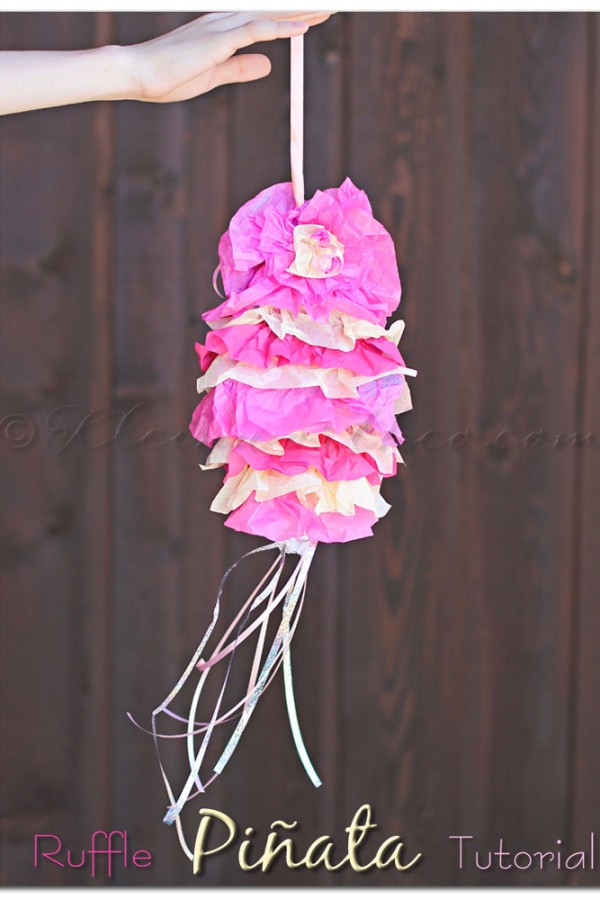
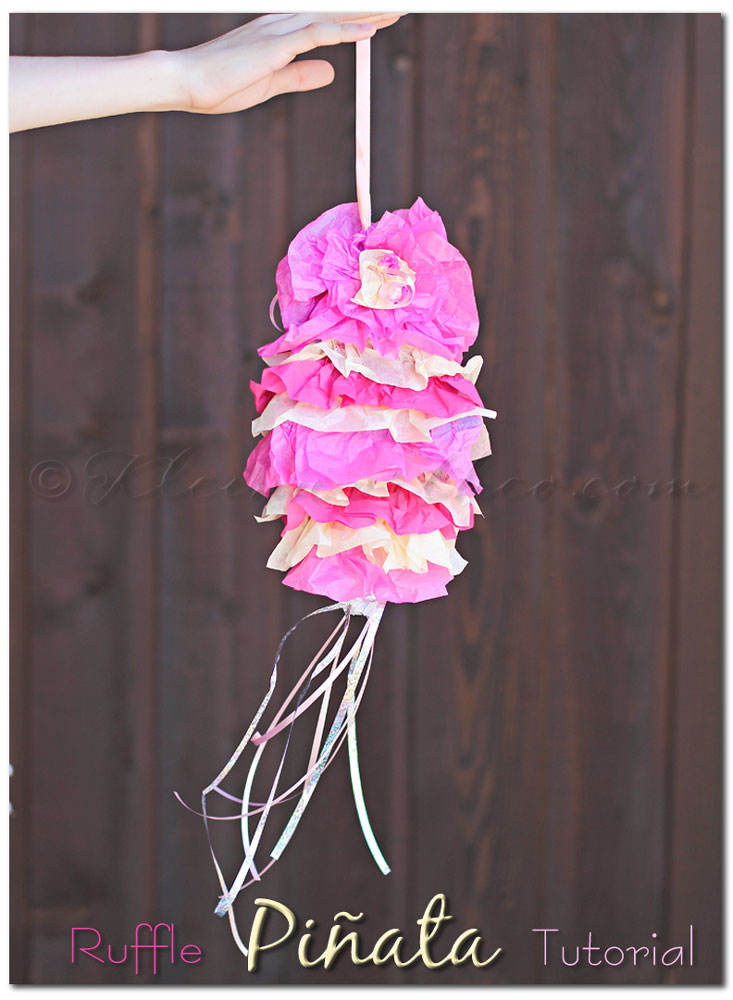
Ruffle Piñata Tutorial
Ruffle Piñata
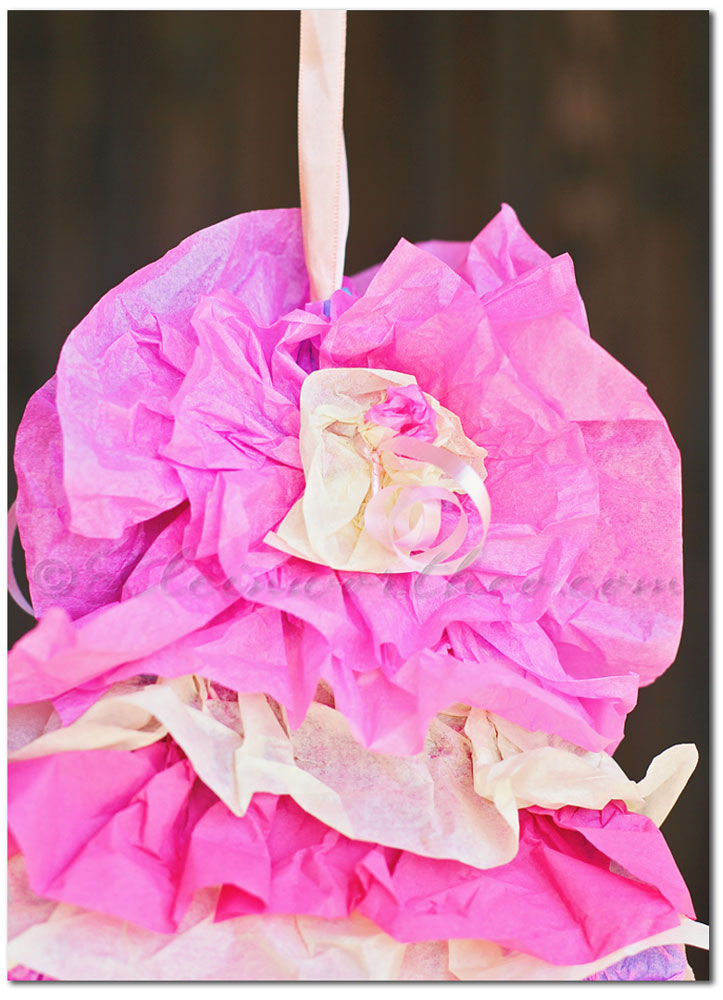
It came out so cute – the girls don’t even want to bust it apart.
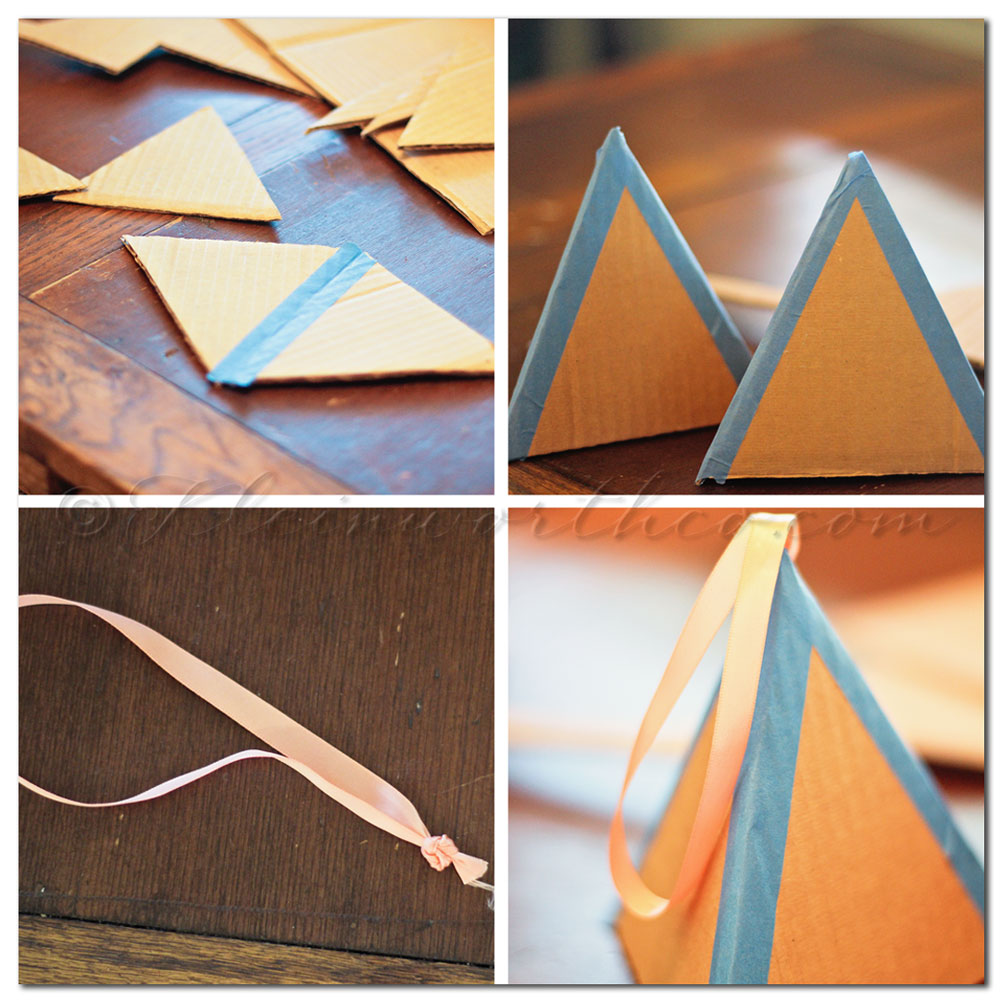
So here you start with 6 cardboard triangles- it will be diamond shaped but because I did ruffles- you can’t see that. I might do one with the traditional fringe & then you would see the shape better. Use painters tape so it comes apart easily when it’s hit with the bat. So then you have 2 pyramids. Take your ribbon & tie a knot in the end leaving your loop. Poke through the hole at the top of one pyramid so you will be able to hang it.
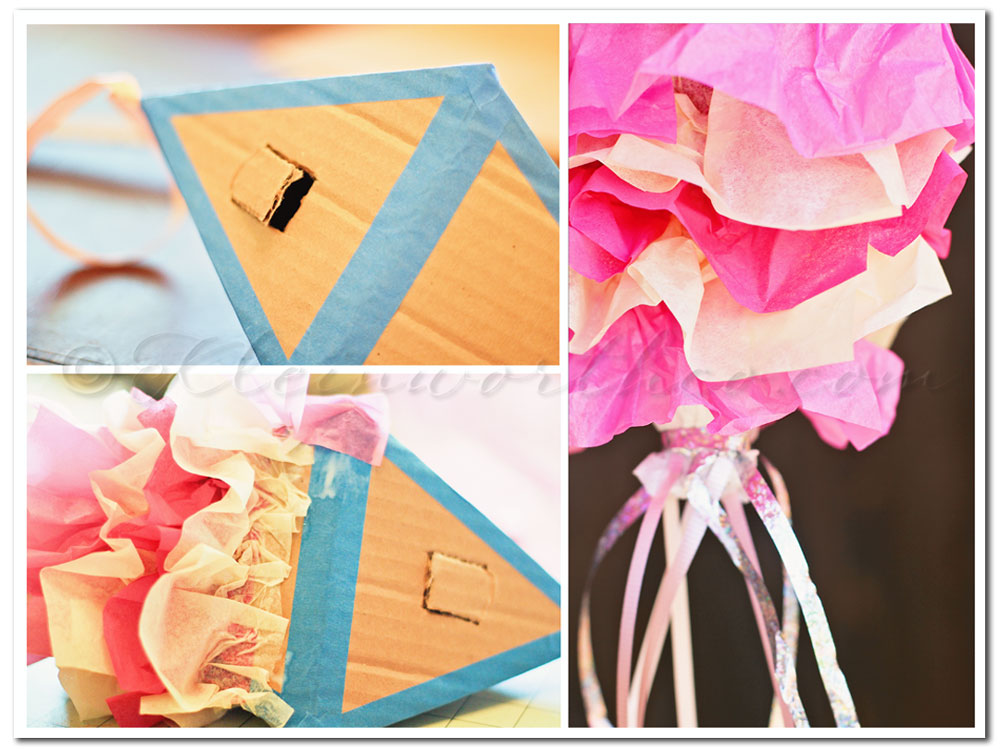
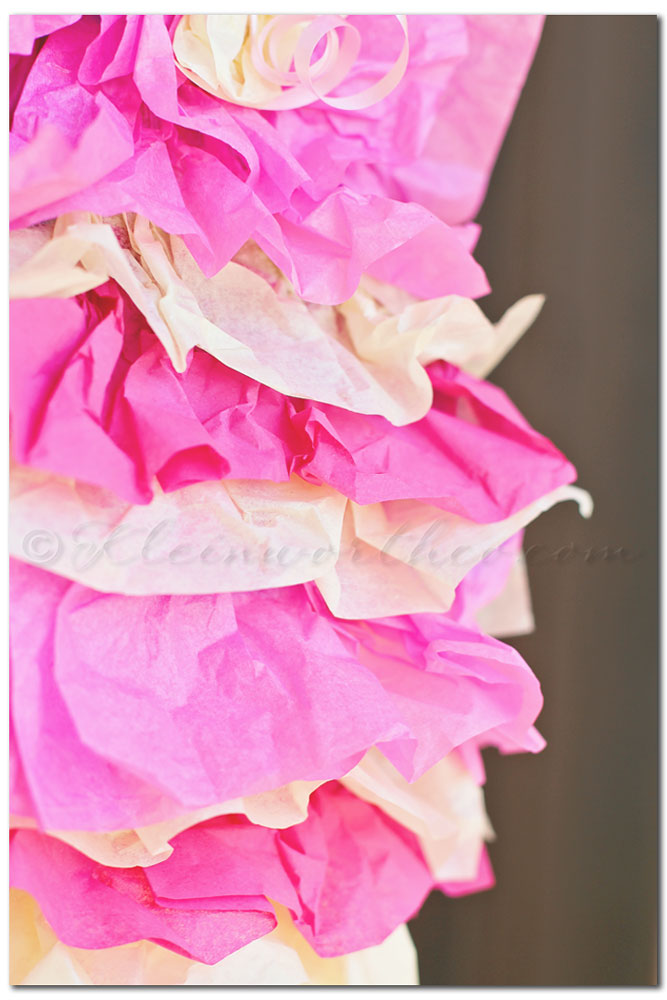
Cut your flap for your candy filling. Tape the pyramids together to make your diamond. Then cut strips of colored tissue paper. Working in strips, starting at the bottom of the piñata, paint on Mod Podge & then lay your strip of tissue over & pulling & pinching to ruffle it around the cardboard. Keep working up the sides making sure you are letting the un-glued part overlap the previous glued part. Go ahead & glue over your cut flap & then once dry- you can slice through the tissue to allow it to open. When I got to the top I decided to make tissue flowers so I just crumpled them to the center & tied with some curling ribbon to hold. Glued them on- one on each side. I decided to add some more curling ribbon in metallic & in coordinating pink to the bottom by just tying it around the bottom point.
I didn’t have orange tissue paper on hand to keep with the true yellow, pink & orange sorbet colors of the party decorations. So I just used 2 different shades of pink. I did all of this with things I had on hand here at the house. I broke it all down by doing the construction on the first afternoon- total time maybe 30 minutes. Then the next afternoon I worked for maybe 1-2 hours (including photos) adding on the tissue paper.
Supplies:
Cardboard
Scissors
Painters tape
Mod Podge
Tissue paper
Curling ribbon
Satin ribbon
TOTAL COST: $0.00
I was so happy to make something for the party that didn’t cost me anything but my time. Yes I purchased all these things at an earlier time but I had them on hand as leftovers from other birthday decorating & my regular craft supplies. No additional birthday cost which is more money I can spend on gifts for her. YAY!!
Now that I have done it- I will probably be making more for future birthdays.
So simple.
Don’t forget to come back & join me on Mondays for Project 52
To see where I am linking today- visit HERE
[jetpack_subscription_form]
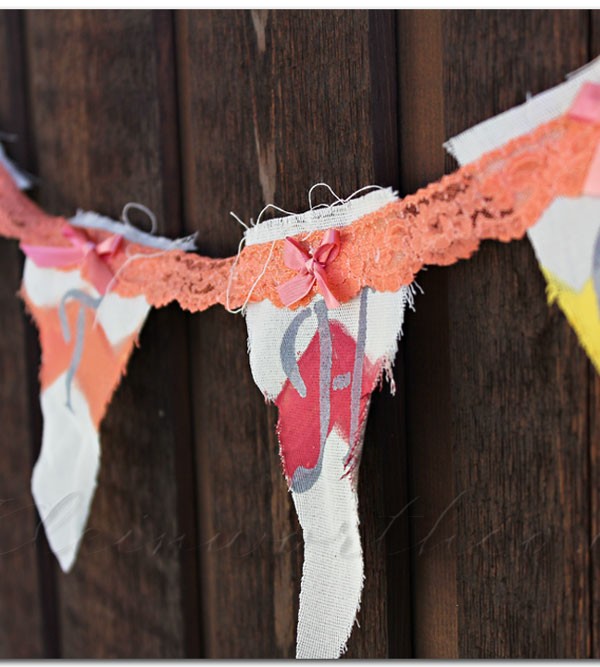
Sorbet Birthday Banner
The munchkin’s birthday is less than a week away. I have been going crazy getting everything prepared & planned. I don’t know why but it seems that we seem to always do more for her birthday than for the others when it comes to planning. Maybe because it’s summer & the others are right before & after the holidays & we are just completely wrapped up in all that stuff during that time. But for whatever the reason- August brings on a big deal for the the little one. Usually my mom comes & we make the cake & I have lots of help with all this. No this year- I will REALLY MISS having her here as I totally suck at making cakes. I love having a professional cake decorator here to help me through it. But her health is SO MUCH MORE IMPORTANT right now so I will be chugging through on my own. I decided to start off easy this time & make a
Sorbet Birthday Banner
I decided that since the munchkin loves pink & orange- we would go with a Sorbet colored theme.
It’s happy & summer like too
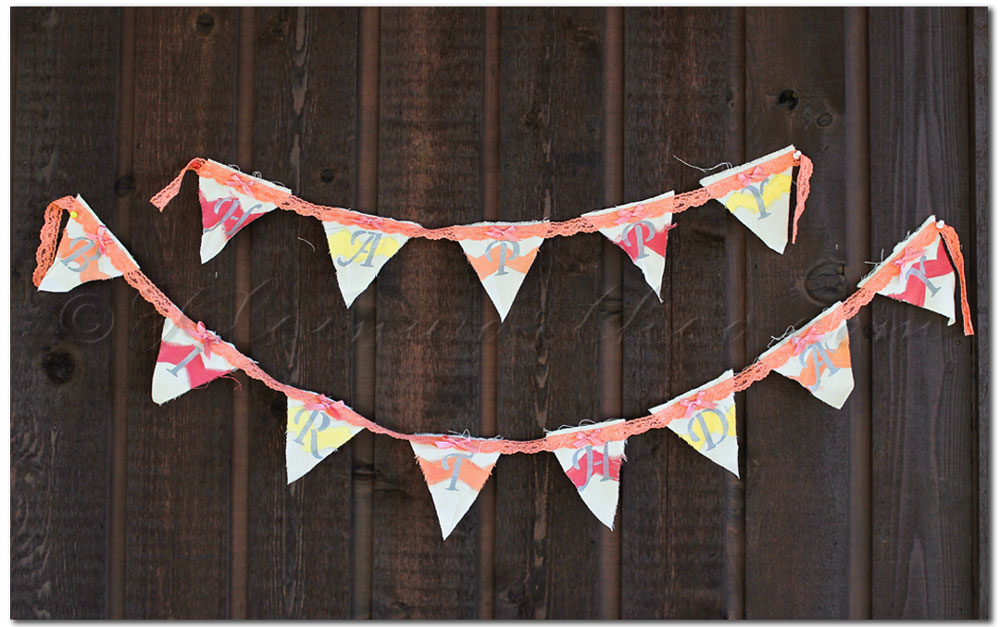
Please forgive me for not getting this thing hung evenly. The wasps were bothering me & I was trying to work fast & get out of there.
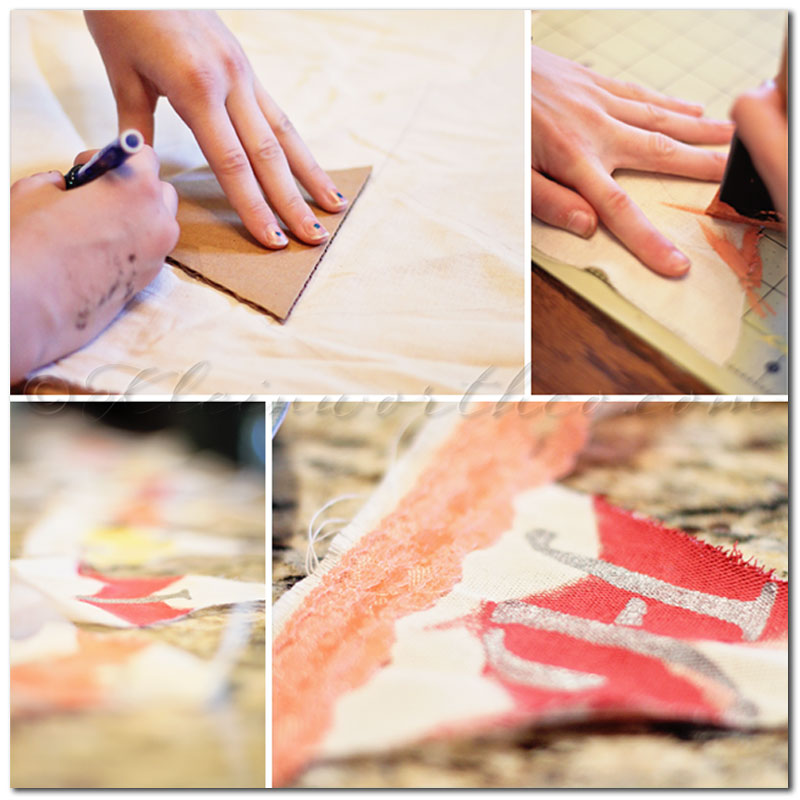
The girls helped me with this. Using a template we cut out the canvas. Then used another template to make the chevron marks & paint them in with yellow, pink & orange. Then I used my stencils from my Plaid Summer Kids campaign & stencil in the letters with some metallic silver paint. After they were dry I used some hot glue (the fabric glue just wasn’t holding tightly) & attached the lace to the tops of the banner pieces. I felt it was sort of incomplete still so I then glued on some little pink bows on the tops of each piece. I think that was just enough embellishment for my taste.
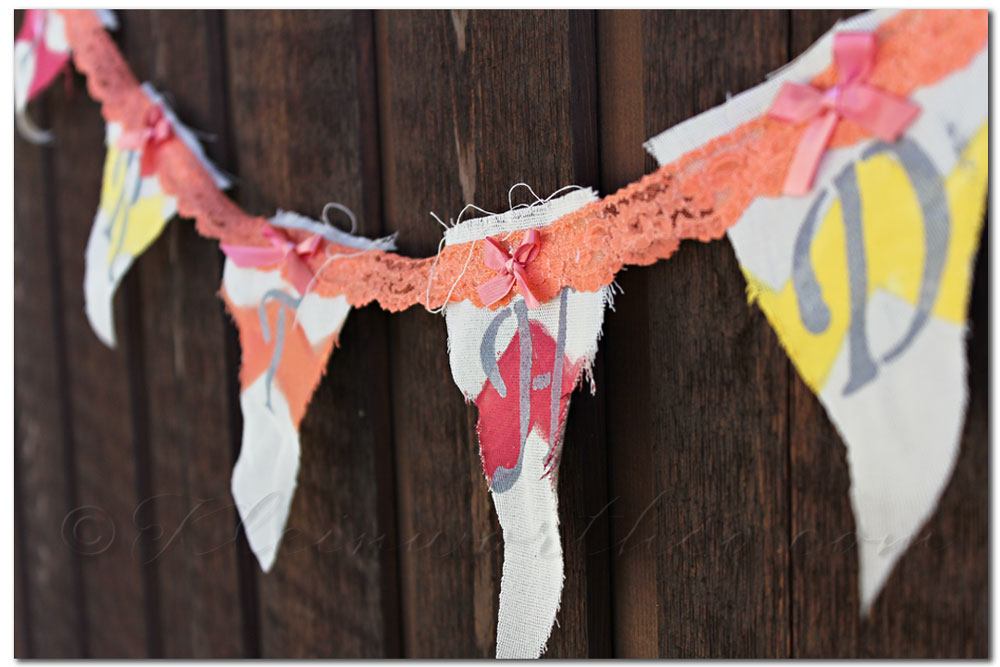
I love the ragged edge on these.
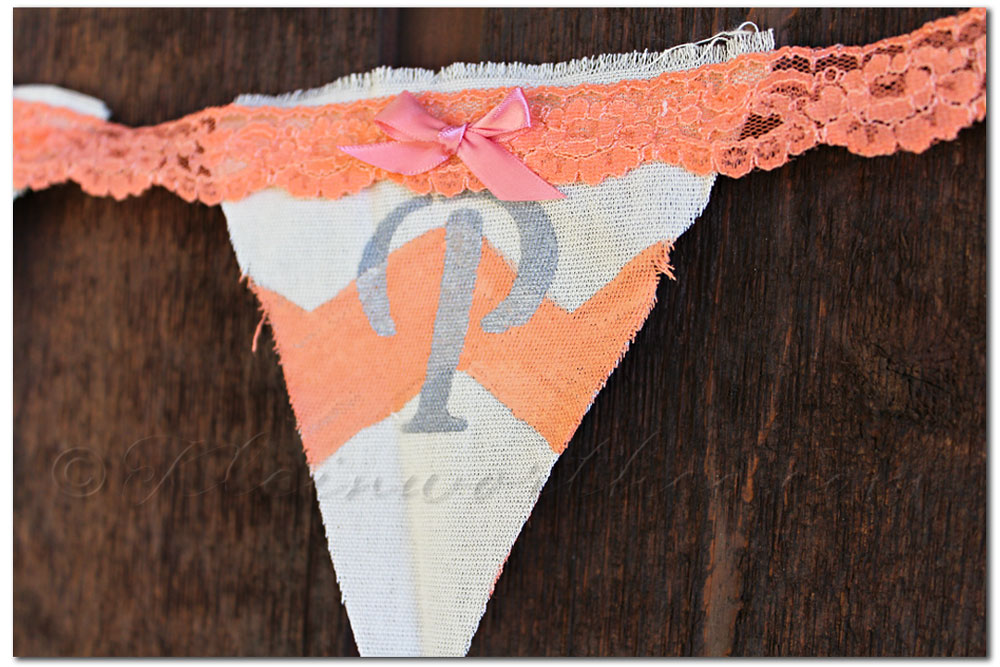
So there you have it. Simple little birthday banner for my not so little girl.
Don’t forget to come back & join me on Mondays for Project 52
To see where I am linking today- visit HERE
[jetpack_subscription_form]
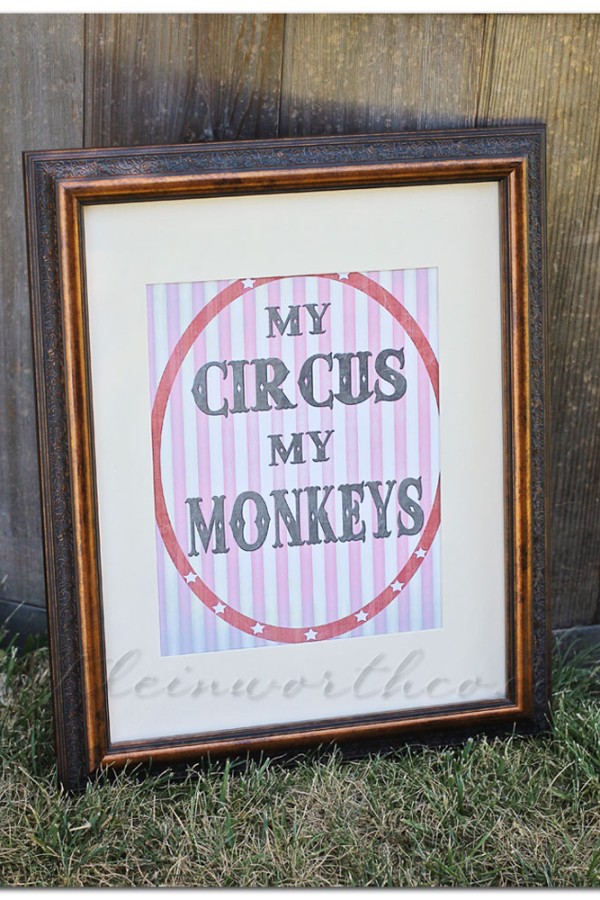
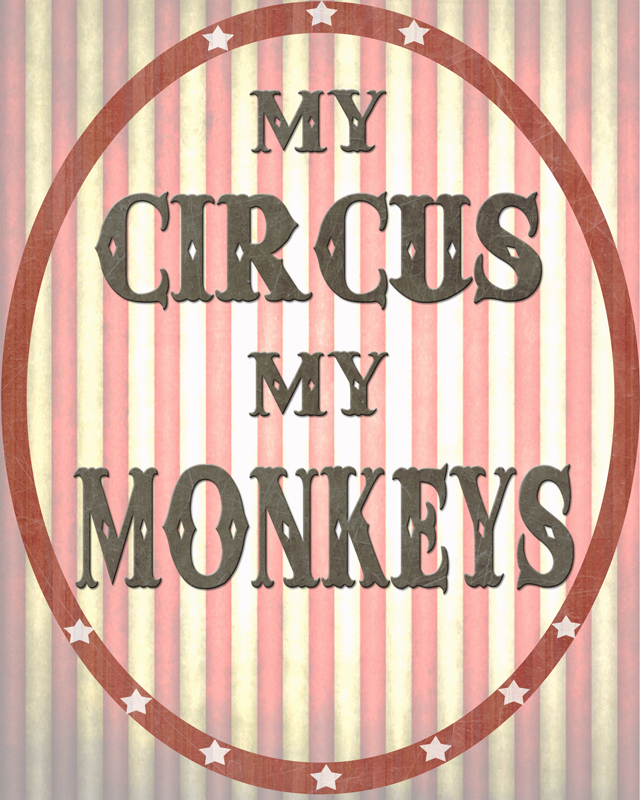
My Circus My Monkeys Printable ~ Project 52 Week 30
Hi there!!! Welcome to Project 52!
Usually I spend my free time in the kitchen or making different projects. That is pretty apparent around here. Most of the time it’s something for the house or something for the kids. Once in a while the hubs puts in a request for something. Not a lot of the time I actually get around to doing it. But this past weekend he was super busy with work & all sorts of other things. This gave me the time to work on his special request.
Free Printable Checklist Templates
You see- a little while back I saw THIS PIN on Pinterest which lead me to THIS Etsy shop for this print. It reads “Not my Circus, Not my Monkeys”. Apparently it’s a Polish Proverb that means “Not My Problem”. When I first showed it to the hubs he laughed. Then he said he wanted one that said “My Circus My Monkeys” because in his line of work- EVERYTHING IS HIS PROBLEM. So I spent some time in Photoshop & created this free printable.
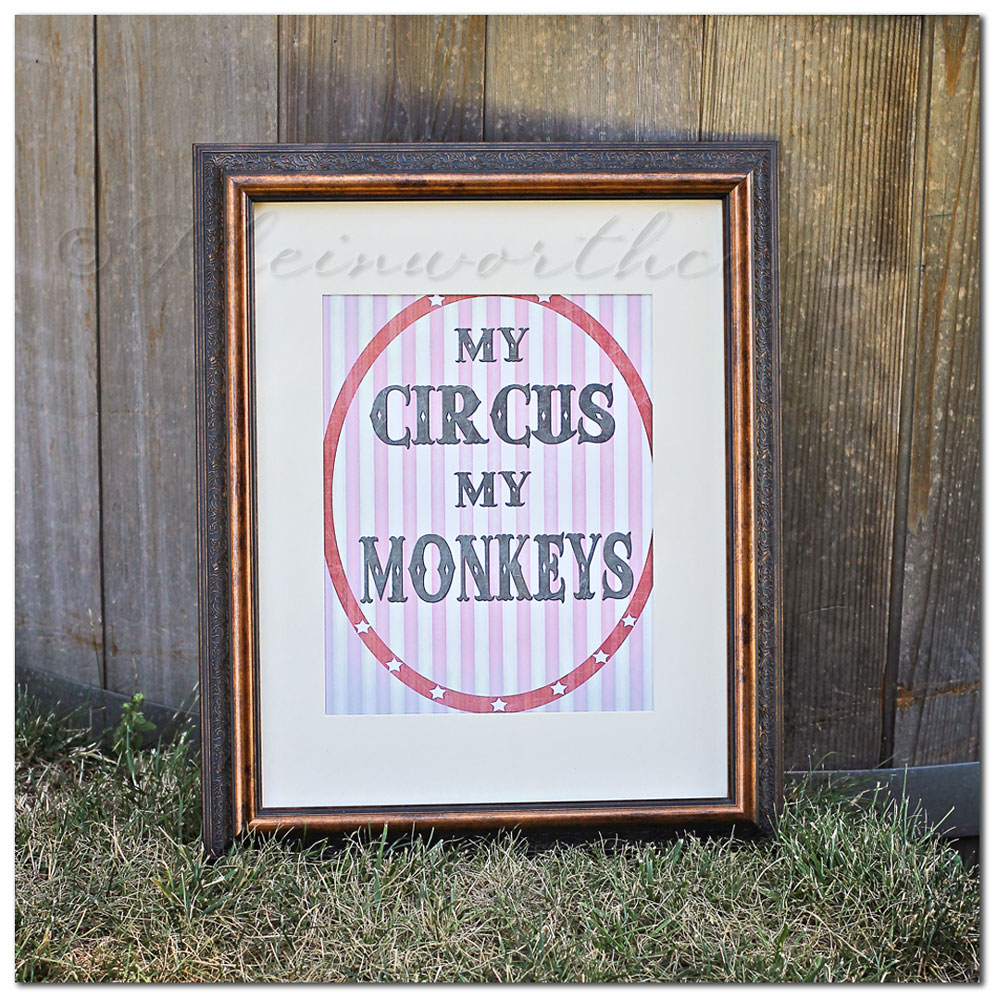
So there you go. I printed it, framed it & now it’s hanging in his office.
Everyone laughs & completely understands why it’s there.
Of course I made it available for you all too.
If you are the kind of person where EVERYTHING is your problem too- this is for you.
Maybe you are a mom- and everything defaults to your problem… print it!!
What did you do this past week???
The P52 Details
* Post 1 photo or as many as you like each week on Mondays.
* The button or text link should be present in your post- but not absolutely necessary.
* Please visit some other blogs & leave some love & encouragement.
* Submit the URL of your blog post – not your home page.
Project 52

Grab the button HERE
To see where I am linking today- visit HERE
[jetpack_subscription_form]
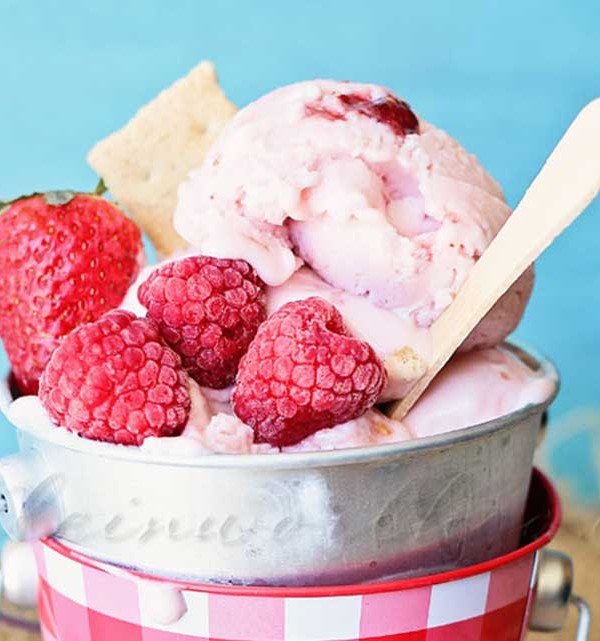
Double Berry Cheesecake Frozen Yogurt
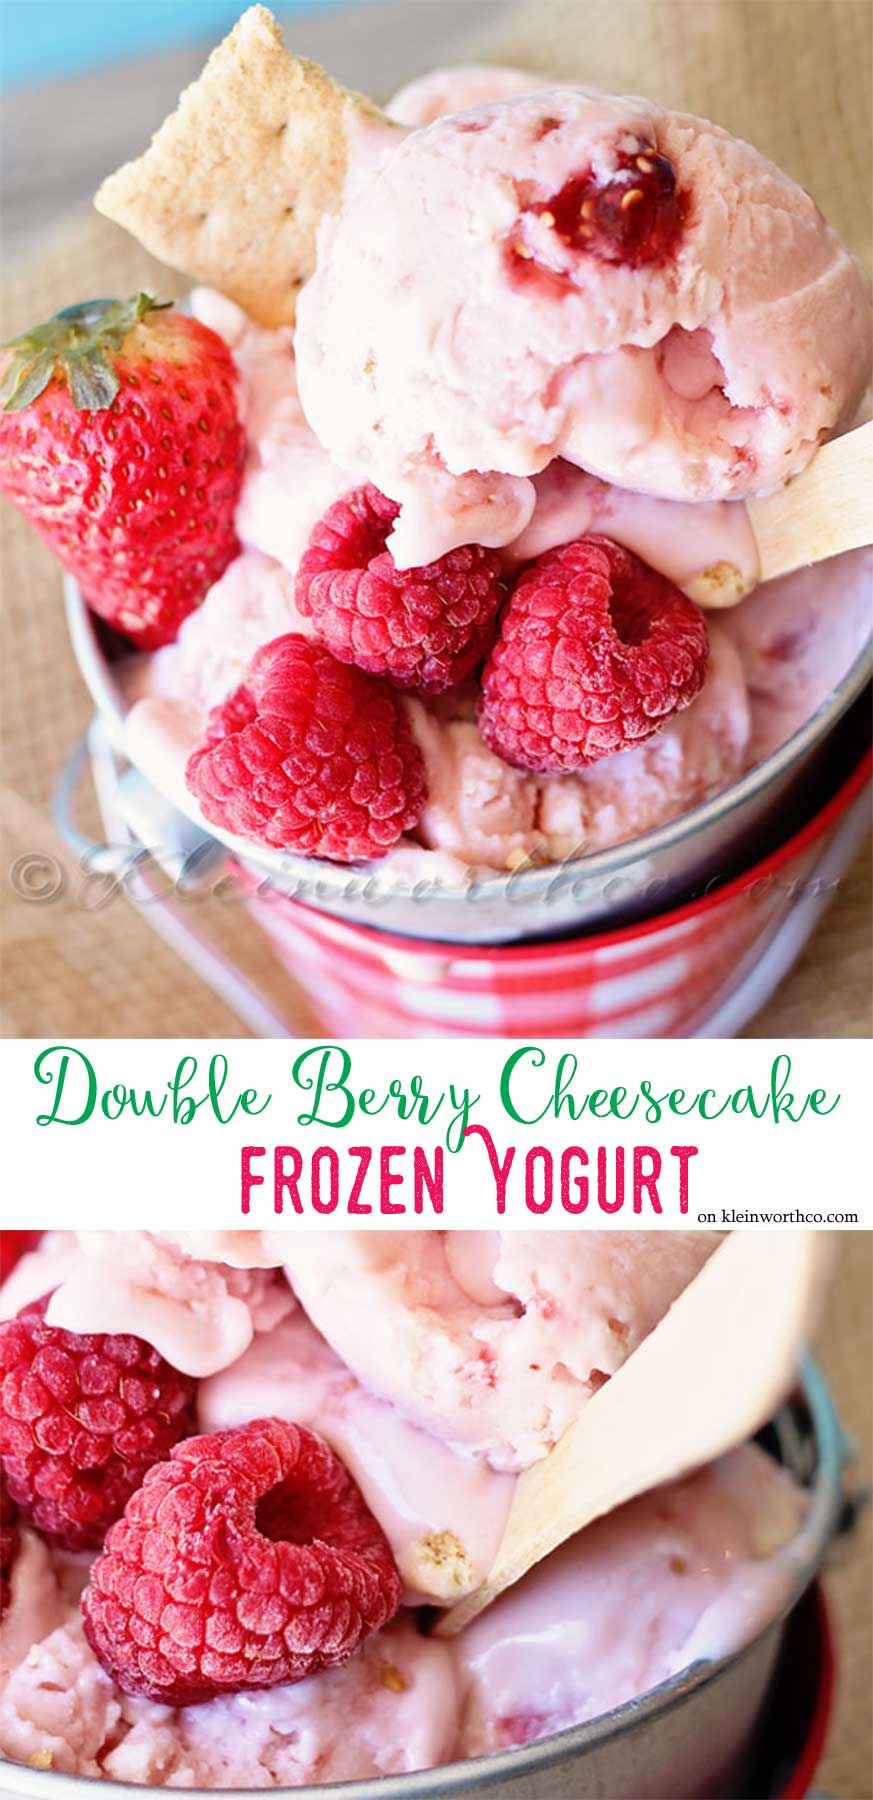
This time I made Double Berry Cheesecake Frozen Yogurt
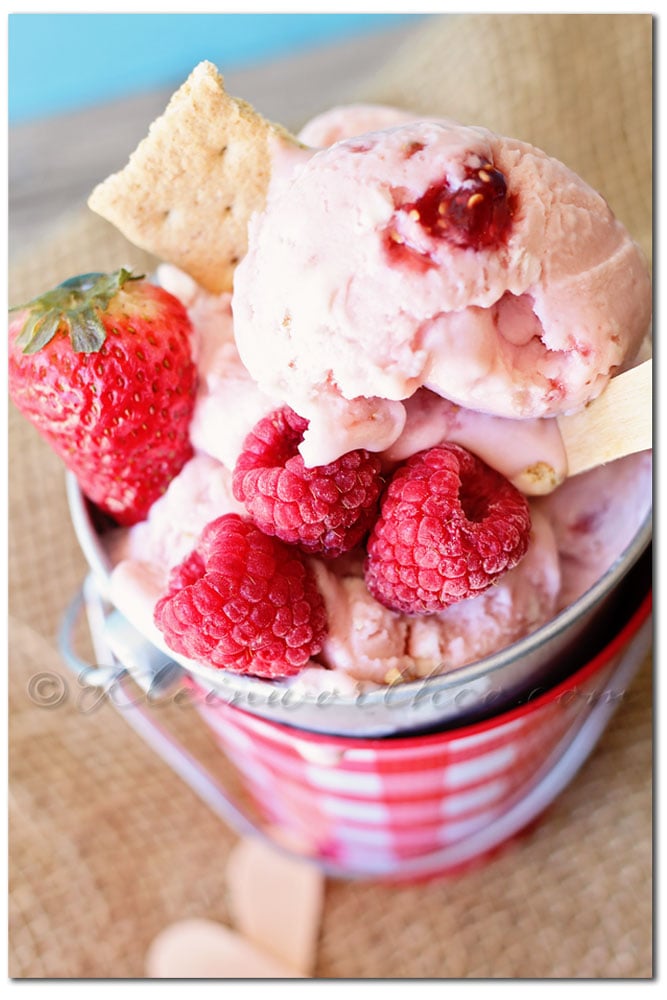
Topping with some frozen berries made it all the yummier (is that even a word?)
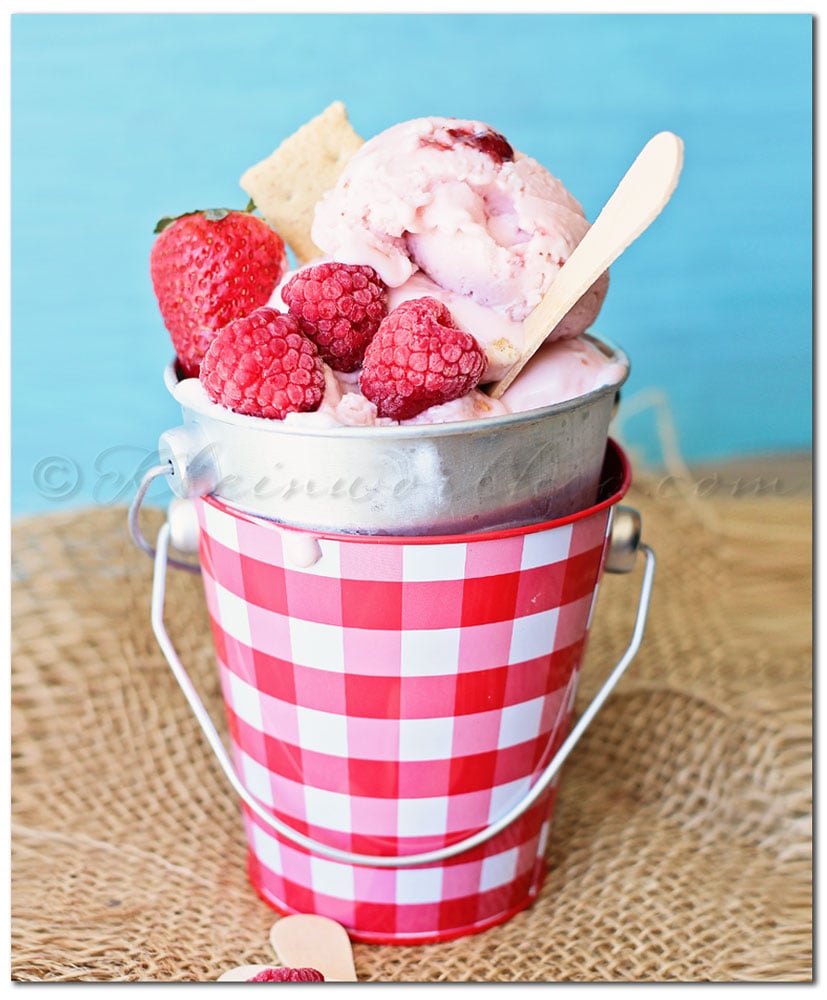
Can you tell I am just loving these little pails from the $1 bin at Target.
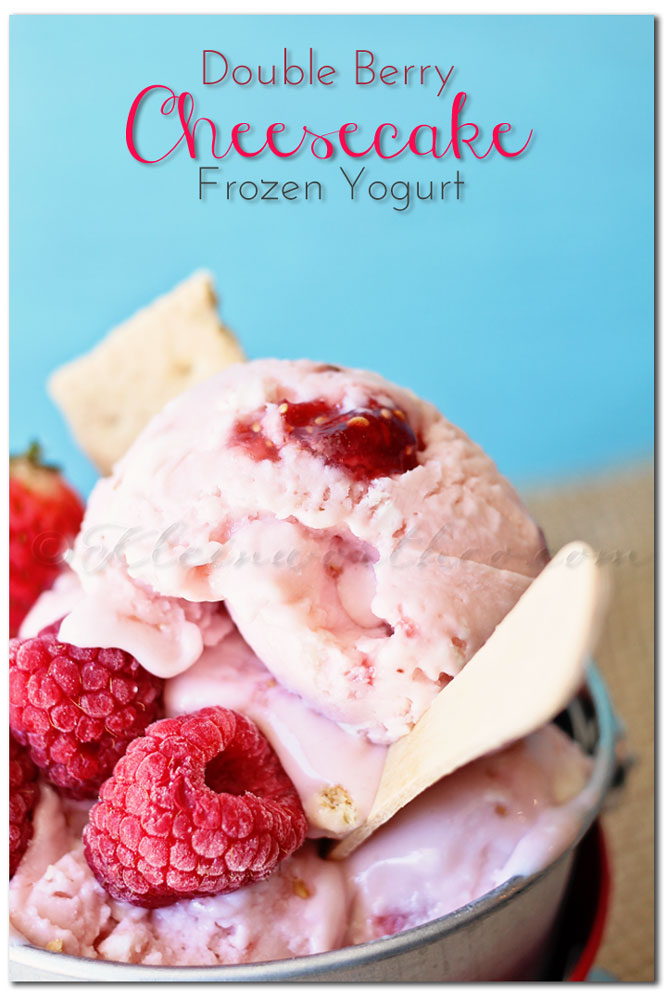

Double Berry Cheesecake Frozen Yogurt
Ingredients
- 1- 32 oz container strawberry yogurt
- 1- 8 oz pkg cream cheese - softened
- 2 tsp lemon juice
- 1/2 tsp vanilla extract
- 1- 14 oz can sweetened condensed milk
- 1/2 cup raspberry marmalade
- crunched graham crackers for topping
Instructions
- In mixer bowl, whip cream cheese until soft & fluffy.
- Add in yogurt, sweetened condensed milk, lemon juice, vanilla.
- Beat until well combined - scrape down bowl as needed.
- Add to ice cream maker & churn 20 minutes.
- Transfer to airtight container & fold in raspberry marmalade leaving ribbons of it through the mixture.
- Add crunched graham crackers- fold in just a little.
- Freeze approx 4-6 hours before serving.
- Top with additional graham crackers & frozen berries if desired.
Looking for more great dessert recipes?
Don’t miss these great ideas from these bloggers….
Baking-Ginger – Watermelon Coconut Ice Cream
The Novice Chef – Black Forest Trifle
To see where I am linking today- visit HERE
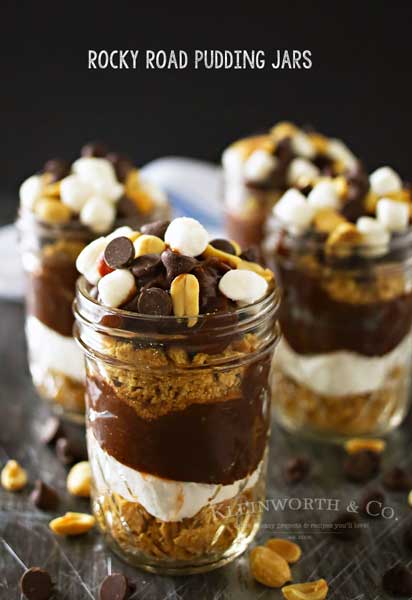
Frozen Kit Kat Pudding Pie
Frozen Kit Kat Pudding Pie

Yeah- this really didn’t last very long. I had just about everyone coming out to check on my progress as I was taking these pictures. They did not want to wait any longer for this treat. It was bad enough I made it the night before & they didn’t want to have to wait until the following night to enjoy it. I really do have to make things early enough in the day so that they are ready to be photographed before dinner. Otherwise people around here start getting a bit irritated that there are treats staring at them in the fridge & they can’t have any. 🙂 I know- I’m mean right??!!


Frozen Kit Kat Pudding Pie
Ingredients
- 1 Oreo pie crust
- 1 pkg Jell-O chocolate pudding prepared to pkg directions for pie filling
- 20 mini Kit Kat bars
- 1/4 cup mini chocolate chips
- whipped cream as desired
Instructions
- Chop mini Kit Kat bars into 3 pieces each
- Prepare chocolate pie filling according to pkg instructions
- Stir in 1/2 of the chopped Kit Kats & 1/2 of the chocolate chips
- Pour into pie crust
- Sprinkle with remaining Kit Kat pieces & chocolate chips.
- Freeze for at least 3-4 hours.
- Let sit for 20 minutes on the counter before serving.
- Top with whipped cream as desired.
Want more chocolate- don’t miss these recipes.
Don’t forget to come back & join me on Mondays for Project 52
To see where I am linking today- visit HERE
[jetpack_subscription_form]
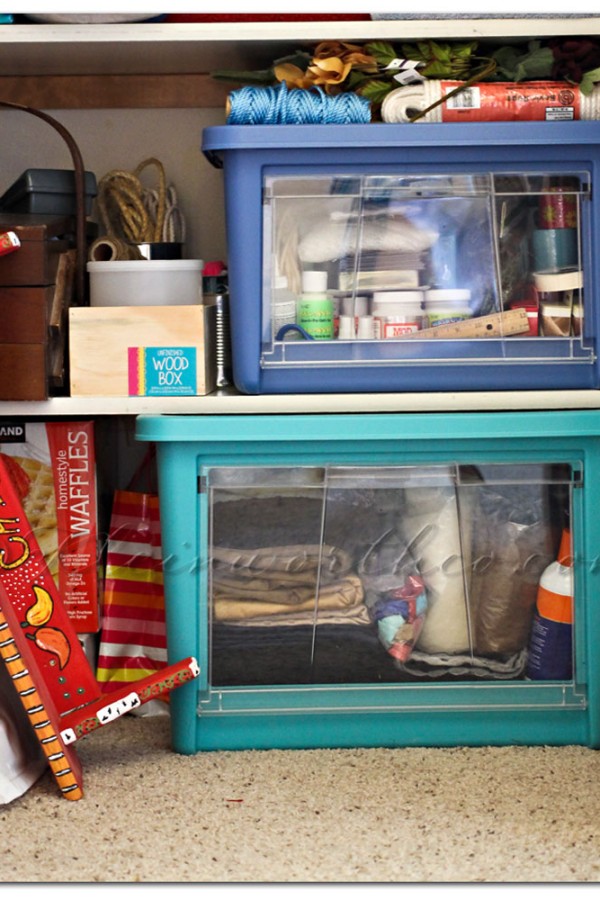
Getting Organized with Rubbermaid All Access Organizers
**This shop is part of a social shopper marketing insight campaign with Pollinate Media Group™ and Home Depot & Rubbermaid, but all my opinions are my own. #pmedia #AllAccessOrganizers https://cmp.ly/3/8vNxcO
This week I was able to Get Organized with Rubbermaid All Access Organizers – WhoooHoooo!
When we made our cross country move 7 months ago we knew things would be tight on space. You see we only had 30 days to get relocated for the new job & apparently things like moving are a seasonal thing up here in Northern Idaho. This wasn’t something we were used to being that we are both CA natives & lived in the desert of NV for the last 12 years. So house choices were slim pickin’s. We actually took this house on a leap of faith- sight unseen. Yep- we went off of photos, phone conversations & our faith that everything would be okay. Fortunately everything worked out.
That being said- this house is 1000 square feet smaller than our last. Even though we sold or donated 50% of our belongings to make this move happen- we are still very tight on space. I used to have my entire office plus 2 closets & a bunch of space in the garage to store my crafting supplies. I had to use our new garage space for my studio (which I am grateful for) & don’t have a full dedicated office space like I used to. This means that I had to take over half the linen closet & most of the coat closet to accommodate what I still have left of my crafting supplies.
It’s been driving me INSANE!!
So you can imagine how positively THRILLED I was when given the opportunity to try the new Rubbermaid All Access Organizers.

I could barely wait to get on over to The Home Depot & pick up my organizers.

I was not only super excited to see how affordable they are- but I love the blue & green colors they were available in.
They are also much larger than I expected. So I got them home & immediately got to work.

YEP- embarrassed to say that I have been living with my closet like this for the last couple months. As I would keep collecting new craft supplies they would just get dumped in here because we hardly ever open the door. But every time I wanted to make something I would have to tear it all out & hunt for things. Did I mention I have NO PATIENCE for this. It literally puts me in an instant bad mood when I have to hunt for things. I want them within my sight & easy to access. I really don’t like feeling disorganized so this situation had to end.

Check out how neatly all this stuff fits in my bin. This is the small bin but it wasn’t small at all. I was shocked at how much I was able to fit in here. I absolutely LOVE the fact that it has the clear side door so that I can access my things without taking the lid off. I like seeing things from the label view instead of the tops of the lids. Being able to reach in from the side is AWESOME!!!!!!!!!!!! Sticking in a standard tote would have been equally as annoying for me because I’m one of those people that has to see what I have or I forget it exists. Then I end up re-purchasing things I already own just because I can’t see that I have it. Do you see now why being organized is so important for me. It’s how I survive. I can’t function otherwise. I just have too much going on & my mind is in too many places to try to remember it all. So these clear doors letting me see what I have & access it so easily- LOVE!!!!!!!!!!!!!!!!!!

This is the large bin. It holds a TON of stuff. I decided that I would use this for corralling all the fabric & supplies for making my camera straps. I literally had it all just dumped in a large (person sized) tote with all my other fabric & anything else that would fit in there. Every time I would make a sale I would have to drag everything out & hunt for the supplies I needed. This HAD TO STOP. I can’t live like that. I swear it’s some sort of torture to be disorganized in this way. 🙂 So now I have everything I need all in this easy to grab space. I was able to fit 30 stacks of fabric in here & all the other things that go with it- batting, spray adhesive, & most of my packaging supplies (minus the shipping boxes) in here too. That makes me HAPPY!!!

So you can see here that I bought both colors. Yeah- I really wanted the green in both sizes but they didn’t have the green in the small at the time we were there. So I decided that the colors reminded me of going home to the ocean- so that was okay with me. 🙂 I had planned on stacking a set in each of these spots- but they were so much bigger than I expected so one of each. These do stack well & open when stacked- but they didn’t fit stacked here in my closet because of these shelves. But this works really well for me because of – again- that nifty side door. I don’t have to remove them from the shelves to get to my stuff – but if I wanted to, they do open from the top as well.
You can see my projects I still have yet to complete- unfinished boxes, a shelf that needs repainting, all sorts of rope for things & the waffle box that is currently holding burlap & raffia that needs to be covered with either paint or contact paper so I don’t have to look a the logo anymore. 🙂 I will be buying a whole lot more of these Rubbermaid All Access Organizers. Every single closet in this house needs more organization along with my laundry room. My prop cabinet is also bursting & these would be great in addition to that for storing all my things for photos. The kid’s school supplies need to be moved into these organizers too so we don’t have to store them with their crafts & games. SO MANY possibilities. Looks like I will be spending a lot more time at The Home Depot picking up more of these organizers from Rubbermaid.
You can connect on Facebook with The Home Depot & Rubbermaid.
Thank you Pollinate, Home Depot & Rubbermaid for helping me get organized!
Don’t forget to come back & join me on Mondays for Project 52
To see where I am linking today- visit HERE
[jetpack_subscription_form]
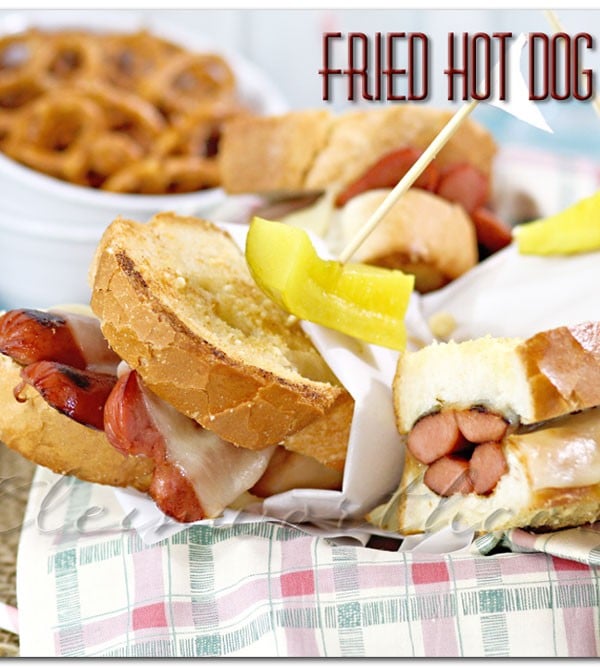
Fried Hot Dog Sliders
Today is National Hot Dog Day so we are celebrating by making Hot Dogs the theme for July’s Recipe Round-Up.
Fried Hot Dog Sliders is my celebratory recipe
Looking for Easy Family Dinner Ideas? The hubs is a bit of a hot dog nut. He will vote to have hot dogs just about any time. So it’s fair to say that we have tried them in all different ways & have narrowed it down to just a handful of the best brands. Yes we take hot dogs fairly seriously in this house despite their fun nature. So I really couldn’t resist taking advantage of National Hot Dog Day & celebrating. So today not only am I sharing my new favorite way to eat them- but a bunch of my friends are sharing either their recipes with hot dogs or recipes that go great with them. 🙂
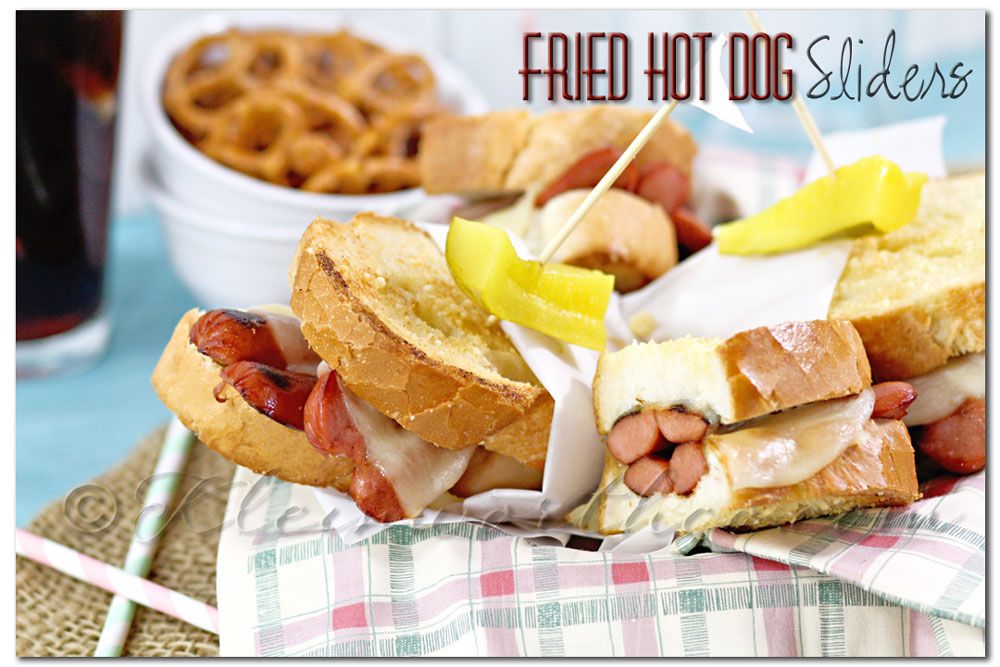

Fried Hot Dog Sliders
Ingredients
- Hot Dogs 2 per slider
- Provolone Cheese
- French Loaf
- 1 Stick Butter
- Garlic Powder
- Parmesan Cheese
Instructions
Prepare your bread
- Cut french loaf into slices & lay on ungreased baking sheet
- Melt butter & brush over each slice of french bread to coat.
- Sprinkle with garlic powder & Parmesan cheese.
- Broil until golden brown.
Cook your hot dogs
- Start by slicing each hot dog length wise until it's not completely separated but you can open it to lay it flat.
- Fry in skillet until you get those nice crunchy, blackened strips on them & they are good & hot.
Assemble your slider
- Lay fried hot dog on one slice of your un-toasted side of your bread.
- Add provolone cheese slice.
- Return back to broiler to melt & bubble cheese slightly.
- Remove from broiler & add top piece of bread. Cut as desired.
- Serve immediately.
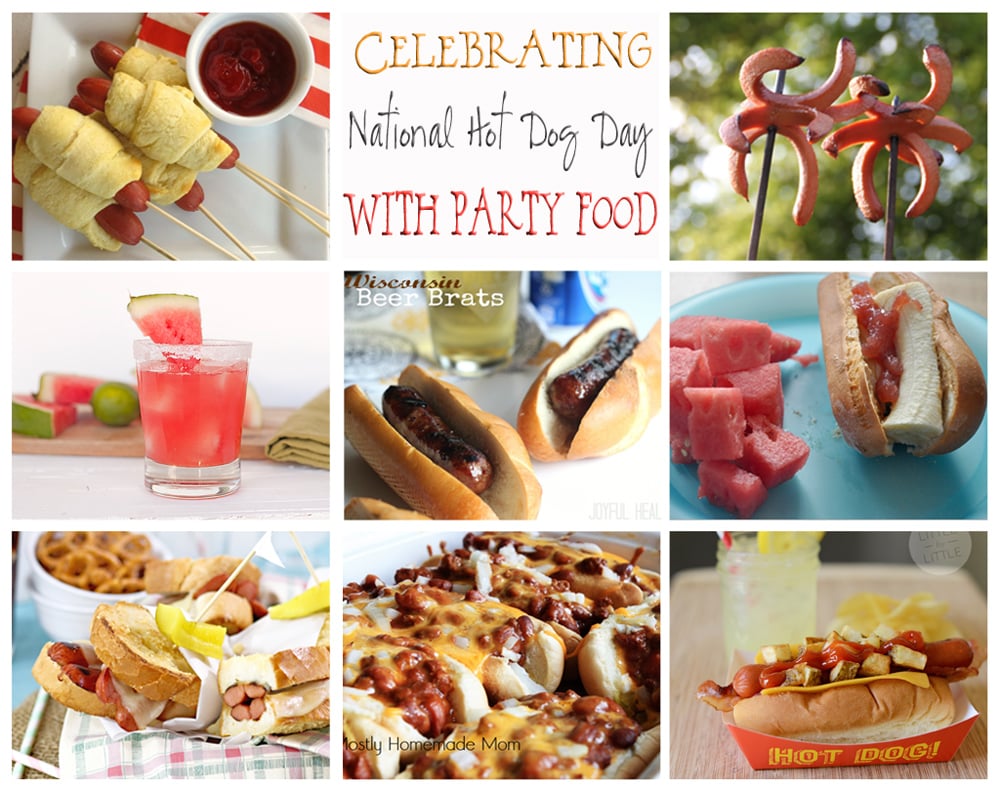
Hot Dog on a Stick from The Taylor House
Watermelon Daiquiri from One Martini at a Time
Fried Hot Dog Sliders from Kleinworth & Co.
Campfire Cooking from Nap-Time Creations
Peanut Butter Banana Hot Dog from Random-osity
Wisconsin Beer Brats from Joyful Healthy Eats
National Hot Dog Day from Little by Little
Loaded Oven Chili Dogs from Semi-Homemade Mom
To see where I am linking today- visit HERE
[jetpack_subscription_form]
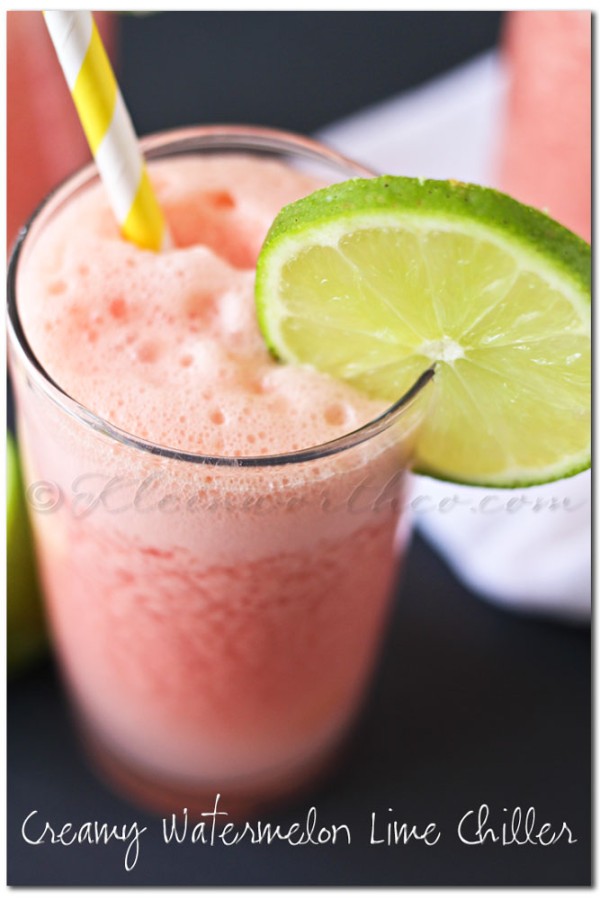
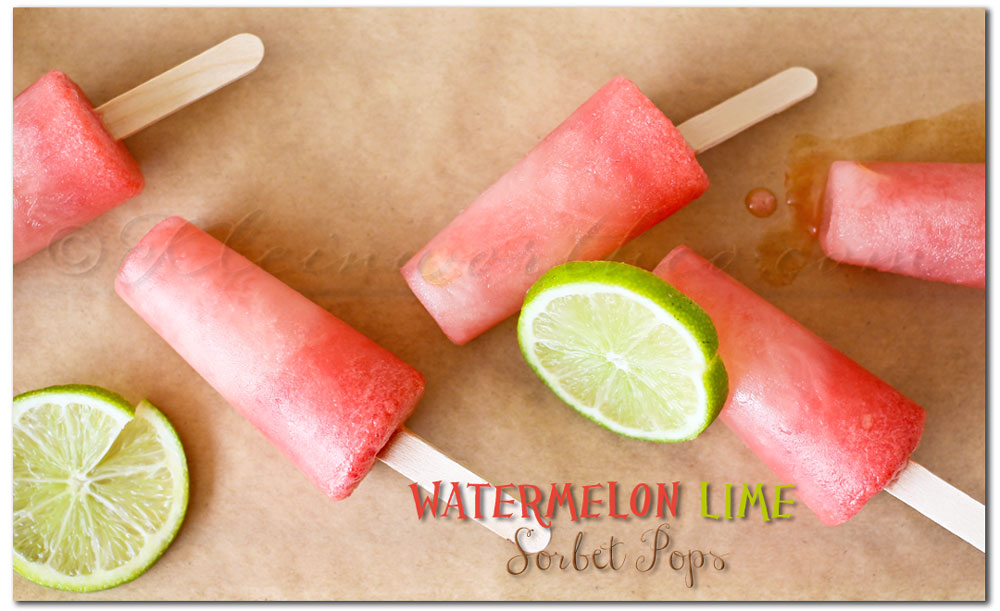
Creamy Watermelon Lime Chiller
Welcome to Project 52- week 29
Wow- hard to believe that we are more than half way through July. I am seeing more & more people pinning Christmas things. I know!!! Part of me wants to start planning & then the other part of me feels overwhelmed because I have all these other months to think about first. If I plan out too many at once- I’m going to burn out I think. So I think I will be focusing week by week & see how far I go. At the moment the munchkin has a birthday coming up- fairly soon. So I need to really start planning for that & doing things to prepare. So if you are wondering what I am up to when I am not in the office much this week- that is it.

As part of that prep for munchkin’s birthday- I have been playing with creating drinks.
She loves pink so this Creamy Watermelon Lime Chiller was a top pick.
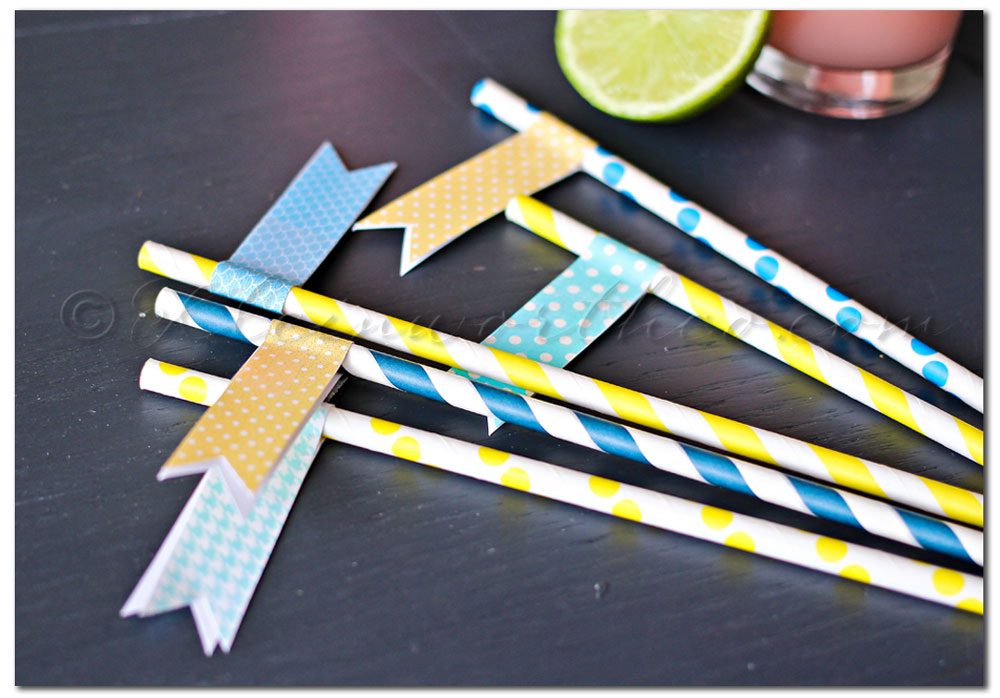
Plus all this drink creation gave me the chance to play with these straw flags from Life n Reflection.
As part of being on the design team for Kristy- I was given this Spring party Set.
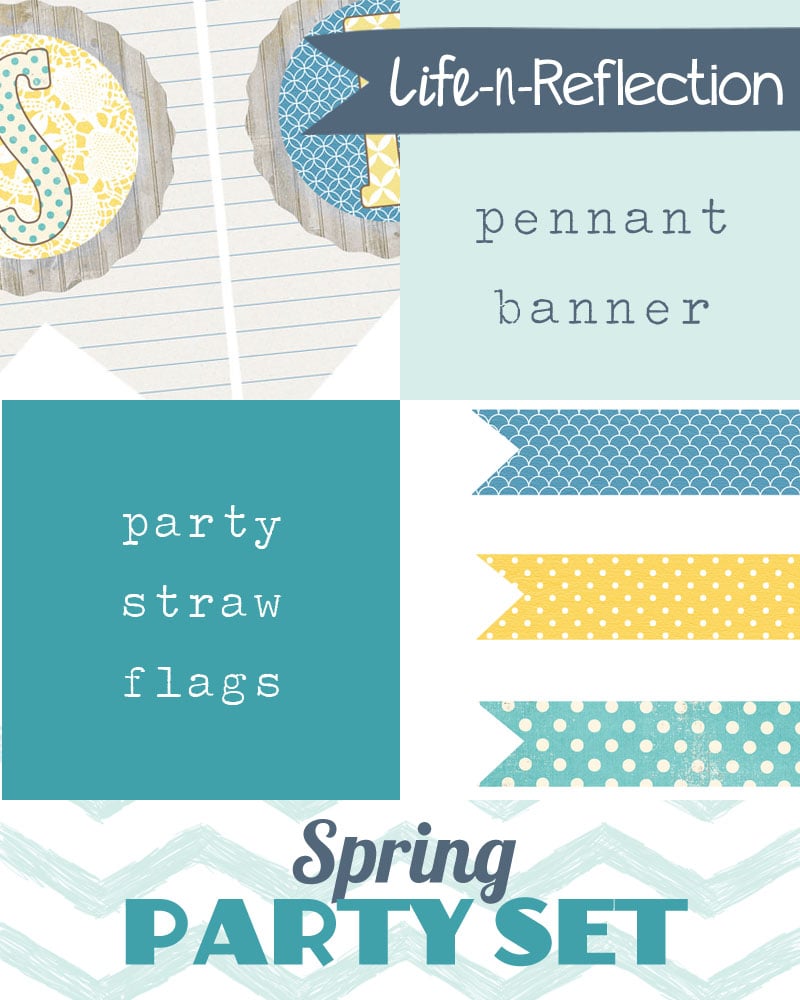
Since it’s not spring anymore- I focused on the flags. I can use them all year long- which is awesome!
You can pick up the set HERE.
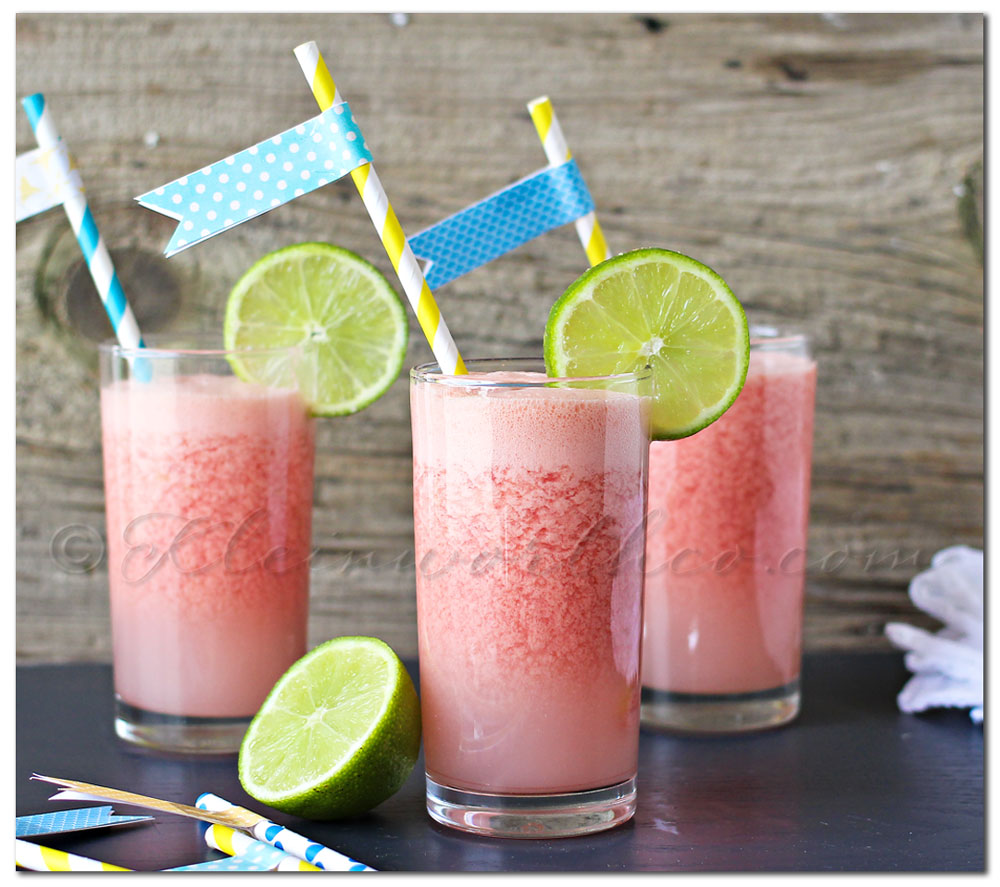
As I mentioned yesterday in my Scavenger Hunt post- we spent part of the weekend at one of the stations having a cleaning party & BBQ afterwards. So I didn’t get too many personal photos- most of them are for the FD. I was happy to be able to capture these drinks & share them with you. We all loved them & apparently so do the yellow jackets. The stinging/flying things around here are in abundance & poor Mini-Me not only got stung on her eyelid (what are the chances??) during our Bayview Days celebration but then again on her leg this past week. Sooooooo- I’m not all that thrilled about that. I AM however happy that we found out she’s not allergic.
So do you want the recipe??
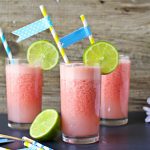
Creamy Watermelon Lime Chiller
Ingredients
- 2 C watermelon- cubed
- 1-1/2 C simple syrup
- 1/2 C whipped cream
- 1/2 a lime - juiced
- 1 oz rum opt since this is for kids- I withheld it.
Instructions
- Blend all ingredients until smooth & well combined.
- Serve immediately.
Now share what you have been up to!!
Project 52
* Post 1 photo or as many as you like each week on Mondays.
* The button or text link should be present in your post- but not absolutely necessary.
* Please visit some other blogs & leave some love & encouragement.
* Submit the URL of your blog post – not your home page.
Grab the button HERE
To see where I am linking today- visit HERE
[jetpack_subscription_form]
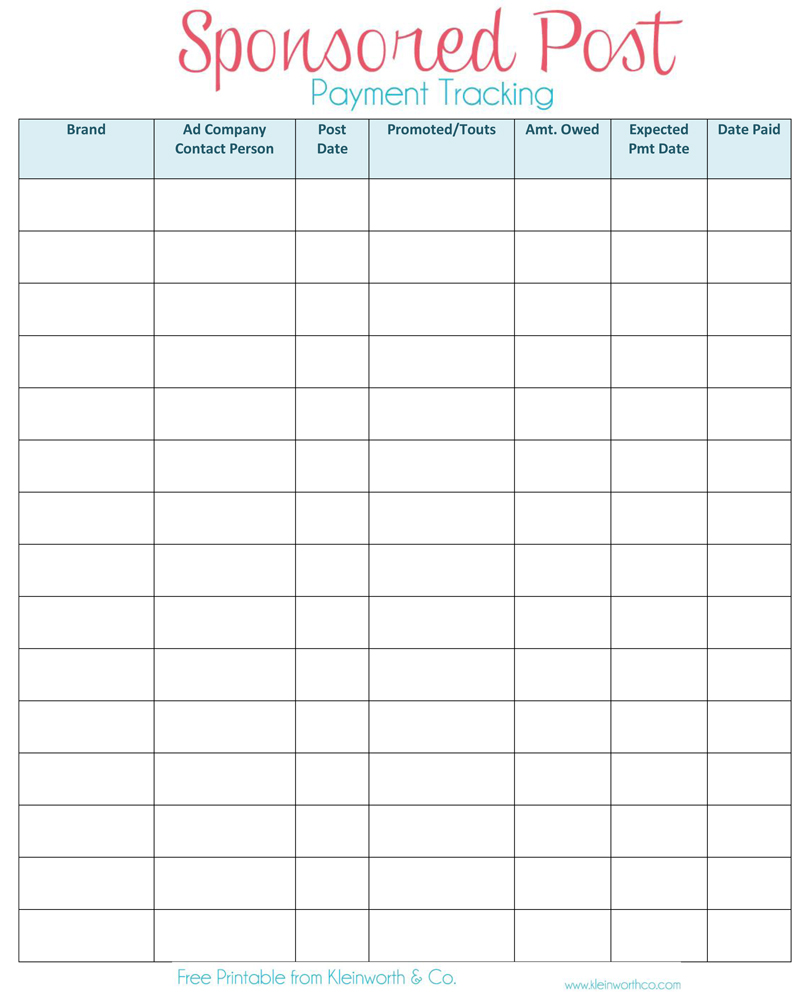
Blog Payment Tracking Printable
So I finally made my own Blog Payment Tracking Printable.
Don’t forget to come back & join me on Mondays for Project 52
To see where I am linking today- visit HERE
If you love this – you don’t want to miss our latest book!
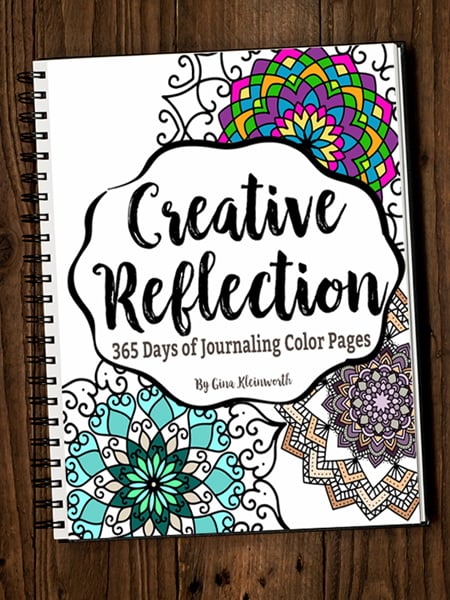
Creative Reflection – 365 Days of Journaling Color Pages
365 Journaling prompt coloring pages + monthly & yearly goal sheets AND 14 free color pages
Nearly 400 printable coloring pages for just $8.99
Looking for more awesome printables?
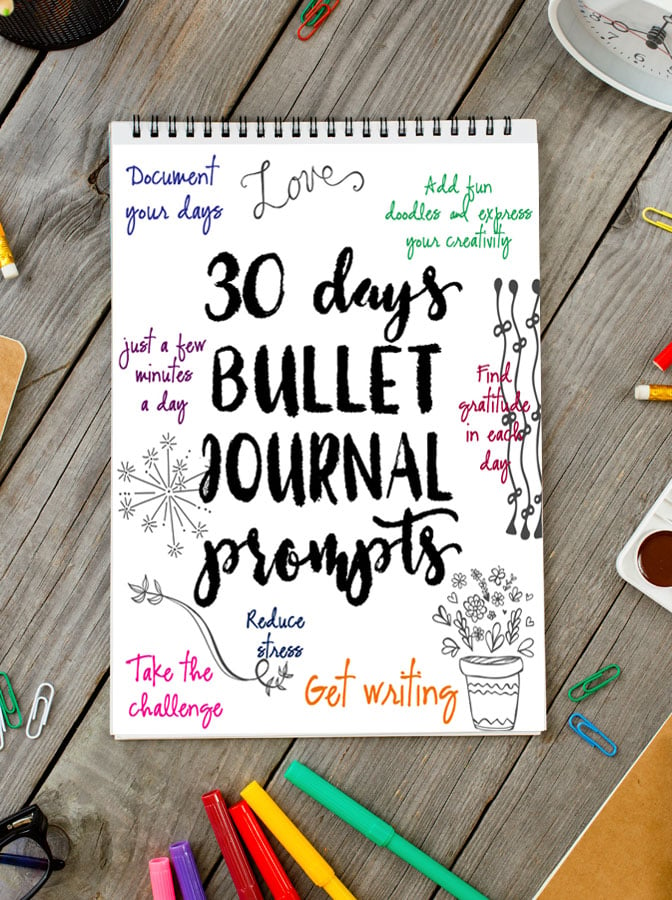
30 Days Bullet Journal Prompts Free Printable
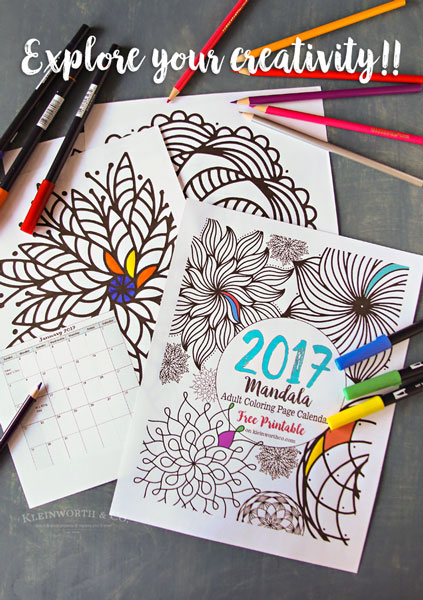
2017 Mandala Adult Coloring Page Calendar Free Printable
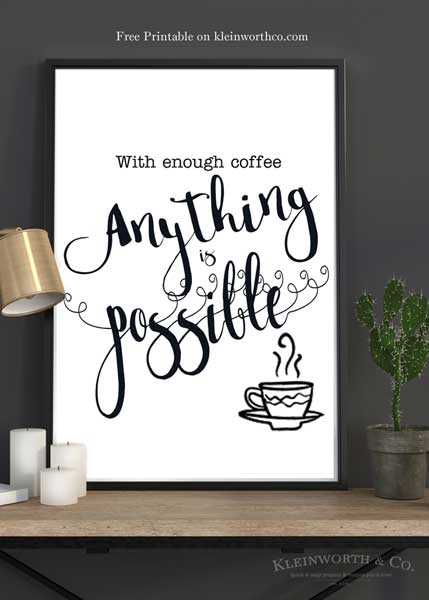
With Enough Coffee Free Printable
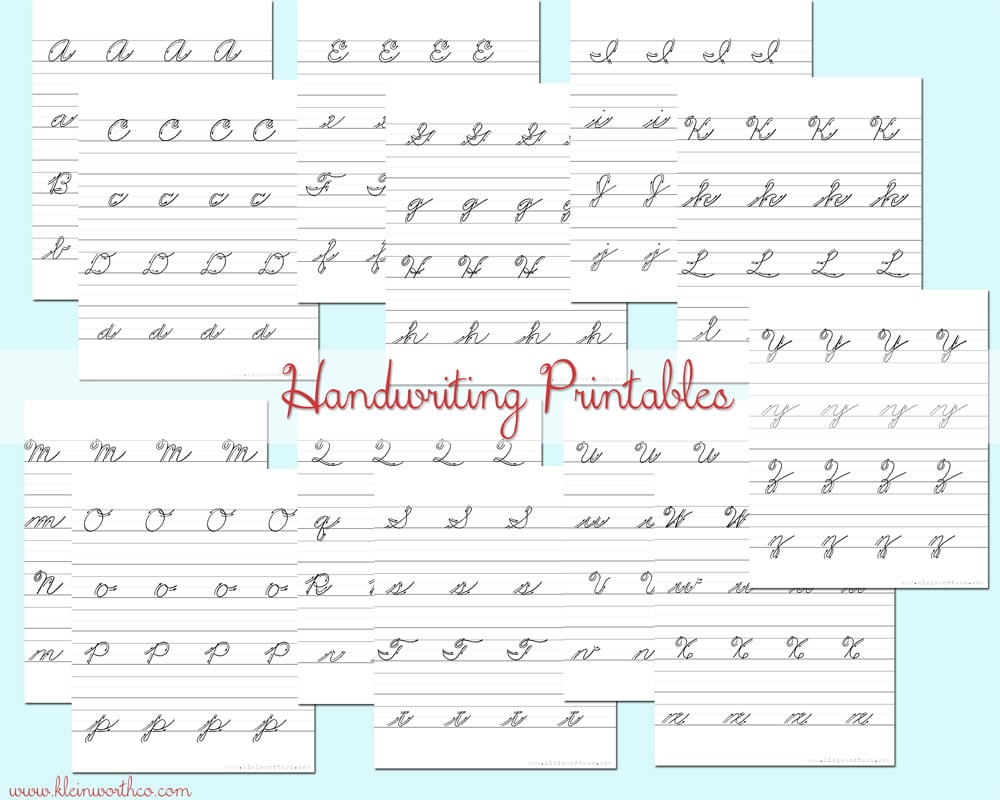
Cursive Handwriting Practice Sheets
Don’t miss these great ideas from these bloggers….
free printable initial wall art from burlap and blue
Organizational Printables from landeelu.com
To see where I am linking today- visit HERE
Easy Kids Crafts Room Decor DIY
*Disclosure: Sponsored Post- I have been compensated for this post either monetarily or with product. All opinions are truthful & my own.
Hi Everyone!!! Happy to see you today! I have been up to my eyeballs in projects for about the past week. I have been focused on trying to spruce up the girl’s room. Ever since moving in here it has been bugging me. Then shortly thereafter the largest frame on their largest wall broke. So they have had this huge blank wall for a while now & it finally bothered me enough that I did something about it the other day.
I was so thrilled when I was offered the opportunity to be a part of the Summer Kids’ Crafting Streat Team for July. Summer is a great time to craft with your kids. I had so much fun working with the girls to find out what they wanted for their room. I was so inspired by Plaid Kid Crafts & so were they. We decided that the first issue we would tackle was that huge blank wall & then see where our creativity took us from there.
Easy Kids Crafts Room Decor DIY
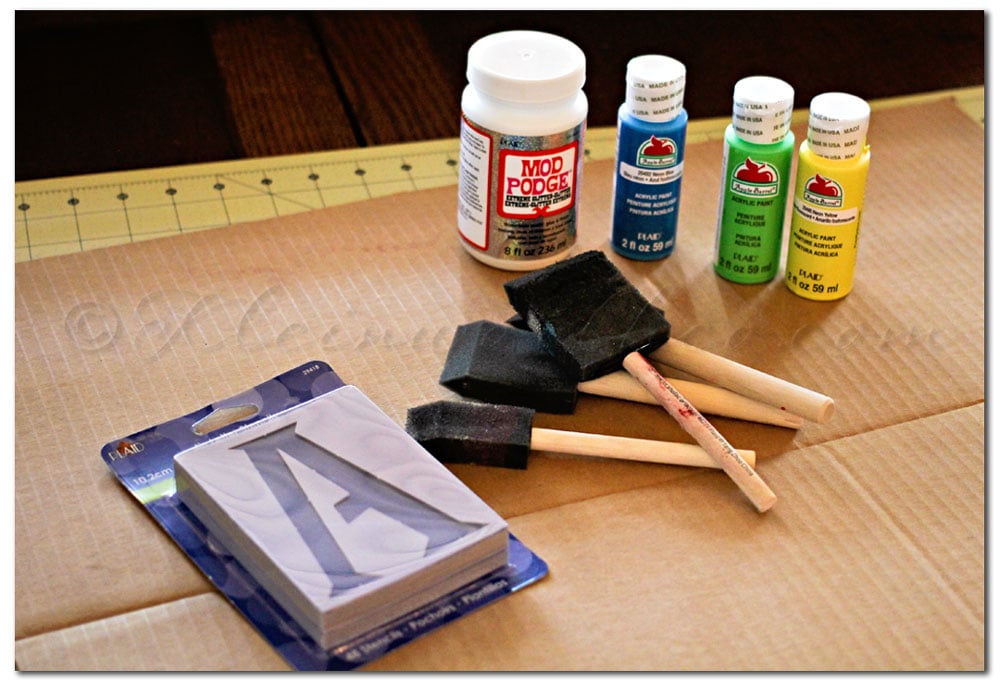
I started out with these items from my Plaid kit I was sent. Then I added a few of my own things I had on hand. I am already a HUGE Plaid user – so I was thrilled to work on a project with them.
Product list:
Mod Podge Extreme Glitter
Plaid Stencils
Plaid Apple Barrel Paints in 20492 Neon Blue, 20487 Neon Pink, 20489 Neon Orange, 20491 Neon Green, 20408 Gloss White, 22814 Tropical Blue
Cardboard
Rope
Painting sponges
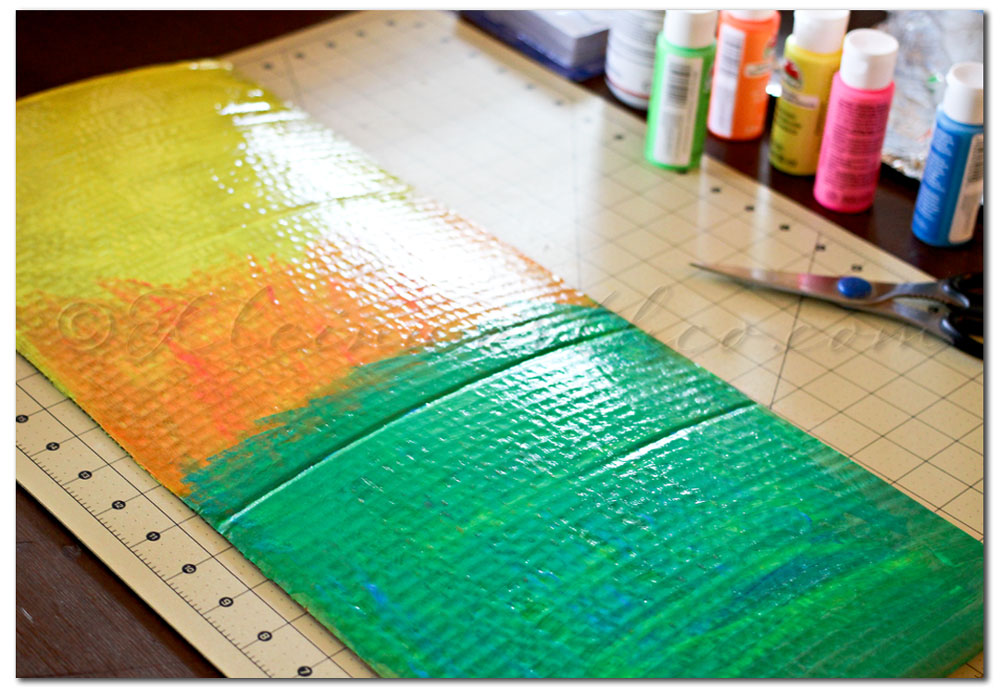
First I painted on the yellow at the top, then mixed the orange & pink in the middle, then mixed the green & neon blue at the bottom. Let dry.
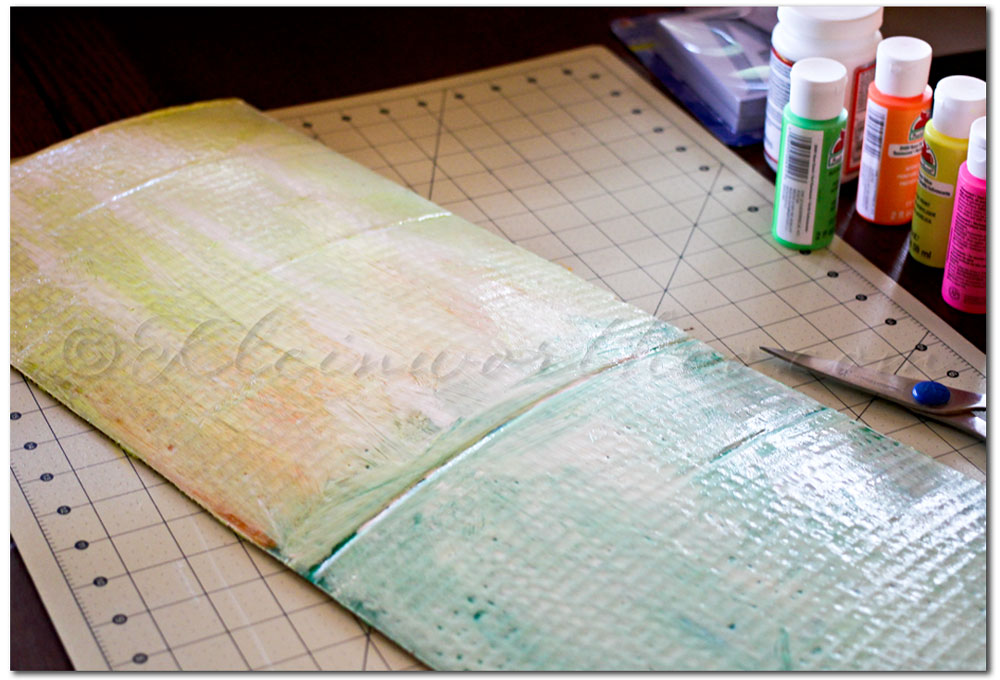
Then I coated with white – rubbed off some with a paper towel to not only let the colors back through but to give a more distressed look.
I added the Tropical Blue paint to the bottom on the blue/green part to give it a more ocean feel. Let dry.
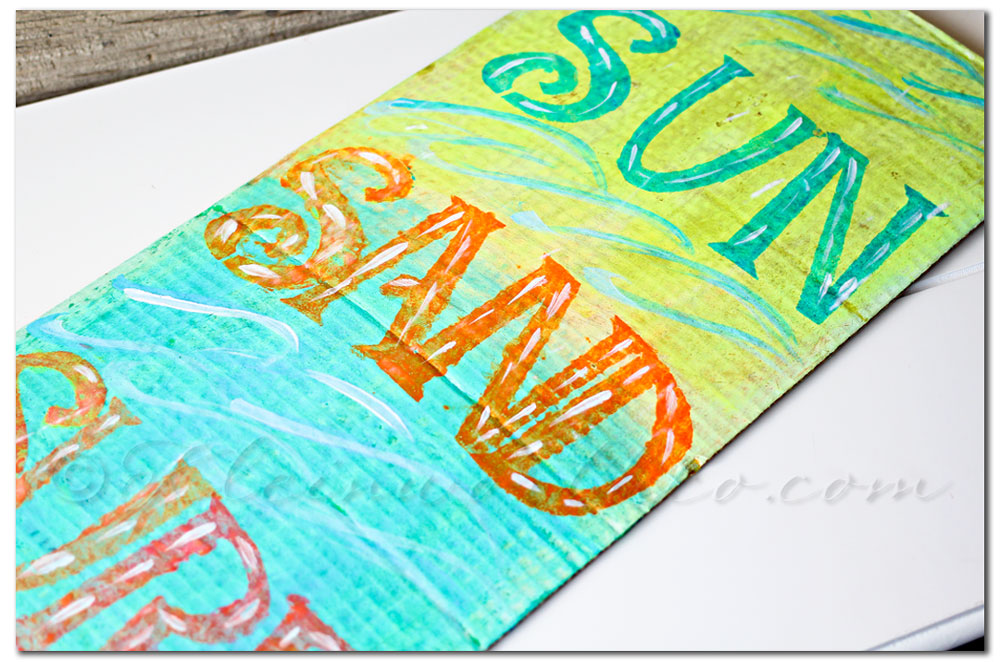
Then I stenciled on my letters. Painted on some ocean waves freehand. Let dry again.
Then the REALLY FUN PART!!!! Once it was dry I added 2-3 coats of Mod Podge Extreme Glitter. OH MY GOSH- I love this stuff. Can I tell you a secret?? Before my Plaid box arrived- I had never used Mod Podge before. GASP!!!! I know, right??!!! I don’t know why- I just never did. But I can tell you I am TOTALLY HOOKED!!! Be prepared to see a whole lot more projects using all variations of Mod Podge. OH YES- it’s my new favorite toy.
So I let it dry between coats – which it dried REALLY FAST. Once finished I punched holes in the corners for the rope & tied it through. So simple. The whole project only took a couple hours & the girls had so much fun helping me. They LOVE their new art in their room. Now we will be using these same colors with their already neutral base colors to punch up the fun in there.
Want to find out more about Plaid & their awesome products??
-
Facebook: https://www.facebook.com/InspiredByPlaid
-
Twitter: https://twitter.com/PlaidCrafts
-
Pinterest: https://pinterest.com/plaidcrafts/
Don’t forget to come back & join me on Mondays for Project 52
To see where I am linking today- visit HERE
Want more Plaid Kids Crafts?? Check out all of these…
*Disclosure: Sponsored Post- I have been compensated for this post either monetarily or with product. All opinions are truthful & my own.
[jetpack_subscription_form]
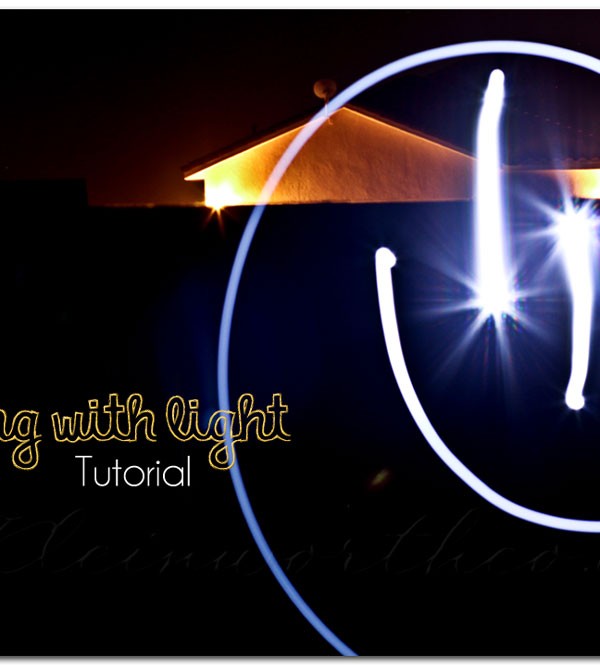
Drawing with Light Tutorial – Project 52 Week 28
Drawing with Light
It’s really quite simple & the kids will have some summertime fun.

But before I get in to the tutorial I have to share with you this image I captured of the fields around our house. This is after all Project 52- so I need to share with you an image that was taken this past week 🙂 I just love the golden tones of this particular shot.
Okay- so now on to the fun stuff. First thing- you are going to need a tripod or some other steady surface to set your camera on because your shutter is going to be SLOW.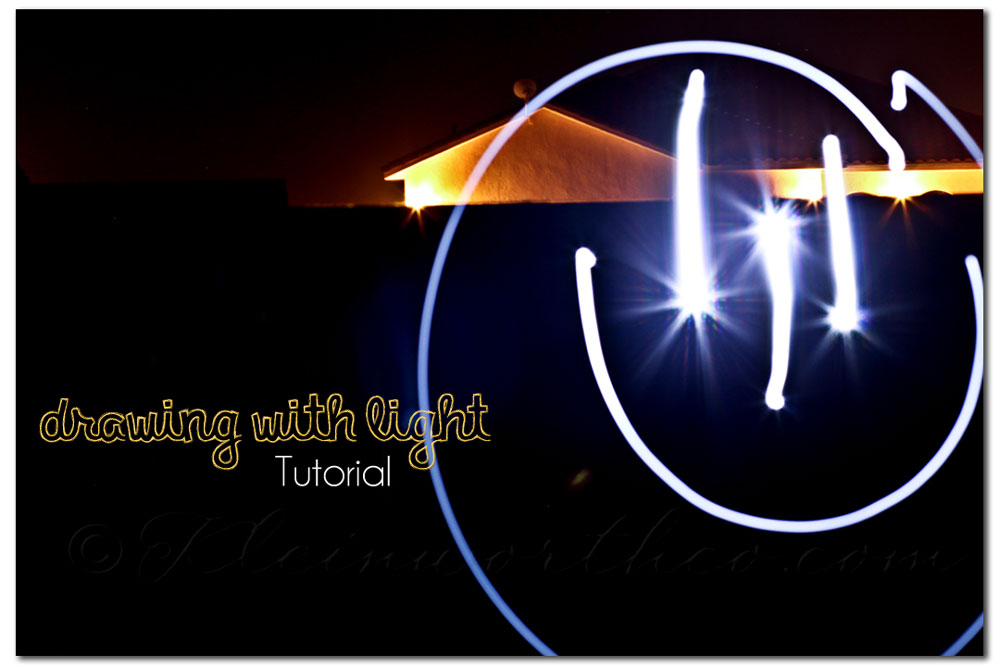 Settings for a DSLR should be set to Manual ISO 100 f/3.5-5 depending on how many people you have in your shot. SS 10-30 seconds.
For point & shoot style camera- choose the night or fireworks setting. You will have less control over the length of time your shutter stays open unless you have a manual setting & can follow the same settings as listed for DSLR. The key here is to not have a super deep depth of field so that you are keeping the people drawing out of focus. The shutter speed will depend on how much you want in the shot. I found that using a flashlight with a click button on/off worked well. That way we could control when the light was on. You could use glow sticks if you like- but you will have to have the kids move them to behind their back’s when they are done drawing.
 I had my son stand in front of me with the lights on- I took a single test shot to make sure I was in focus- you will need to manually focus. You may need a couple test shots for this. Once you get your focus- don’t move your tripod & try to have the kids keep their feet in one place even though their arms will be moving . This is part of the fun to see who can do all these crazy things with their hands while keeping their feet in one place.
Then we turned out the lights. I gave the countdown- when I said “GO” I pressed the shutter button & he clicked on the light- drew what he wanted to & then clicked it off when he was done. I found that even with the longer things he wanted to write- 15 seconds was more than enough time & we had extra time where the shutter was hanging open a lot of the time. So I just started adjusting the shutter speed accordingly. It’s super fun to see how creative they get with the things they want to draw. We had shapes & then he tried to write messages.
OR- you can just flip the image in Photoshop if it’s too hard for them. My son liked the challenge of writing backwards.
If it’s too light out where you are – like it is for me (doesn’t get really dark until 10-10-:30 here in the summer) then you could do this in a dark garage.
 Have fun- as far as processing, not much needs to be done to images like these.
That makes it even better in my book. I think I only sharpened these & sized for the web.
Give it a try- the kids will laugh until they are aching.
The P52 Details
* Post 1 photo or as many as you like each week on Mondays.
* The button or text link should be present in your post- but not absolutely necessary.
* Please visit some other blogs & leave some love & encouragement.
* Submit the URL of your blog post – not your home page.
Project 52
Grab the button HERE
To see where I am linking today- visit HERE
[jetpack_subscription_form]


