
Happy 4th of July!!!
I hope you all have some really great things planned out for today! We kick off our 4 days of celebration today with a parade – the hubs & all the fire engines will be there throwing candy for the kids. That is always fun & I hear there is a lot of community spirit here. Can’t wait to see that. Then there will be the 1st of many fireworks shows late tonight. Since the sun isn’t totally set until about 10pm here- it will be a very long day. I think I may try to catch a nap if I can sometime this afternoon before heading back out.
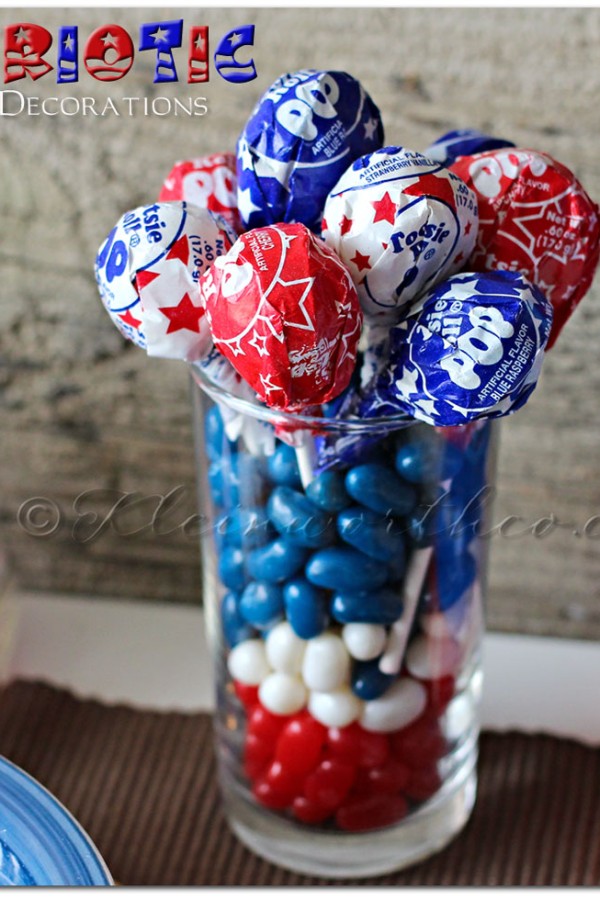
As I told you yesterday- I wanted to make some cute little table decorations to make all the festivities just a bit more fun.
So along with the luminaries from yesterday- I also made these
Patriotic Table Decorations

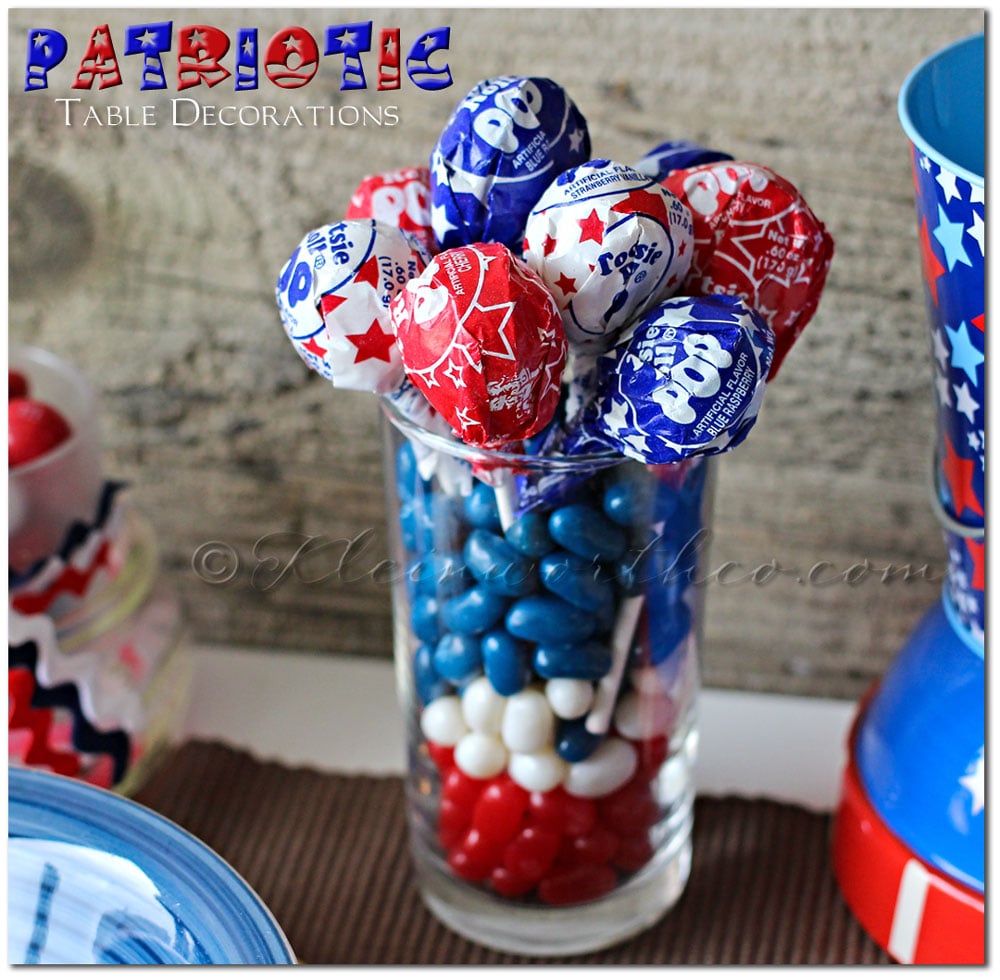
So simple- with Jelly Bellies & Tootsie Pops.
Then as the night goes on- the kids have some treats to keep them happy while they wait for the fireworks to start. 🙂
Have a SAFE & HAPPY 4th of July!!!
Be FIRE SAFE!!!
To see where I am linking today- visit HERE
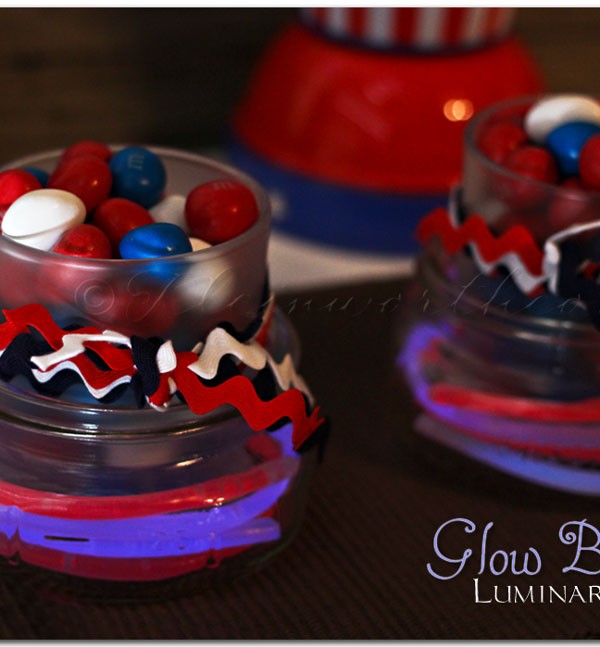
Glow Band Luminaries
Hi everyone!!! Can’t believe that tomorrow is the 4th of July!!!
Exciting things happening- wanted to share some last minute decorating ideas with you this week. I decided that I wanted to make some table decorations. I never really get too festive in this department but I thought with all the gatherings going on- there will be a lot of food involved & the tables should probably look cute too! So I made these super simple…
Glow Band Luminaries
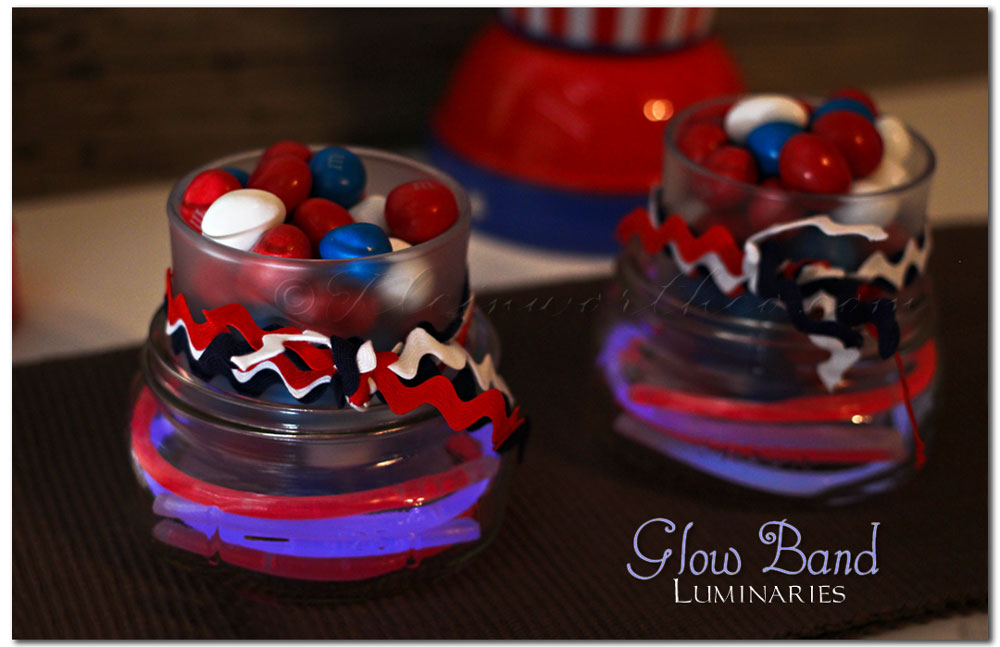 I love these because they bring a pop of color & are fire safe too. (you know me- always worried about fire safety)
Just take a short mason jar & stick some glow band bracelets in there (I bought mine at Target $1 bin area)
Then I took another taller jar & stuck it in the middle- filled with M&M’s & tied some decorations.
They will make your party come alive once the sun goes down!
If you are looking for more 4th of July inspiration- or maybe you missed one of these posts.


Simple Patriotic Ice Cream Sandwich
Red White & Blue Daiquiri (cocktail/mocktail)


Patriotic Cookie Dough Brownie Bars

Hope this gives you some great ideas for your festivities this 4th of July!!!
I will have one more quick decorating idea for you tomorrow too. Have a great one!
Don’t forget to come back & join me on Mondays for Project 52
To see where I am linking today- visit HERE

[jetpack_subscription_form]

No Sew Patriotic Hair Ties
First- I want to say just how deeply saddened over the loss of the Arizona Hot Shot Crew. As most of you know- my hubs is a fire chief. But what you probably don’t know is that wildland is his specialty. Way back in the day he was a Hot Shot for USFS long before I met him. Through his career he has always been on wildfires- even while working for municipalities- he’s always been sent & has been on nearly all of the largest & most catastrophic fires in recent history. But this touches a bit closer to home for me. About 8 years ago- he was nearly killed in a burnover incident. The details are great & I won’t go in to them now. But having gone through that- this devastation is too much to handle sometimes. We are absolutely distraught with this news.

My hubs found this image & sent it to me. GaryVarvel.com
This breaks our hearts.
This week I’m going to be focusing on all the 4th of July activities we have coming up. It’s going to be a very full week. Especially with the 4th being on Thursday- that means a 4 day weekend for us PACKED full of things happening in all the different communities that the hubs is responsible for. I’m pretty sure we have at least 2-3 different firework shows, BBQ’s every day & community gatherings & parades filling up the week. So my goal is to keep it low key. Because of that I decided to keep the sharing easy too. This week I’m focused on last minute things that you can create to make your holiday festive!! So I bring you today…
No Sew Patriotic Hair Ties
I whipped these up in a couple minutes so the girls would have something cute to pair with their 4th of July clothes.
So simple & adorable.
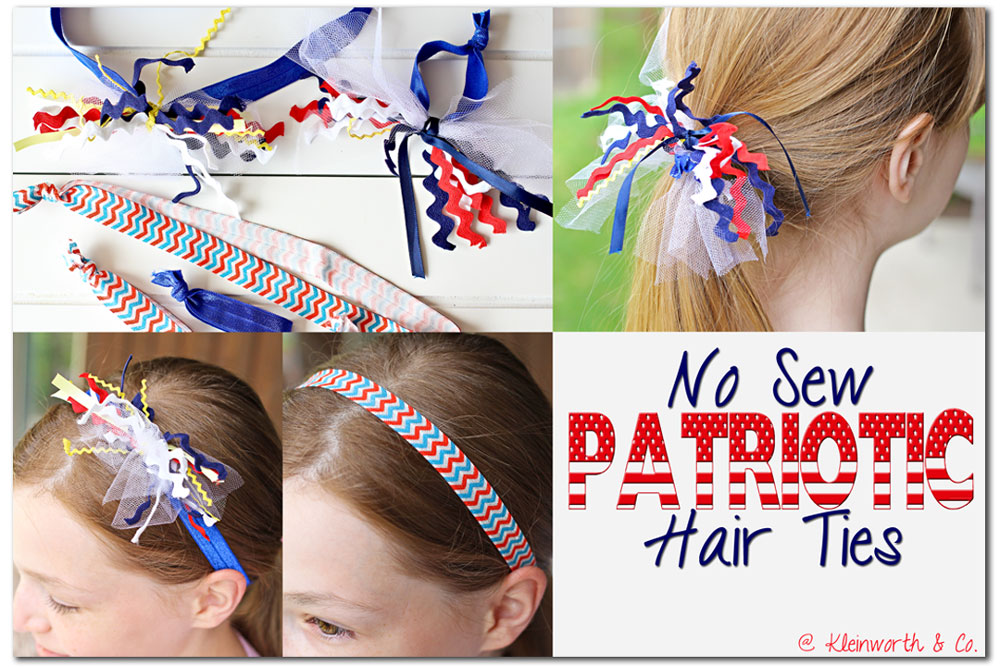
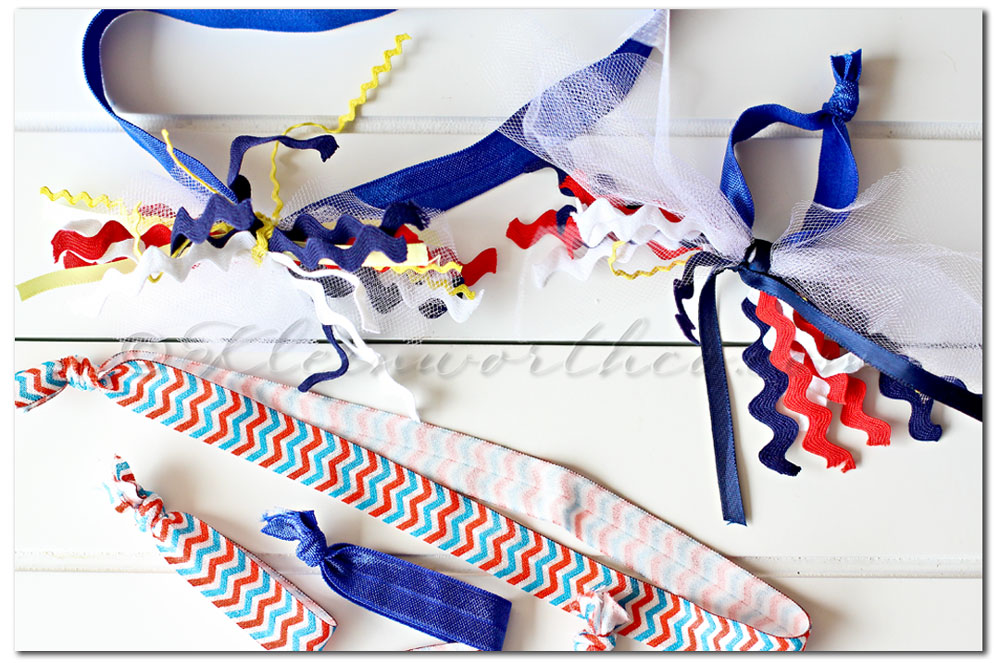
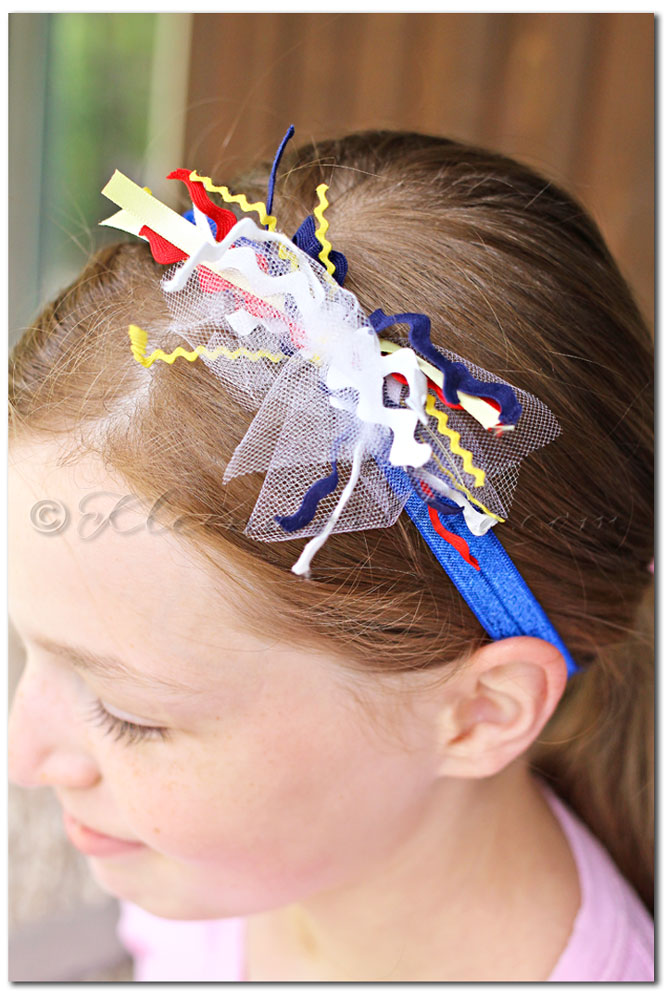
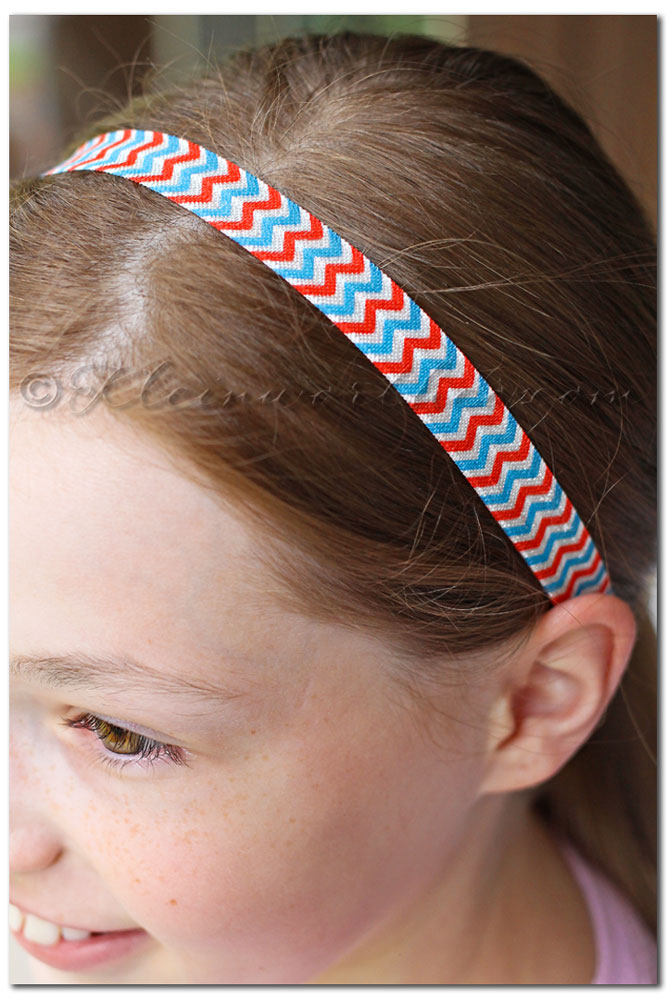 Then just tie the poof on to the hair tie or head band.
I like these because once 4th of July has passed- I can untie it & they can continue to use the bands all year long.
Have a FABULOUS Tuesday!
Don’t forget to come back & join me on Mondays for Project 52
To see where I am linking today- visit HERE
[jetpack_subscription_form]

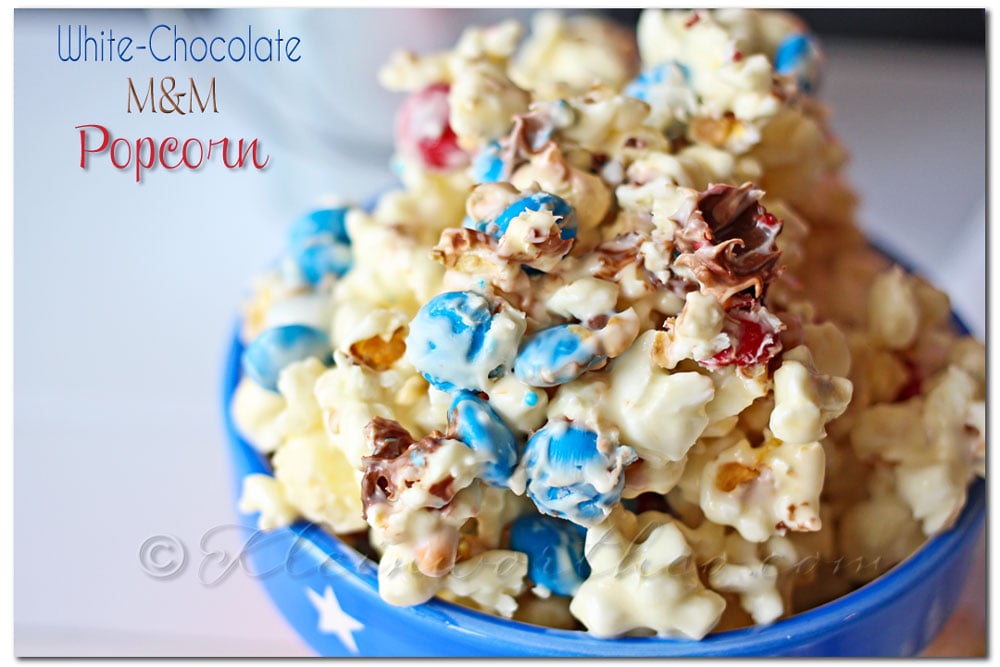
White Chocolate M&M Popcorn
White Chocolate M&M Popcorn is an easy dessert recipe for popcorn coated with melted white chocolate & loaded with patriotic M&M’s. Perfect holiday treat!

Oatmeal Raisin Muffins w/ #LACTAID
**Disclosure- I was sponsored by LACTAID for this post & future posts. All opinions & thoughts are my own.
As I have told you before- I have incorporated LACTAID into many of my recipes lately after I was able to sit in on a LACTAID Briefing Session with dietitian Michelle Harrington, Cooper Munroe of The Motherhood & celebrity chef Melissa d’Arabian back in May. Some of you may have seen Melissa d’Arabian Wednesday on the TODAY Show talking about cooking lactose-free dinner options with LACTAID. You can watch the video of that segment below.
Cooking with LACTAID has been just as easy as when I was previously cooking with milk. One just substitutes for the other & there really isn’t any change in flavor. So I decided to share with you a recipe that I have been making quite often in my quest to stop buying pre-packaged breakfast foods for the kids. This means that every couple days I bake something & a lot of the time it’s muffins or a breakfast cake/bread of some sort. One of the kid’s favorites are these
Oatmeal Raisin Muffins
They taste like an oatmeal raisin cookie- but so much healthier.
Adding LACTAID to them has made it so everyone in the house can enjoy them too.
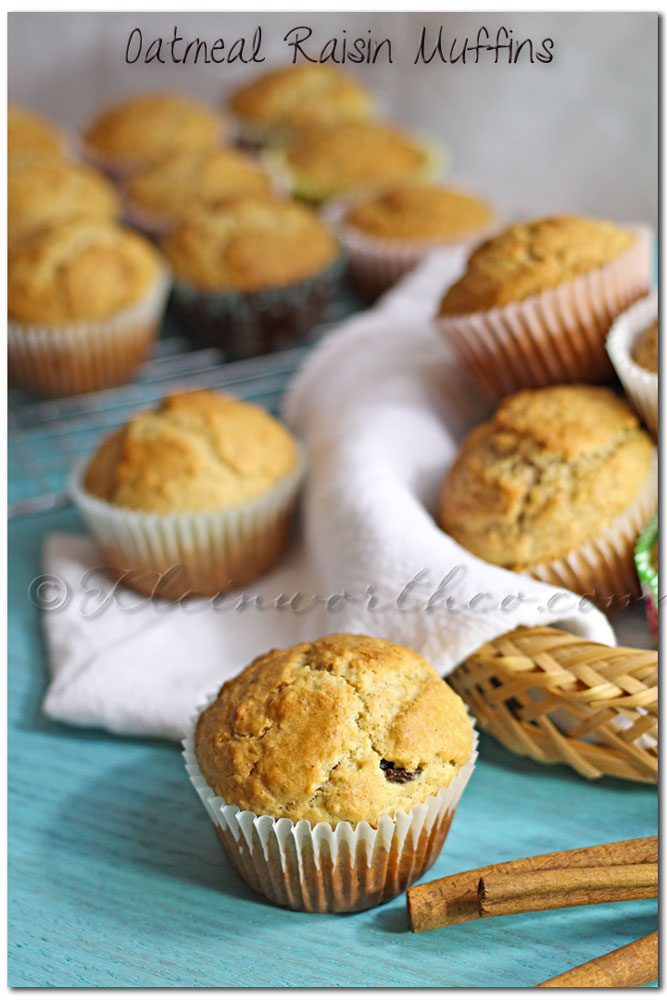
Oatmeal Raisin Muffins w/ #LACTAID
Ingredients
- 2 cups LACTAID
- 2 cups quick cooking oats
- 2 eggs
- 1/2 cup vegetable oil
- 2 cups all-purpose flour
- 1/2 cup granulated sugar
- 4 tsp baking powder
- 1 tsp salt
- 2/3 cup raisins
- 1 tbsp cinnamon
- 2 tbsp cinnamon/sugar mix for sprinkling
Instructions
- Preheat oven to 425 degrees.
- Line muffin tins- set aside.
- In small bowl combine LACTAID & oats & let soak for 10-15 minutes.
- In mixer bowl- beat oil & eggs- then add oatmeal/LACTAID mixture.
- Add flour, sugar, baking powder & salt to your wet mixture & beat until just combined.
- Spoon into prepared pans.
- Sprinkle with cinnamon/sugar mixture.
- Bake 25 minutes or until they spring back when touched.
Check out Melissa d’Arabian on The TODAY Show Wednesday!
Melissa shared a recipe for Chicken with lactose-free Creamy Mushroom Sauce. Watch HERE.
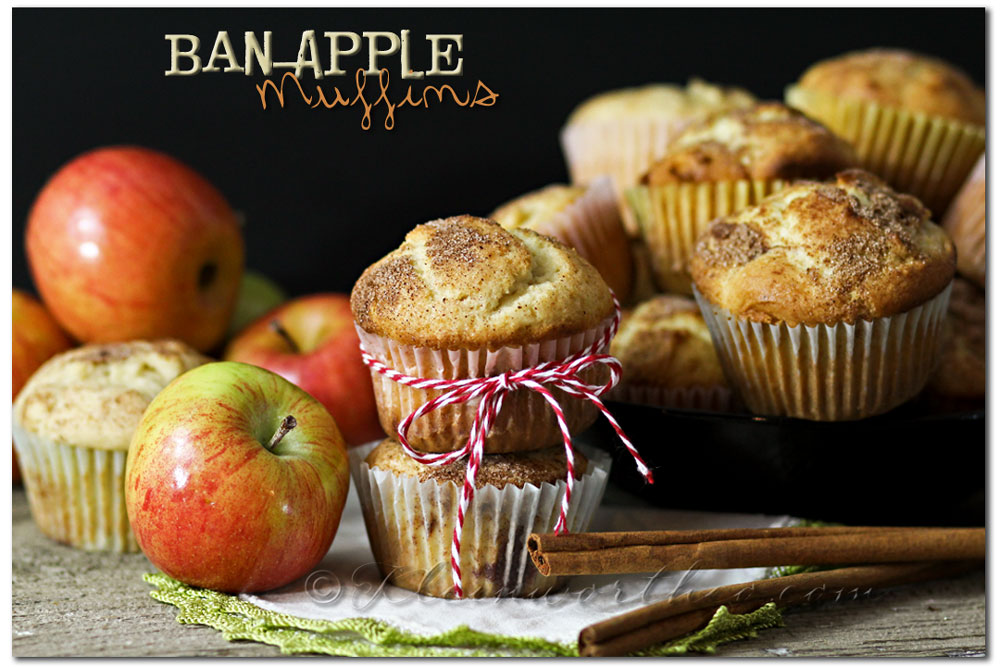
You can also view/print my other LACTAID recipe for – Ban-Apple Muffins
Melissa d’ Arabian
LACTAID Brand Spokesperson – Mom of four girls, Author of NY Times best selling cookbook, Ten Dollar Dinners, Celebrity Chef & Television Host, Was on live segments on the TODAY Show with Kathie Lee & Hoda
Michelle Harrington , R.D.
LACTAID® Regulatory and Nutritional Affairs Manager, Pediatric Dietitian at Children’s Hospital in Philadelphia
Don’t forget to come back & join me on Mondays for Project 52
To see where I am linking today- visit HERE
[jetpack_subscription_form]
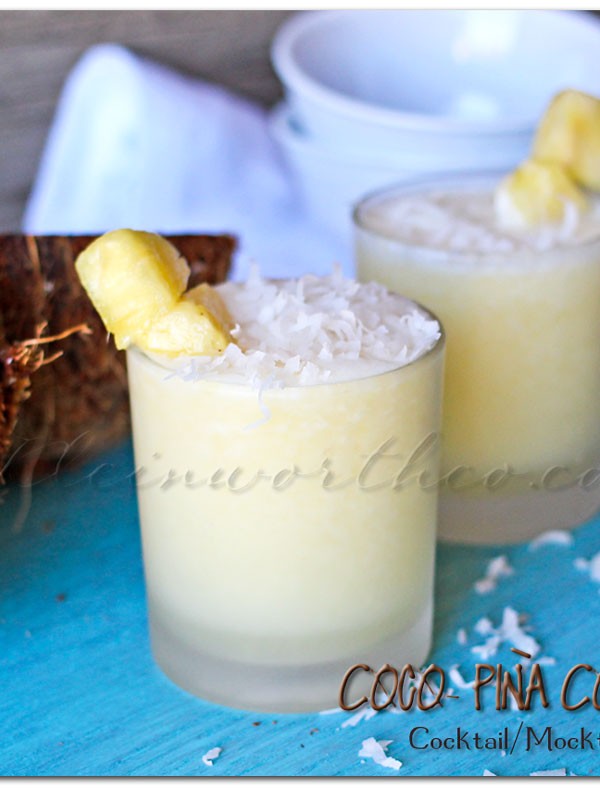
Coco Piña Colada
One thing about me- I’m crazy for all things coconut. I love coconut flavored treats, the smell of coconut & especially the smell of sunscreen when it has that coconut scent. I can’t get enough. It takes me home & reminds me of the days of spending my summers with my aunt & cousins either playing by the pool or loading the surfboards in the back of the VW & enjoying the beaches of So Cal. Cherished memories that all come flooding back with every hint of coconut. So it’s no surprise that I use it in a lot of recipes- Piña Colada is no exception. Only this time I had to add even more coconut to amp it up a bit. 🙂
Coco Piña Colada
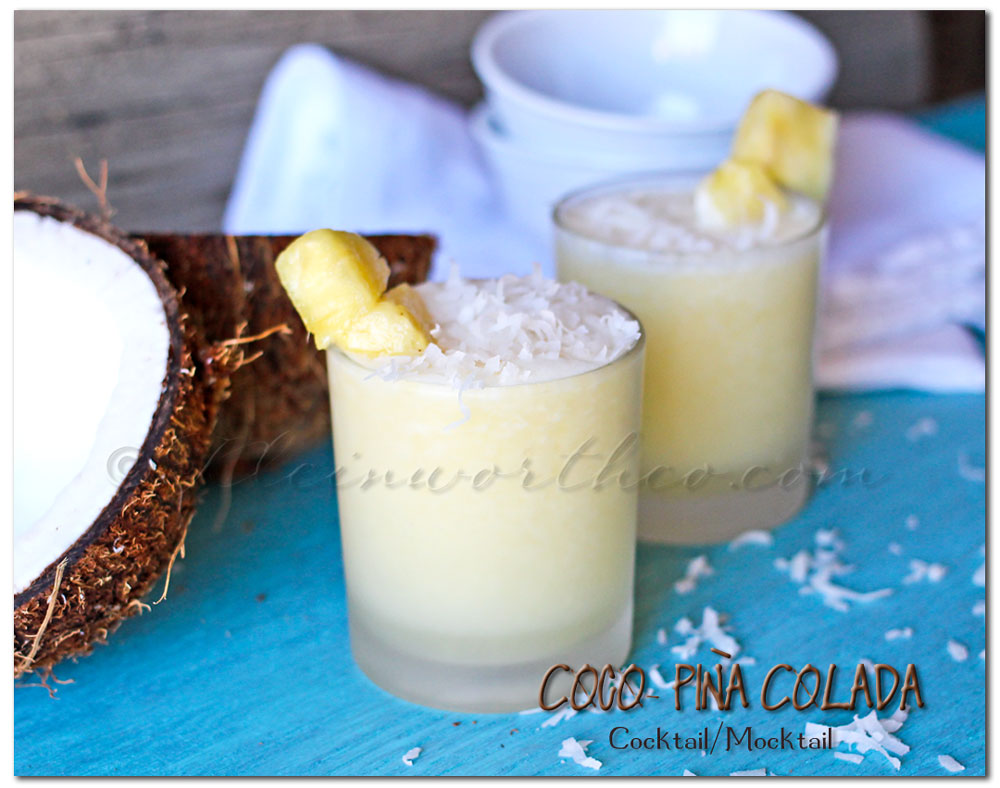
Coco Piña Colada Mocktail/Cocktail
Ingredients
- 2 cups Pineapple Juice
- 1 cup chunk pineapple + more for topping
- 6 oz cream of coconut
- splash lime juice
- 1/3 cup sweetened coconut + more for topping
- 1-1/2 cup ice
- 1 oz clear rum if desired
- *I like my drinks the kid friendly way- so we made this without the rum & then those that like it added it after we poured everyone else's)
Instructions
- Add all ingredients to blender & pulse until ice & pineapple chunks are the desired consistency that you are after- should be thin enough to go smoothly through a straw.
- Pour into serving glasses & top with additional coconut & pineapple.
This was really yummy & really took me back home. I could drink these all day- everyday.
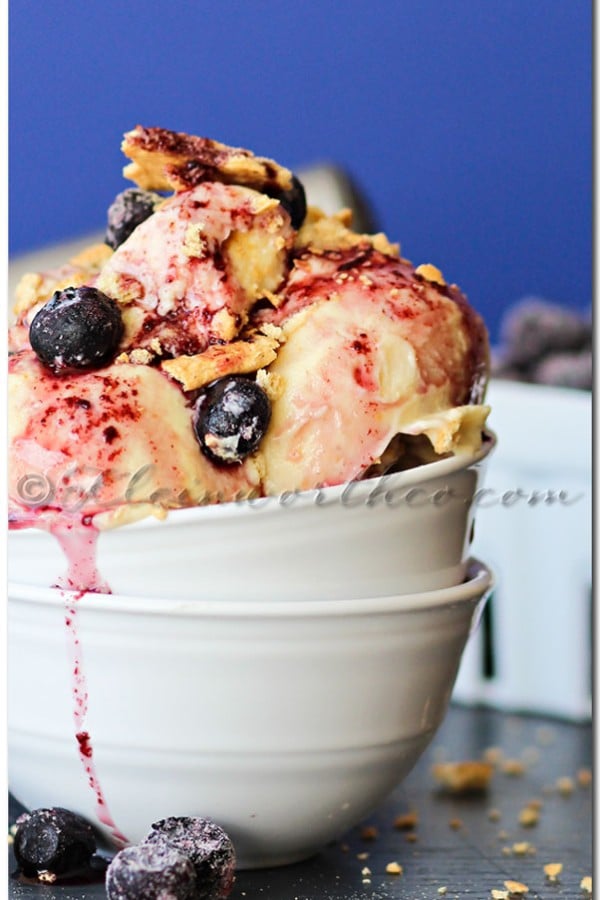
Blueberry Pie Frozen Yogurt
One of my favorite frozen summer recipes is frozen yogurt. I love making my own & I certainly love jazzing it up to create my own flavors for more fun. I got really good at making frozen treats when we lived near Death Valley & spent most of our year hovering around 100 degrees. I was making some sort of easy frozen dessert almost every day. This time I decided to use some of the blueberry syrup that I made & add it to my simple vanilla frozen yogurt. It was SO GOOD!
Blueberry Pie Frozen Yogurt

Blueberry Pie Frozen Yogurt
Ingredients
- 1 container 16 oz low fat vanilla yogurt
- 2 tsp vanilla extract
- 1 pkt low fat french vanilla pudding mix
- 1 can 14 oz sweetened condensed milk
- 1/2 cup low fat milk
- 1/4 cup blueberry syrup
- 1/2 sleeve graham crackers- crumbled
Instructions
- Combine all ingredients except syrup & graham crackers in mixing bowl & beat until well combined.
- Transfer to ice cream maker & churn for 15 minutes.
- Transfer to air tight container & fold in graham crackers & syrup- not mixing too much
- Cover & freeze at least 4 hours to firm up.
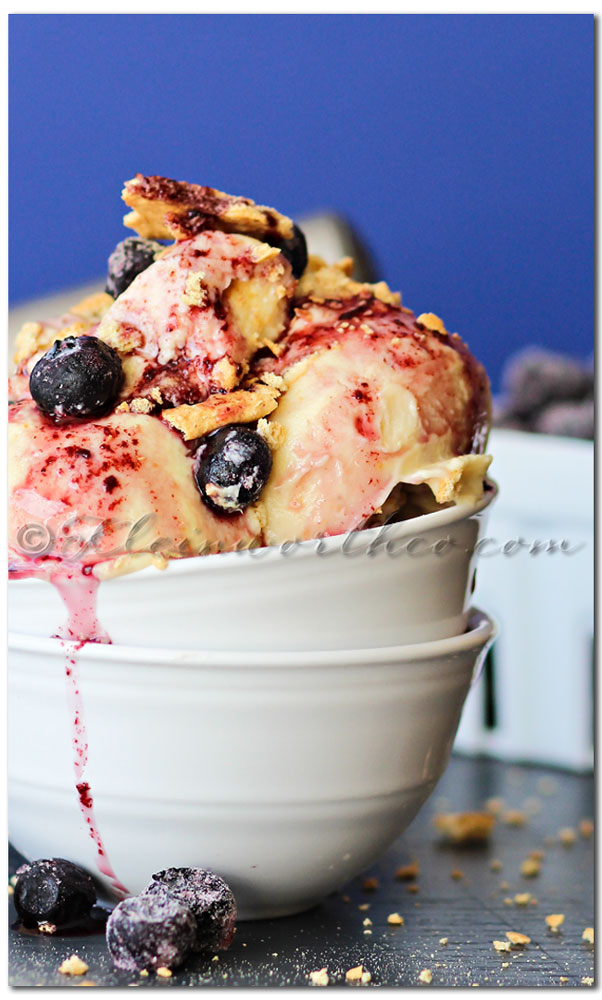
This is so simple & a great way to cool off this summer!
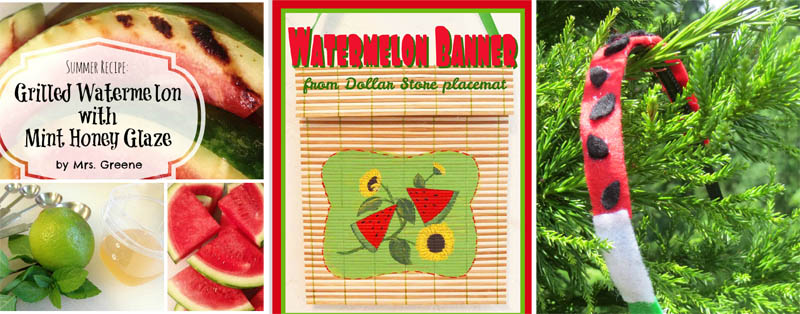
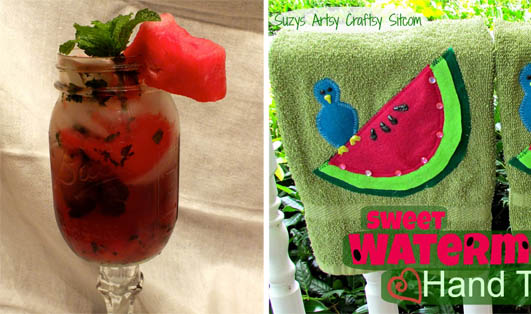
Also- We are wrapping up Watermelon week today. Be sure to check out these AMAZING ideas from these talented ladies.
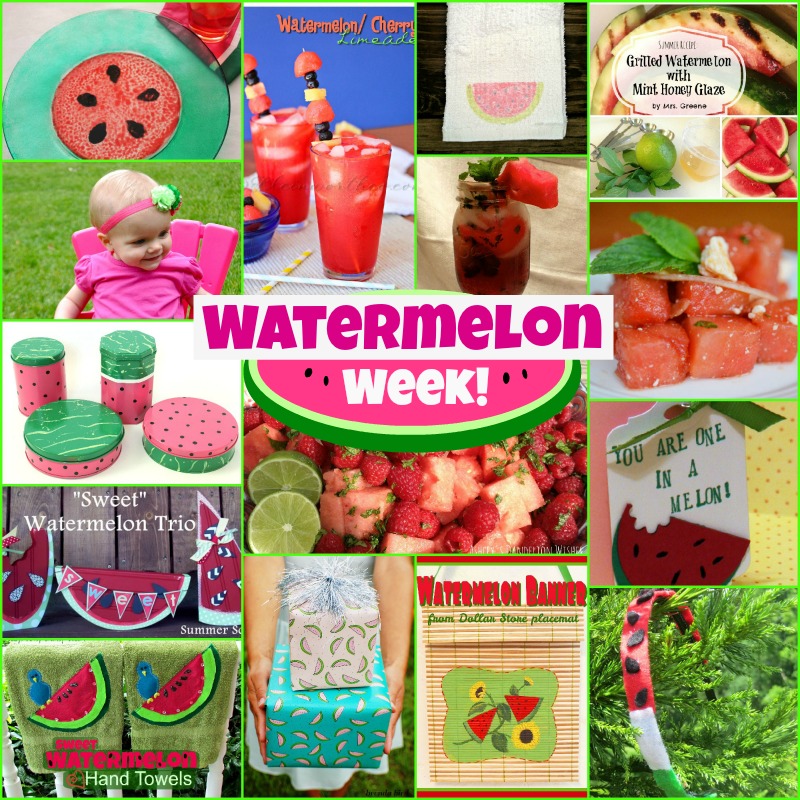
Brenda: https://wp.me/p39A28-jU wrapping paper
Sarah https://www.craftquickies.com/a-sweet-watermelon-inspired-outfit-for-a-sweet-little-lady/
Summer https://www.summerscraps.com/2013/06/sweet-watermelon-trio.html
Don’t forget to come back & join me on Mondays for Project 52
To see where I am linking today- visit HERE
[jetpack_subscription_form]
Cherry Limeade Ice Cream Soda Pops
Today is Ice Cream Soda Day!!!
So I decided what better way to celebrate than to make Ice Cream Sodas our theme for the June Recipe Round-Up.
We have grown our monthly part this month & we have 10 of us together sharing our favorite take/ spin or twist on the classic Ice Cream Soda.
After doing a more traditional ice cream soda recipe & the images not working out at all- I decided to try again with a different take. I decided to take my favorite drink- Cherry Limeade & turn it into not only an ice cream soda but to then turn it into a frozen dessert & make ice popsicles with it. Turned out SO GOOD!


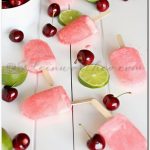
Cherry Limeade Ice Cream Soda Pops
Ingredients
- 3 cups Cherry Limeade Soda
- 1/4 cup Lime Juice
- 1/4 cup Grenadine
- 1/2 scoop Vanilla Ice Cream per pop
Instructions
- Combine liquid ingredients in small pitcher & stir to mix.
- Scoop ice cream into each pop mold & push down into bottom.
- Slowly pour your liquid mixture on top of ice cream.
- Insert stick- ice cream in the bottom should hold it in place.
- (if soda makes it float up- clip a clothes pin to the stick to weight it down.
- Place in freezer & allow to firm up at least 4-5 hours before removing from mold.
- Serve immediately or store in airtight container in freezer or up to 1 week.

You have GOT TO try these this summer!!!!
Check out all the fabulous Ice Cream Soda Recipes posting for June’s Recipe Round-Up

Ice Cream Soda Cupcake from Chrissy @ The Taylor-House
Patriotic Ice Cream Soda from Kelly @ Mostly Homemade Mom
Ice Cream Soda from Emily @ Nap-Time Creations
Ice Cream Soda Cocktail from Jessica @ One Martini at a Time
Independence Day Ice Cream Soda Bar from Danelle @ Let’s Dish
Blackberry Vanilla Bean Ice Cream Soda from Krista @ Joyful Healthy Eats
Raspberry Ginger Ice Cream Soda from Julie @ White Lights on Wednesday
Vegan Ice Cream Soda from Tamar @ Random-osity
Ice Cream Sodas from Kim @ Little by Little
Cherry Limeade Ice Cream Soda Pops from Gina @ Kleinworth & Co.
Do you want to participate in future Recipe Round-Up’s & join in on the fun??
email Gina at Kleinworth & Co (chichomeschoolmama{at}att{dot}net) for details.
Also continuing on with Watermelon Week- be sure to catch the fun ideas shared today by these great bloggers.
Don’t forget to come back & join me on Mondays for Project 52
To see where I am linking today- visit HERE
[jetpack_subscription_form]
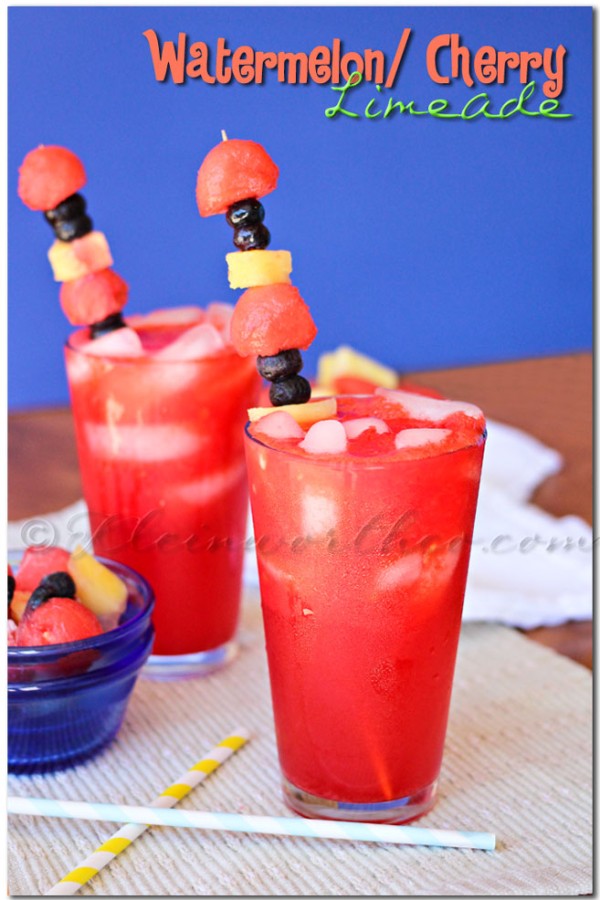
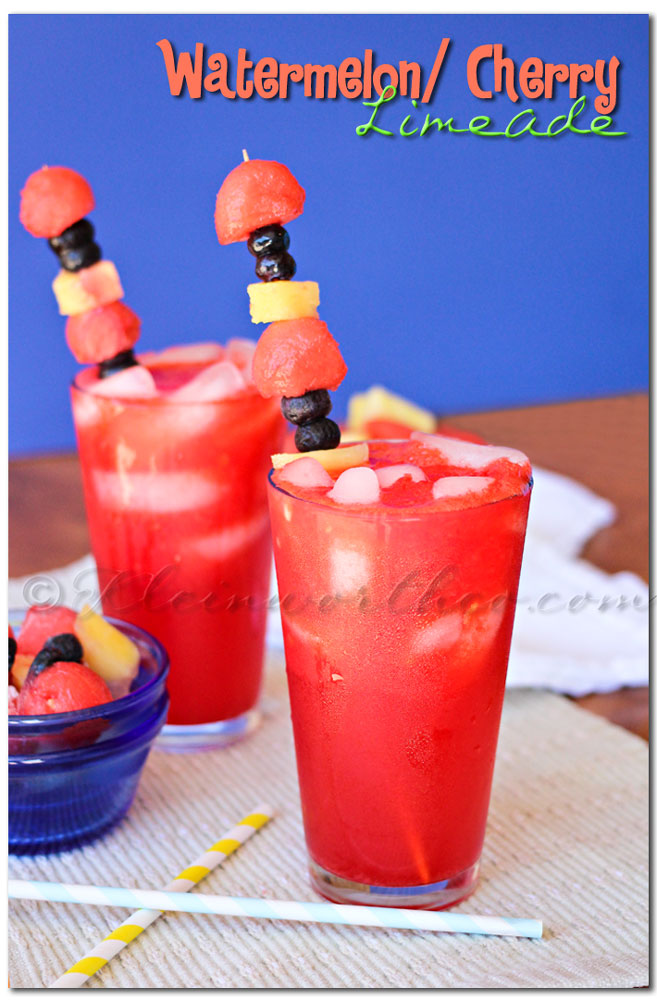
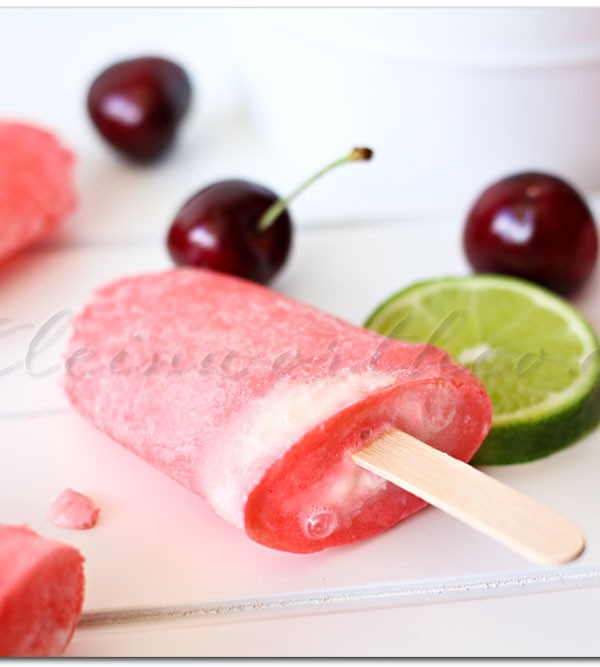
Watermelon Cherry Limeade
So excited!!! This week I have teamed up with 15 other fabulous bloggers for Watermelon Week!!! That means that all this week I have been & will be sharing with you 15 different things to do with watermelon. I’m super excited about it because the family is crazy for watermelon & I am always looking for new ways to use it. Watermelon is the one thing that just screams summertime doesn’t it??!! Every summer gathering involves watermelon & what better way to make those festivities more fun than by adding some of these watermelon ideas to them!!
For my recipe I decided to make Watermelon/Cherry Limeade
I have a super huge obsession with all things cherry flavored. So it was only natural for me to take that & add it on in to Watermelon Week!!
The kids love it OR you could add a little vodka to for more of a grown up drink. I’m not one for alcohol- so I keep mine original.

Watermelon/Cherry Limeade
Ingredients
- 1 pkt Cherry Limeade Powder Drink Mix
- 1/2 glass Lemon/Lime Soda
- 1/2 Glass Watermelon Puree
Instructions
- Add about 1/4 watermelon to blender
- Sprinkle in cherry limeade powder from packet & blend until you have a nice puree consistency.
- Pour over ice in glass to about the 1/2 way point
- Fill remainder of glass with soda
- Stir to combine. Add any additional garnish if desired.
- I added watermelon, pineapple & blueberries frozen on a skewer.
Check out these other AWESOME Watermelon recipes posting today- be sure to check back to catch all the others this week!!
Lindsey https://www.redheadbabymama.com/2013/06/summer-watermelon-mojito.html
Don’t forget to come back & join me on Mondays for Project 52
To see where I am linking today- visit HERE
[jetpack_subscription_form]

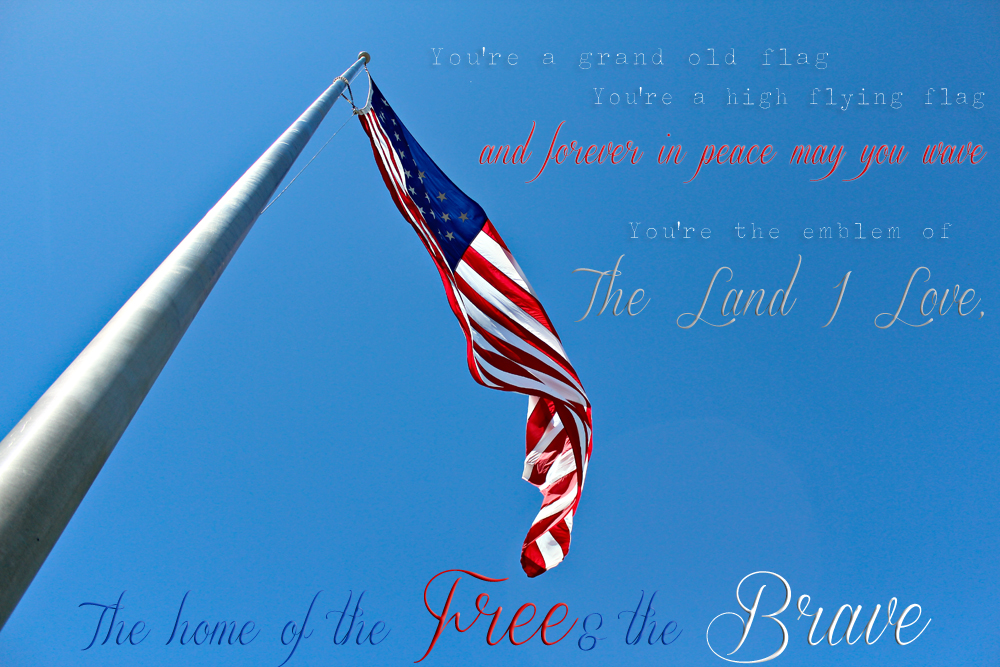
American Flag Printable
It’s flag day-
so I thought I would give you this American Flag Printable image that I captured this past weekend.
I have an obsession with capturing the flag. We can’t pass a flag pole without me having to snap at least one shot of it. In this case I was able to get right up close to it while we walked around Coeur d’Alene park. As you can see the weather was amazing & the vibrant colors of the flag against the blue sky was awe inspiring. I was so grateful for all the blessings we have being here in this country. I had to stop, take it in & reflect for a moment.
I had to add the verbiage from one of my favorite songs- You’re a Grand Old Flag
Download- print & enjoy as part of your Flag Day remembrance, or 4th of July decorations.
Don’t forget to come back & join me on Mondays for Project 52
To see where I am linking today- visit HERE
[jetpack_subscription_form]

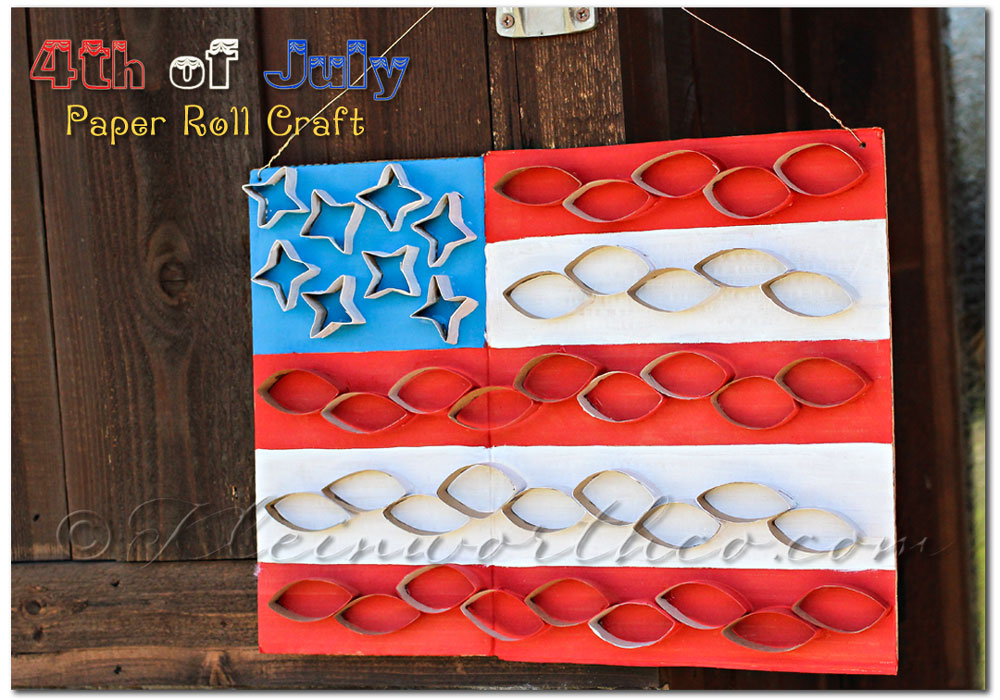
4th of July Paper Roll Craft
The hubs thinks I have LOST MY MIND. Yep- I save all the paper rolls in the house. I have this huge bag of them. He keeps saying “what on earth are you doing with all of these?? don’t you think you have enough by now” NOPE!! I don’t. I have all sorts of plans for these things & he just shakes his head & hopes that I find a new place to store them all. 🙂 Hehehe. Then I go & use a bunch for projects like these & then he sort of understands.
4th of July Paper Roll Craft
Yep- I just had to make a little painted decoration for the porch to help make it festive for the holiday. Flag Day is Tomorrow!!
I taped off & painted just a piece of cardboard. Then I cut & painted the rolls, glued them together & glued them on.
Obviously for the stars & pinched them to make them look more like stars. Added holes at the top & put a wire on for hanging.
I like this because I was able to re-purpose things around the house AND it’s super lightweight so I can hang in on just about anything.
Great project for the kids. My girls helped me with the cutting & pinching of the rolls.
Don’t forget to come back & join me on Mondays for Project 52
[jetpack_subscription_form]
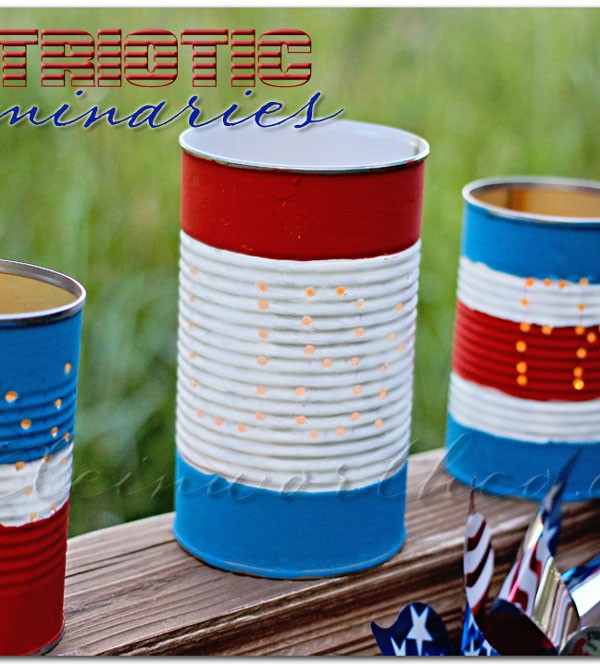
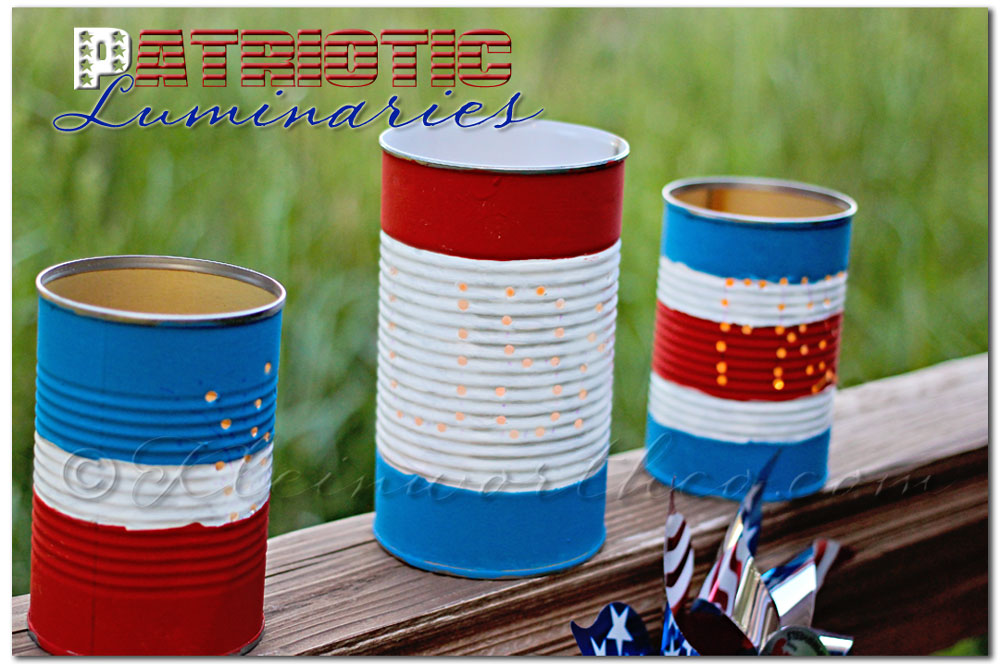
Patriotic Luminaries
There is something that I really love about summer gatherings- especially for 4th of July. It’s that wonderful theme of Americana decorated everywhere & the lovely glow all about. Be it from the late sunset, fireworks in the sky or luminaries decorated all about the back yard- it’s something I love. So I decided to make some of my own for this year’s 4th of July decorations.
Patriotic Luminaries
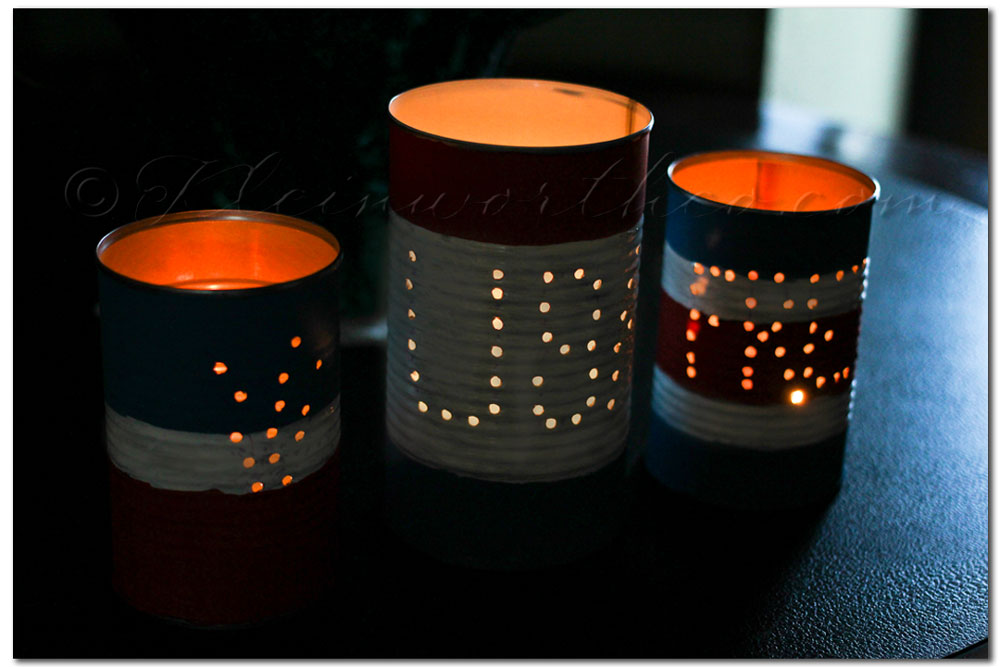
These were so simple. I just marked out where I wanted the holes & grabbed the drill & started making holes.
A couple coats of regular craft acrylic paint & that was it. They were done in a couple hours – start to finish.
**Now being a fire chief’s wife- I’m going to tell you that putting actual candles in these freaked me out. Open flame in the summer is something that keeps my hubs SUPER busy. So I am strongly advising the batter operated “candles” or you can stick a glow stick in these & get the same effect.
Happy holiday decorating!!
Don’t forget to come back & join me on Mondays for Project 52
To see where I am linking today- visit HERE
[jetpack_subscription_form]
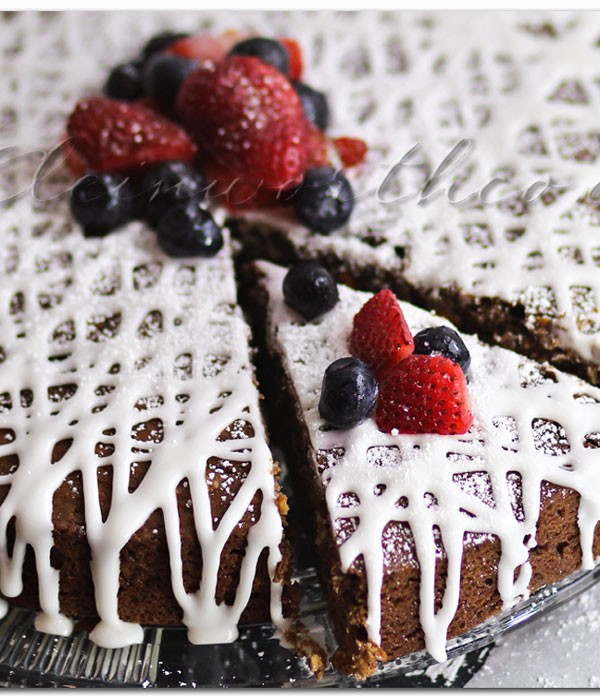
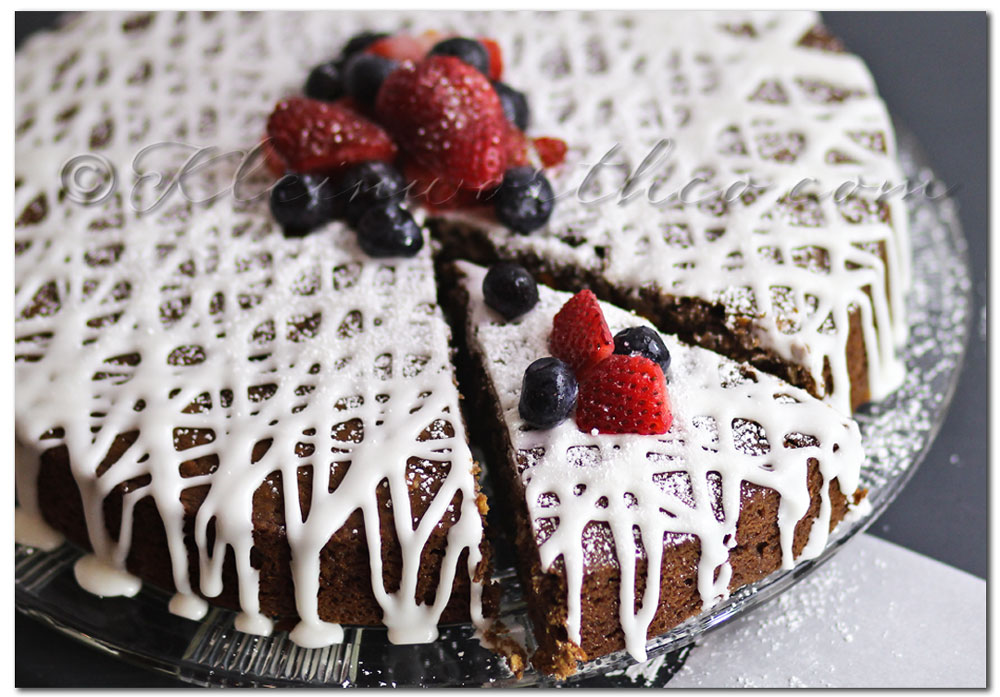
Chocolate Sweet Potato Cake
You all know that we have our weekly food co-op. We don’t get to pick & choose what gets put in it. We pay a flat rate each week & when we pick up our basket it’s always a surprise as to what we will get for the week. This sometimes ends up with us getting a bunch of things that we don’t typically eat- or flat out dislike altogether.
This past basket we received a sweet potato. NONE of us like them- not even a little bit. So we did have a fleeting thought to mail it to my mom as a joke since they like them. But we thought better of it. I decided to push my creativity & find a way to make it into something we would like. I knew that back in the 1940’s, during & after the war- things like sugar & butter were hard to come by & people like our great grandmothers & grandmothers were doing what they could to get creative in the kitchen while doing without. They made Potato Cake. I decided to adapt a recipe for potato cake & see if it would still come out good with the sweet potato. So I made…
Chocolate Sweet Potato Cake
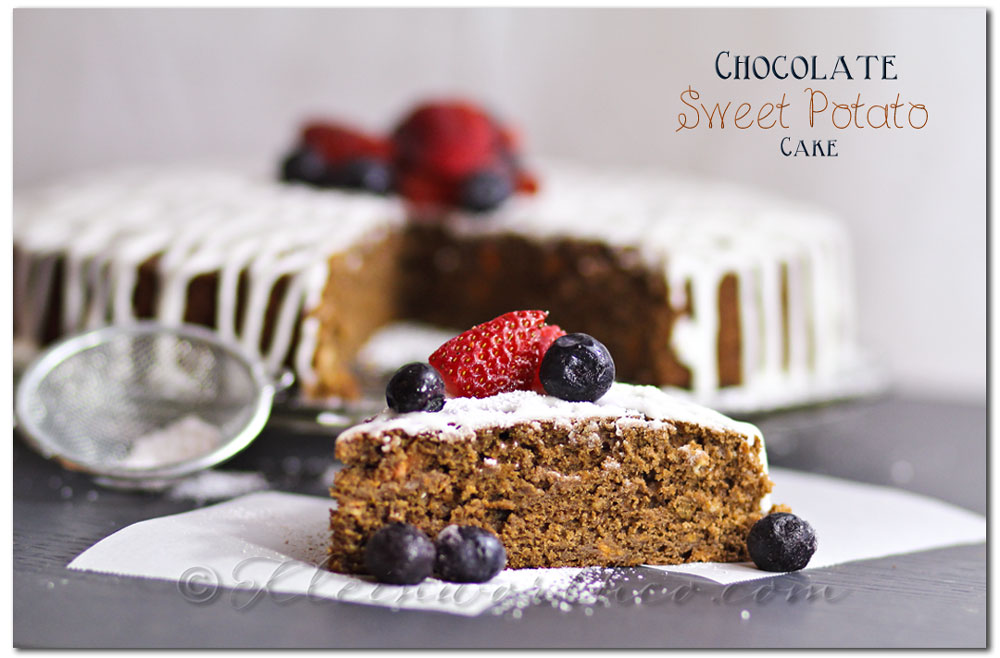
Chocolate Sweet Potato Cake
Ingredients
- 1/2 large sweet potato
- 3 ounces unsweetened chocolate 3 squares
- 1-1/2 cups all-purpose flour
- 2 tsp baking powder
- 1/2 tsp salt
- 1/2 cup 1 stick butter
- 1-1/2 cups packed brown sugar
- 2 large eggs
- 3/4 cup milk I used lactaid
Instructions
- Preheat oven to 350 degrees.
- Line 10" round baking pan with parchment on the bottom.
- Spray parchment lined pan with cooking spray on bottom & sides. Set aside.
- In microwave safe bowl- place sweet potato in with enough water to cover bottom.
- Pierce sweet potato several times- microwave approx 10 minutes. Turn over- microwave another 5-10 minutes until soft like a baked potato. Set aside.
- Melt chocolate in microwave safe bowl - about 20 seconds. Set aside.
- In large bowl whisk together flour, baking powder, salt. Set aside.
- In small bowl, remove skin from sweet potato- mash with fork until no more lumps remain.
- Use electric mixer, beat butter & brown sugar until fluffy.
- Beat in eggs one at a time.
- Reduce mixer to low- mix in mashed sweet potato & then melted chocolate.
- Add flour & turn on low- pouring in milk as it mixes the flour into mixture.
- Spread batter into your prepared pan.
- Bake 35-48 minutes- or until toothpick test is clean.
- Cool in pan 15 minutes.
- Flip onto wire rack to cool completely.
- Flip back to right side onto serving plate.
- Sprinkle powdered sugar or add icing of choice to taste.
I used a standard donut glaze & just drizzled it on in a pattern. This cake didn’t really need heavy frosting.
Add some berries & you have yourself a 4th of July party treat.
Don’t forget to come back & join me on Mondays for Project 52
To see where I am linking today- visit HERE
[jetpack_subscription_form]
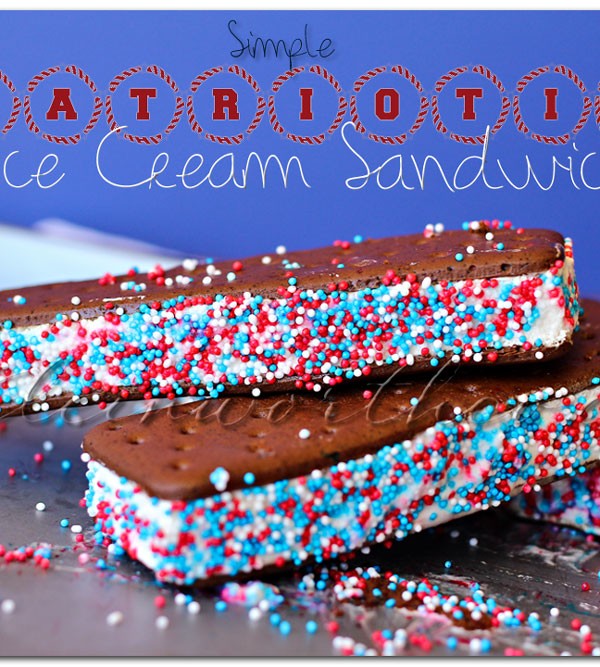
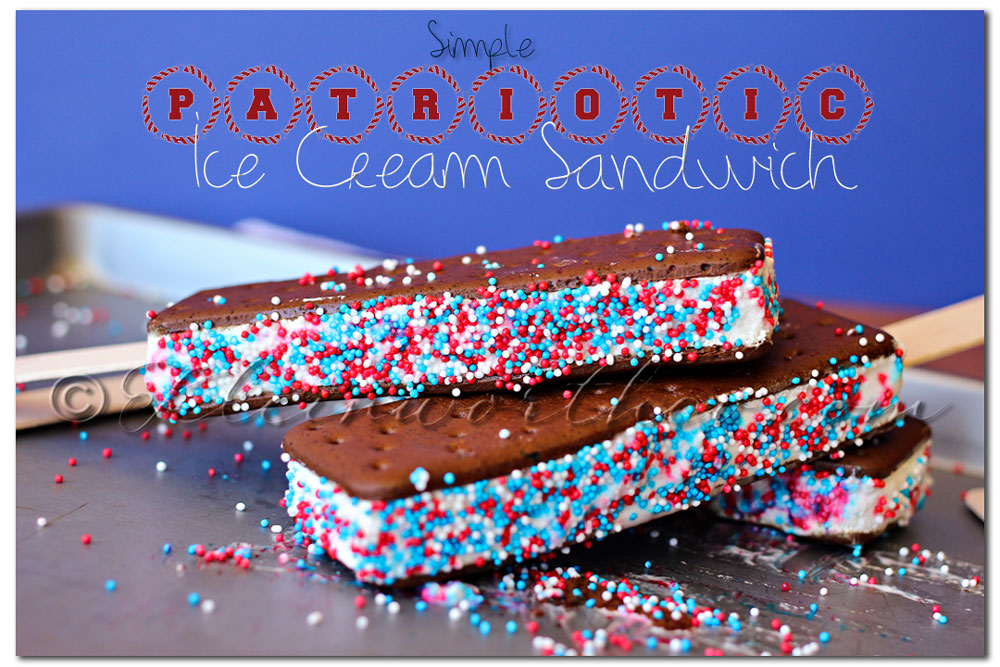
Simple Patriotic Ice Cream Sandwich
Sometimes it’s the little things that make me smile. I love when something so effortless & yet fun brings a little light into my day. This is especially true with desserts. I love things I don’t have to slave in the kitchen for hours on & yet end up being huge hits at a gathering. I am not the fist person to think of this idea- in fact I’m know of at least a few other of my favorite bloggers that have done this for various different holidays in various different ways. But for me- I’m all about these little 4th of July nonpareils. I love them in all color combos but I think the red, white & blue make me the happiest. Which means that I had to use them for this little 4th of July dessert.
Simple Patriotic Ice Cream Sandwich
As you can see- it’s as simple as inserting a Popsicle stick (I used tongue depressors because they are easier to hold) into a semi-soft ice cream sandwich. Then I just sprinkled on the nonpareils & pressed them in a bit. Had to work fast because they were melting quickly. I stuck them back in the freezer to harden again. So easy & yet guests at your party will love the festive touch.
Don’t forget to come back & join me on Mondays for Project 52
To see where I am linking today- visit HERE
[jetpack_subscription_form]
Pink Velvet Funfetti Donuts
It’s National Donut Day!!!! It’s time to celebrate with some….
Pink Velvet Funfetti Donuts
You know I wasn’t going to let National Donut Day go by without making something to celebrate right??!!! I mean- every donut should be celebrated. I have so much fun with my little mini-donut maker. I try to make some for a Saturday morning at least once a month to sort of break the cycle of muffins & breakfast cakes & other things. Besides- don’t you just have those days when you just REALLY CRAVE a donut?? I definitely do.
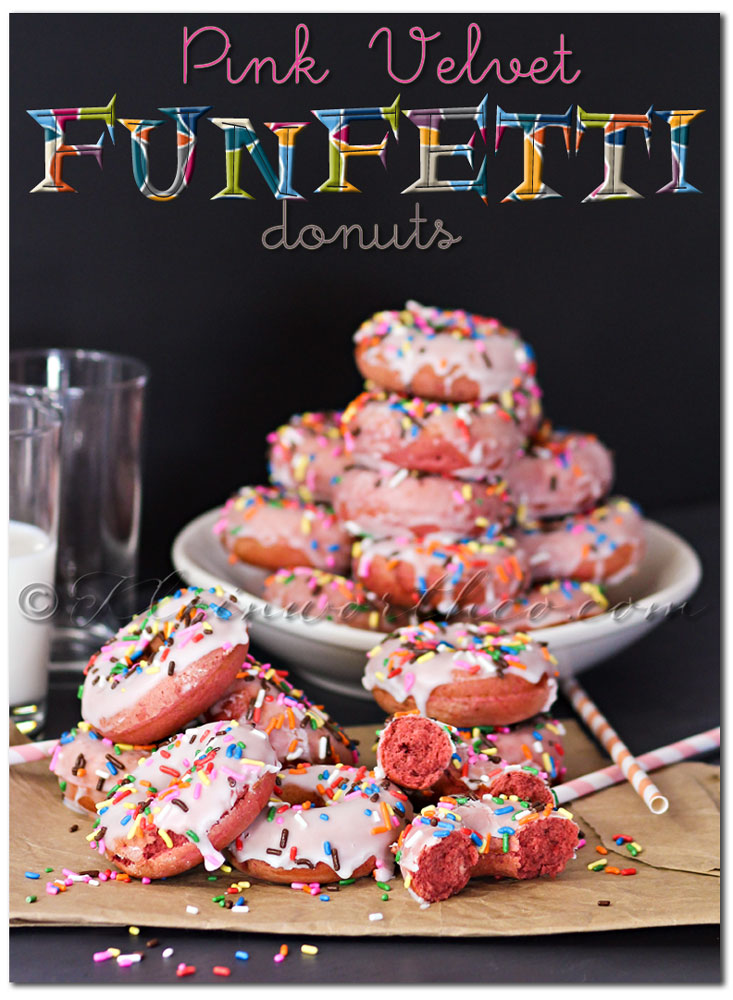
These were SO MUCH FUN!!!!
I was going to do red velvet but as I was adding the food color the pink just grabbed me
& I thought it was better for summer to do something a little lighter.


Pink Velvet Funfetti Donuts
Ingredients
- 4 cups all-purpose flour
- 1-1/2 cups granulated sugar
- 1 tsp salt
- 4 tsp baking powder
- 2 tsp vanilla extract
- 1-1/2 c buttermilk
- 2-1/2 tbsp cocoa powder
- 4 eggs slightly beaten
- 4 tbsp melted butter
- 1 tsp red food color
Instructions
- Sift together flour, sugar, salt & baking powder.
- Add buttermilk, eggs, vanilla to dry mixture- mix.
- Add butter- mix until combined.
- Add cocoa powder & food color- beat until just combined.
- Fill full size donut pans & bake 5-8 minutes.
OR! fill mini-donut maker & bake 3-5 minutes.
- Donuts are done when they spring back when touched- do not over cook.
- Allow to cool on wire rack.
- Dip in glaze & sprinkle with Funfetti before glaze dries.
Want more Donut recipes- head HERE
Don’t forget to come back & join me on Mondays for Project 52
To see where I am linking today- visit HERE
[jetpack_subscription_form]
Desserts for Summer
It’s June!!! That means it’s time to revisit some great
Desserts for Summer
My criteria for making recipes in the summer is that it has to be simple & quick. I don’t want to spend a lot of time in the kitchen- especially now that we live in a place where it’s nice to be outdoors this time of year. I’m not sitting in a puddle of sweat anymore- however that doesn’t mean I don’t want to still enjoy some great frozen treats. I will use any excuse I can to have something sweet. 🙂
I have compiled my top favorites here for you today.
Banana Cream Pie Frozen Yogurt
Vanilla Frozen Yogurt
Peppermint Patty Frozen Yogurt
Raspberry Pineapple Frozen Fruit Pops
Coffee Ice Cream, Oreos & Cool Whip
Raspberry White Chocolate Frozen Yogurt
Raspberry & Cream Pops
Iced Espresso Pops
Strawberry Cheesecake Frozen Yogurt
YEP- I think it’s safe to say I have a healthy obsession with all things sweet. 🙂
Hope these help you all cool down this summer.
Don’t forget to come back & join me on Mondays for Project 52 & Wednesdays for Your Best Weekly
[jetpack_subscription_form]

4th of July Fashion Ideas
Some things are great paired together. Some awesome worn in cutoffs with a pretty flowy tank top or a cute little dress with a nice chunky sweater to warm the shoulders when the sun goes down. Some things are just better together, right?!! After living in the desert for so long- seems I have a much larger summer wardrobe than anything else. But that isn’t stopping me from wanting to update things this year to include some adorable things to wear this 4th of July. I was browsing Polyvore & found so many things I want to or will be adding to my closet. I also got some really great ideas for pairing things that I already have with things I never thought of before.
maurices.com
$42 – houseoffraser.co.uk
usa.frenchconnection.com
$12 – hm.com
$155 – jades24.com
$52 – nafnaf.com
$25 – only.com
$83 – houseoffraser.co.uk
theoutnet.com
wallisfashion.com
papayaclothing.com
stylebop.com
$25 – pret-a-beaute.com
$68 – glam-net.com
$115 – witchery.com.au
matchesfashion.com
$23 – chiarafashion.co.uk
$27 – fatface.com
stylebop.com
matchesfashion.com
wetseal.com
bloomingdales.com
Aren’t these all so cute??!!!!! You can click on each one to see where you can pick them up.
Knowing that I need to keep my clothes looking their best as long as possible I am always looking for new products & systems to help me do that. I was asked by DailyBuzz Moms to try Tide, Downy & Bounce (available at Target) together to see how well they keep my clothes looking their best & brightest wash after wash. First – I have to tell you- I love using Tide products. I love the smell & I know that when I am using Tide I’m using the very best I can for my clothes. Adding Downy & Bounce along with it really makes me feel like I am extending the life of my clothes. That is a very good thing because justifying things like new denim at $175 a pair is a hard sell to the hubs. So anything I can do to keep them looking new longer is great!
**This post is part of the DailyBuzz Moms Tastemaker program for P&G.
This post is sponsored by P&G.

With Tide ®, Downy ® and Bounce ®, you can keep your summer fashions looking new up to 50% longer.
* Text CLEAN to TARGET (827438) for mobile coupons.
*vs. leading value detergent alone
P&G Tide + Target Campaign
Don’t forget to come back & join me on Mondays for Project 52
To see where I am linking today- visit HERE
[jetpack_subscription_form]
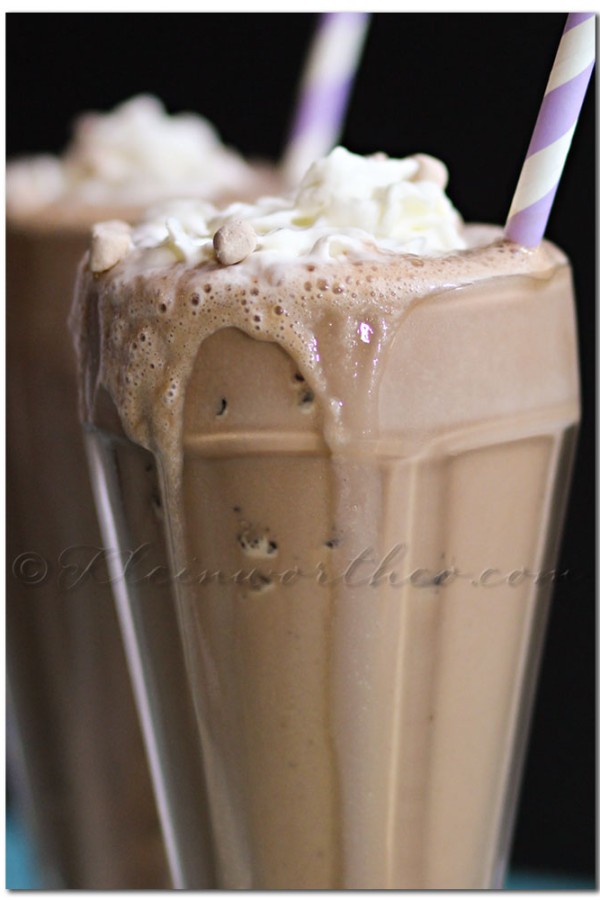
Caramel Macchiato Date Shake
Caramel Macchiato Date Shake

We decided to change it up a bit- they turned out SO GOOD!!!!
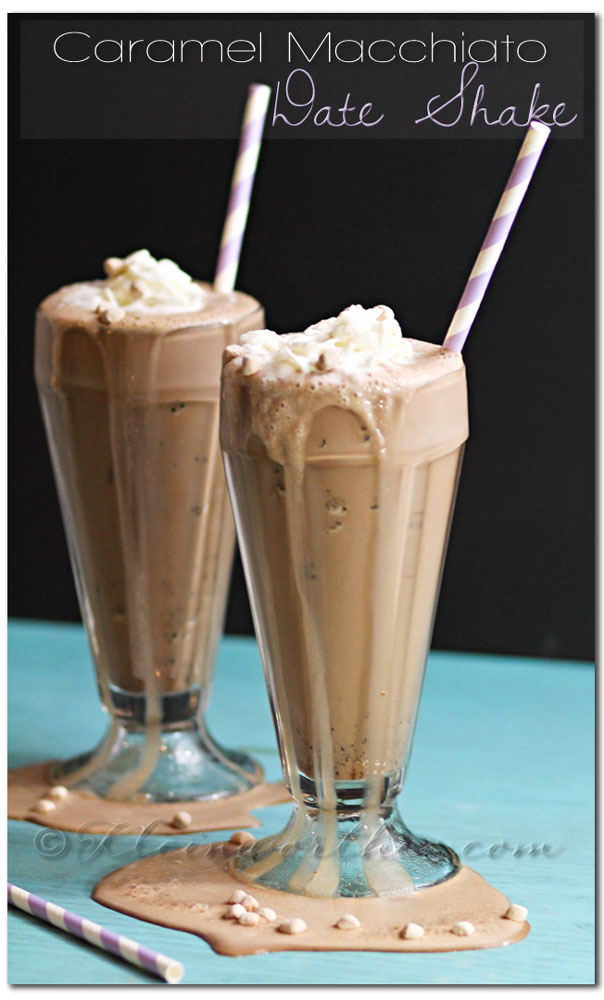

Caramel Macchiato Date Shake
Ingredients
- 1/2 carton Chocolate Ice Cream
- 1/4 gallon Caramel Macchiato Iced Coffee
- 3/4 cup Chopped Dried Dates- diced into smaller pieces
- Whipped topping opt
- Super Mini-Marshmallows for sprinkling
Instructions
- Add first 3 ingredients into blender & pulse just a couple times.
- (too much & it will get to soft & melted & more like a liquid- you want it thick like a malt)
- Pour into your glass & top with whatever toppings you wish.
When I was doing my searches for Date Shakes to see what else was out there- I realized that this really is a So Cal thing. So now all of you that have not had the pleasure of visiting Hadley’s can now give a similar recipe a try. I wasn’t able to find much of any other recipes out there- which is what prompted this one. I am so happy I can have my beloved date shakes now. It will be my summer staple again. BTW- I used International Delight Iced Coffee for mine. They have been so good to me through these campaigns that I have worked on with them. I was not compensated for this post & I purchased the iced coffee in addition to the free creamers I received from them during my last campaign.
Don’t forget to come back & join me on Mondays for Project 52 & Wednesdays for Your Best Weekly
To see where I am linking today- visit HERE
[jetpack_subscription_form]
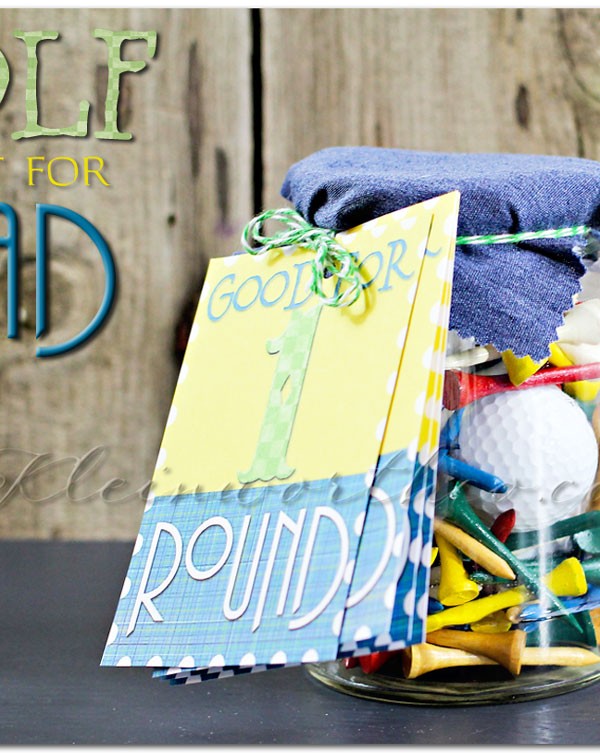
Golf Gifts for Dad
Hi Everyone!!!
Thinking of fun homemade gifts for the hubs for Father’s Day & Golf Gifts for Dad came to mind. Ever since the hubs made the transition from a line guy to his current status we knew that golf would have to be a bigger deal in our lives. It’s sort of been a constant staple in our lives through our relationship. I grew up with my grandfather being a dominant face at The Woodland’s Country Club near their home in TX. Then I met the hubs while we both worked at Cobra Golf during our time in Carlsbad. We lived on a golf course at one time. Then when the hubs promoted beyond a line firefighter- my grandfather built him a custom set of clubs for his height. (hubs is 6’6″). So I thought it would be great to make him a gift that he could use now that he has to get together with the other chiefs to play a round or two & talk station stuff.

Not that he has to have permission- but he does feel guilty when he has few days where he can have family time & then he spends it doing something else.

What golfer doesn’t need a good supply of tees & some new balls to replace the ones that end up in the drink??
You can download & print the vouchers for your own gift.

It’s a fun & simple Father’s Day gift that any golf enthusiast would love from his kids.
I may put together another one for my grandfather too.
Don’t forget to come back & join me on Mondays for Project 52 & Wednesdays for Your Best Weekly
To see where I am linking today- visit HERE
[jetpack_subscription_form]
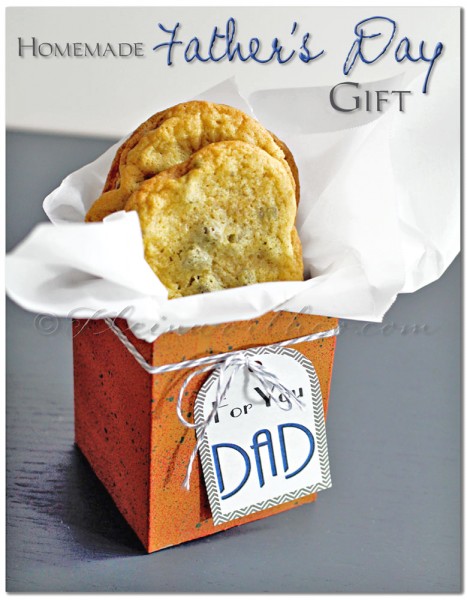
Homemade Father’s Day Gift
Homemade Father’s Day Gift


Looking for more gifts?
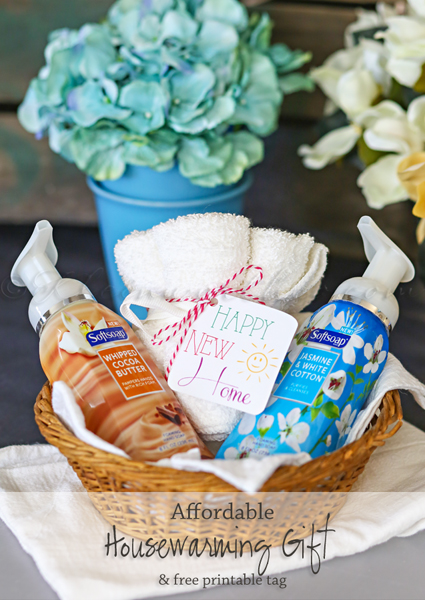
Affordable Housewarming Gift Idea
To see where I am linking today- visit HERE
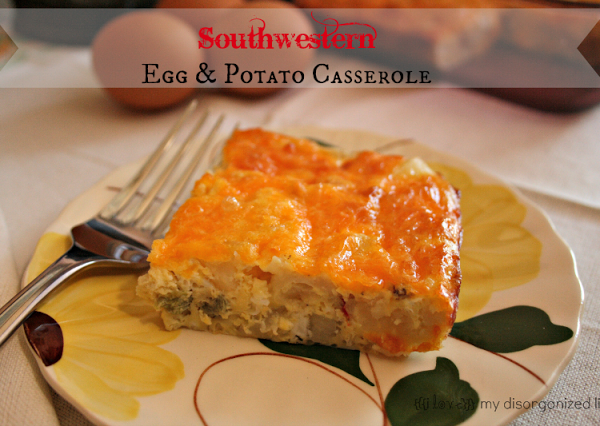
Southwestern Egg & Potato Casserole
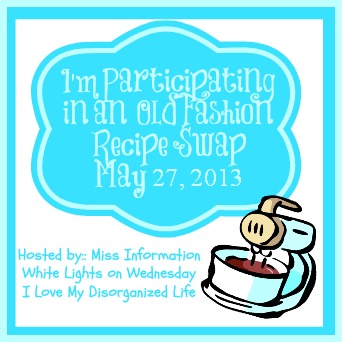
Today’s the day! I’m so excited to be participating in an Old Fashioned Recipe Blog Swap! Julie {White Lights on Wednesday}, Kelley {Miss Information} and Rachel {i love my disorganized life} have paired up 30 incredible bloggers to trade recipes on each others blogs for the day.
I am swapping blogs with Rachel from {I love My Disorganized Life}.
I just know you’re going to love what she’s got for you today.
I’ll be sharing Cinnamon Coffee Cake on her blog, so be sure to stop by and check it out! If you want to go see all of the recipes in the blog swap be sure to go and visit one of the host’s Rachel {i love my disorganized life}, Julie {White Lights on Wednesday} or Kelley {Miss Information}, to see all the recipes linked up in the swap.
Give a nice warm welcome to Rachel!!!
Hello! I’m Rachel Willis from {i love} my disorganized life. I am so excited to be here visiting with you today.
I love breakfast. In fact, it’s my favorite meal of the day. I’m also a fan of quick and easy. Like with potatoes and salad, I’d much rather use frozen potatoes and bagged salad any day. The two things I like least to do in the kitchen are cleaning potatoes and cutting the veggies for salad. . Just ask my husband, he can totally vouch for me! Oh, don’t get me wrong, I love to bake, craft and sew, but I also love a good short cut. I guess you could say I’m somewhere between a homemade and a semi-homemade mom.
With that being said, I have a wonderful breakfast/brunch dish for you. Southwestern Egg Casserole. Not only is it delicious, it’s also very versatile and can be tailored to any taste. It’s my go-to recipe for holiday brunches and Christmas morning, but can easily be made any time of the year. In fact, I made it this weekend when my sister came out from California with her family. It was perfect for feeding all of our hungry kids!


Southwestern Egg & Potato Casserole
Ingredients
- 1- 1 1/2 C potatoes O'Brien with onion and peppers
- Salt pepper and garlic powder to taste
- 1/2 C cooked and diced {any combination of the following} bacon ham, sausage or green chilies {if desired}
- 6 eggs
- 2 Tbsp whole milk or half & half
- 1/2 C shredded cheddar cheese
Instructions
- Heat oven to 350*; spray an 8 x 8 dish with non-stick cooking spray
- Arrange potatoes in a single layer in pan
- Add salt, pepper and garlic powder
- Add {any combination of the following} bacon, ham, sausage or green chilies {if desired}
- In a medium bowl, beat eggs and milk
- Pour egg mixture over potatoes
- Sprinkle with cheese
- Bake at 350* for 50 minutes or until eggs are firm
Thank you so much for spending this time with me. I hope you have enjoyed it as much as I have.
About Rachel: A Southern California native, Rachel has lived in Southern Arizona for the past 17 years with her wonderful husband of 22+ years. They have five children and two grandchildren. When Rachel is not chasing one of the kids down, she is chasing golden retriever puppies. Although she is disorganized, she is constantly working on not being disorganized. That’s OK, because she loves her disorganized life.
Keep up with Rachel: Facebook, Twitter, Instagram, G+
Thank you Rachel for joining & sharing here today. It’s been an absolute pleasure!!!
Be sure to head on over to Rachel’s place & grab my Cinnamon Coffee Cake Recipe.
Don’t forget to come back & join me on Mondays for Project 52 & Wednesdays for Your Best Weekly
To see where I am linking today- visit HERE
[jetpack_subscription_form]
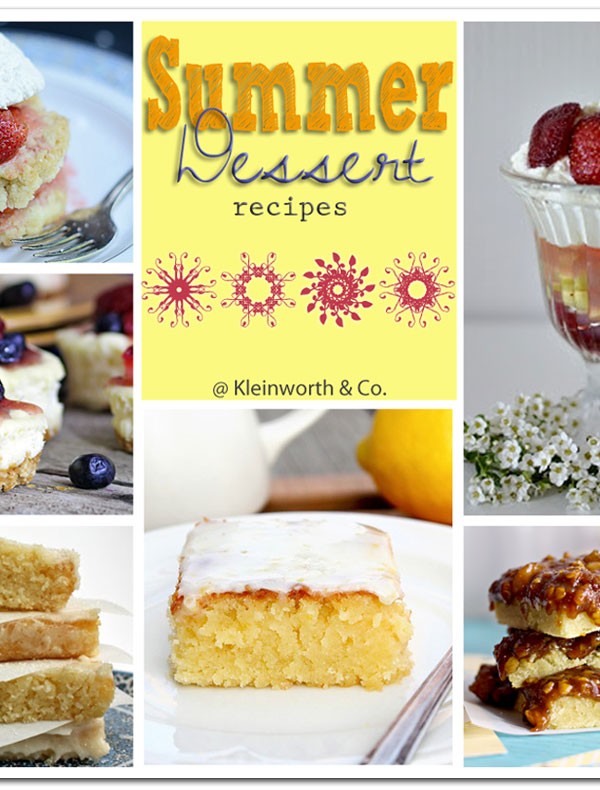
Summer Dessert Recipes
There were so many yummy things shared this past week for Your Best Weekly.
I saw a theme going- so I thought I would run with it & create…
Summer Dessert Recipes
Oh so many things for me to try. I can’t wait. Especially with the long weekend- I will be spending my fair share of time in the kitchen making all these goodies you all have shared. I can’t wait to see what you all come up with for next week. I’m sure you have some goodies planned for this long holiday weekend. We will be at the ready- I’m sure the hubs will be busy. So probably won’t plan anything that requires the BBQ unfortunately. If he were to get called out while we were grilling- I would be lost on what I needed to do to wrap it up. That is totally his gig & he’s great at it. I have the backside to prove it.
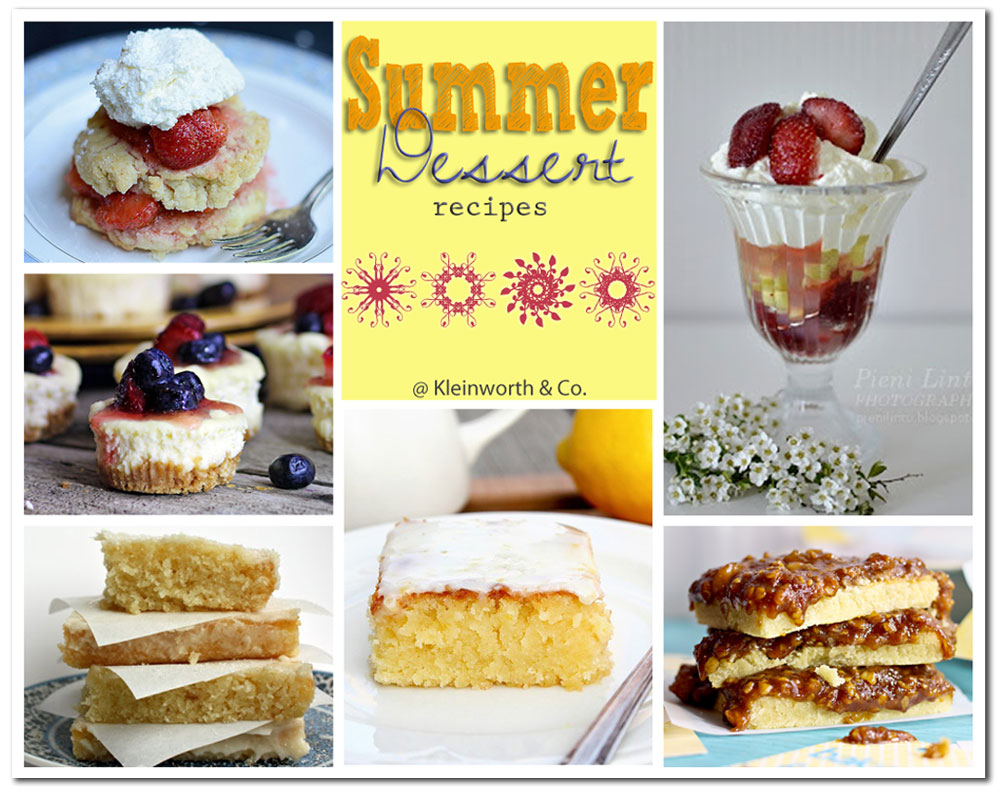
Rhubarb Dessert from Pieni Lintu
Fudgy Vanilla Brownies from Peanut Butter & Jelly
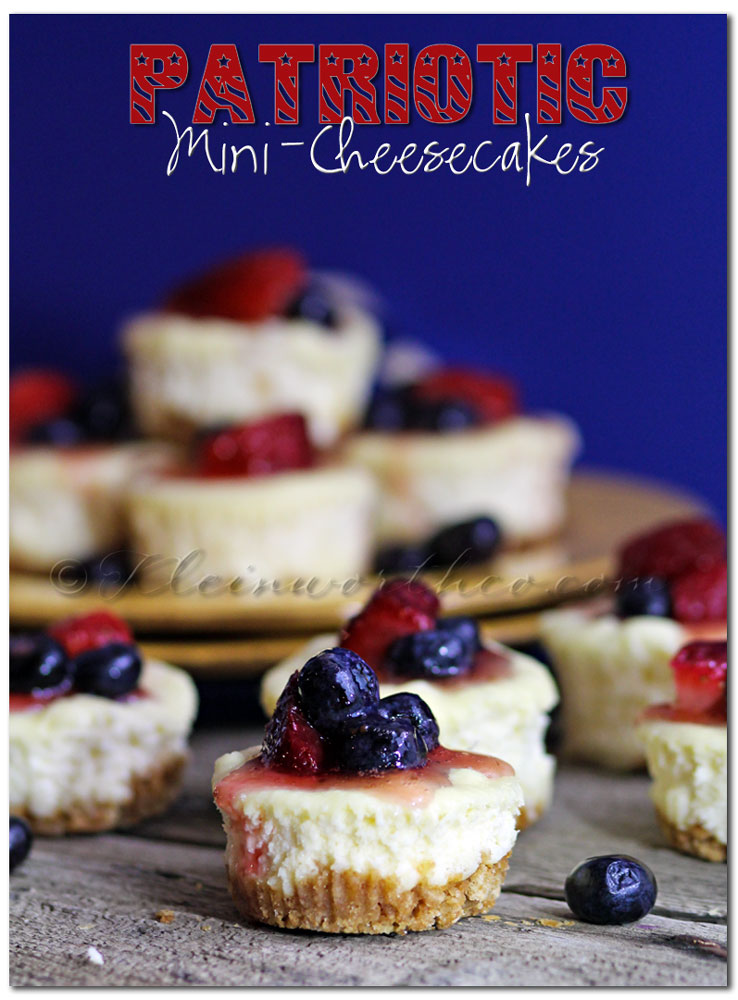
Patriotic Mini-Cheesecakes from Me- Kleinworth & Co.
Lemon Blondies with Lemon Glaze from Let’s Dish
Caramel Pear Bars from Me- Kleinworth & Co.
Don’t forget to pick up my free printable for the First Aid checklist so you can make your own easy First Aid Kit.

While you are over there grabbing your checklist- don’t miss your chance to enter my giveaway happening now!!

Most importantly this weekend- be sure to THANK A VET!!
Have a great weekend everyone!
[jetpack_subscription_form]
First Aid Kit and Printable Checklist
Are you ready for Memorial Day Weekend??
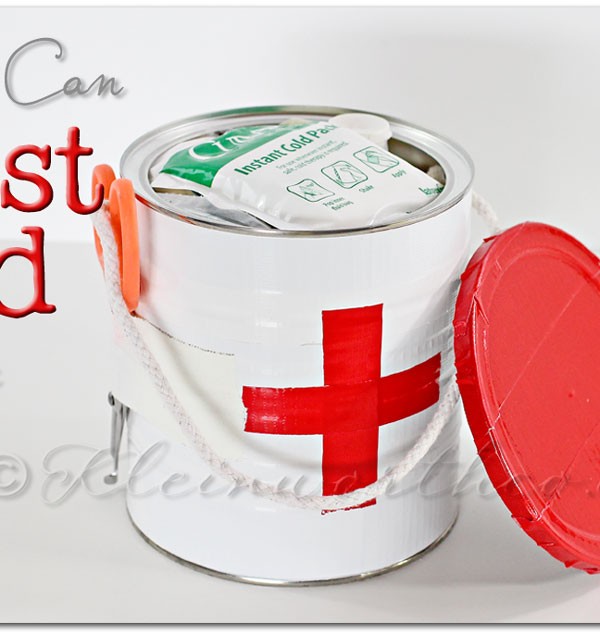
I’m sure most of you have all sorts of plans. The weather this time of year should be lovely. Which means that while most of the country is out enjoying the long weekend the hubs gets super busy. Holiday weekends are super crazy & they never stop running calls. While it’s been a while since he has had to be in the back of an ambulance doing patient care- it’s weekends like these that keep him on his toes with managing emergencies. Emergency preparedness is always on our minds which is why we are so adamant about having a First Aid Kit & why I created this DIY First Aid Kit and Printable Checklist for you all. Free Printable Checklist Templates
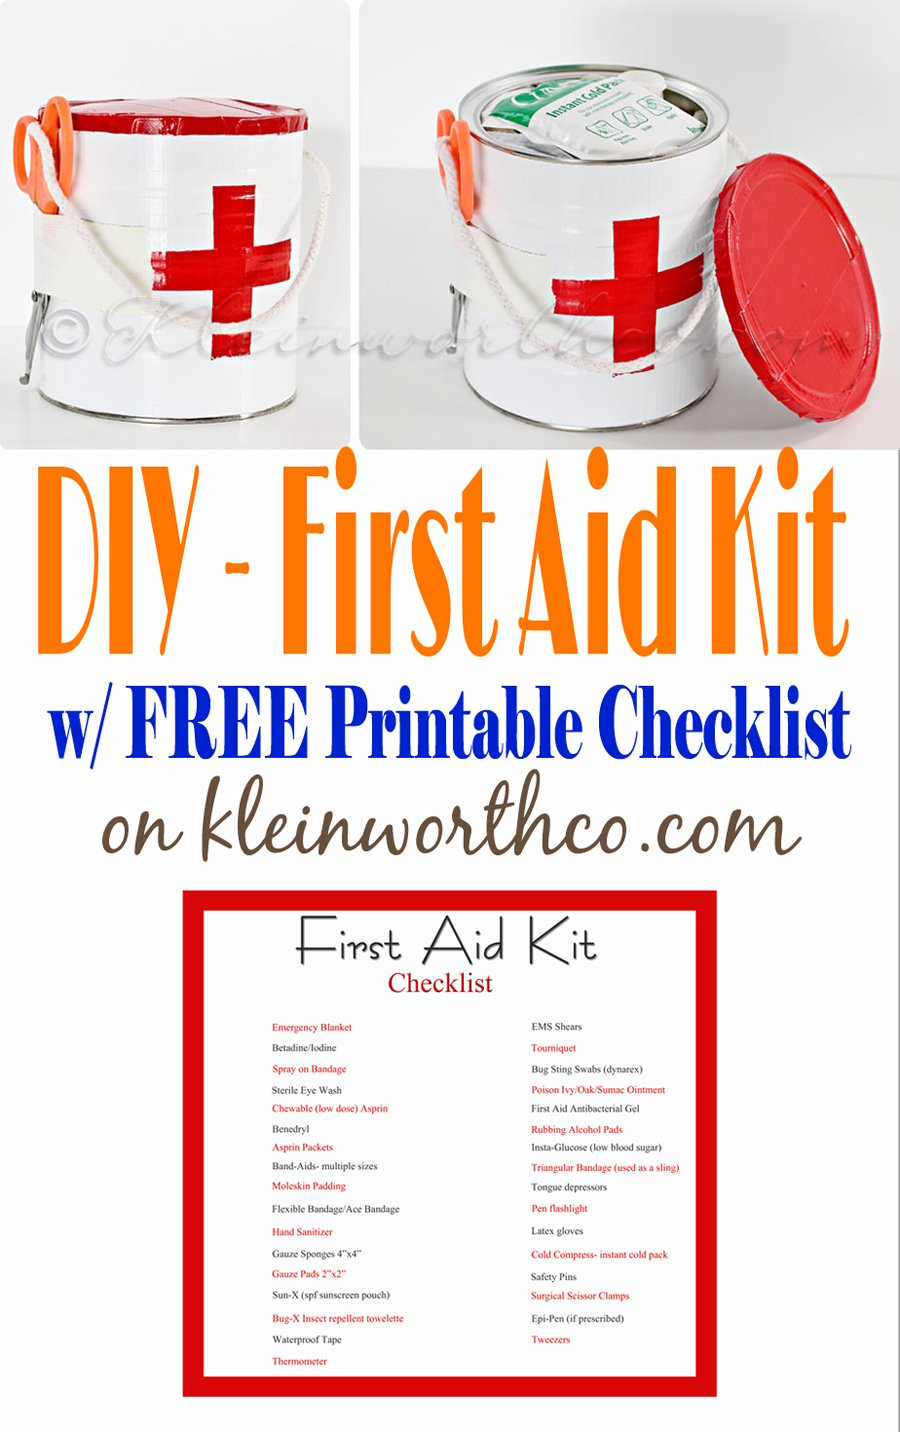
You see- before we moved here- the hubs was not only on the Homeland Security Working Group for NV, he was the County Deputy Fire Chief among many many things- but he was also coordinated the Disaster Preparedness Program for the second largest county in the nation. (geographically speaking) We had things like the NV Test Site, Area 51 (yes it exists) & Yucca Mountain in our jurisdiction. He was PREPARED for the worst of the worst. Which means that we live, breathe, eat & sleep being prepared.

So knowing all of that- it should come as no surprise to you that this above image shows all the things that are in just ONE of our MULTIPLE emergency kits we have between our house & vehicles. I know most people don’t have access to a lot of these things & even if they did- are not medical professionals & therefore wouldn’t use them. So I decided to put together a quick & simple kit for you all that is perfect for your house, car, boat or RV. AND- it’s re-purposed from a coffee can so it’s an extra win in my book.
First Aid Kit DIY

I covered my can with white & red duct tape. You could do the cute prints too.
I wanted mine to be unmistakable so that anyone who sees it would know exactly what it’s for.
You won’t believe all the things that fit in this little can.
You could make several for all the places you may need one. I had one growing up as a kid. We made them in our Girl Scout Troop (thanks mom). It was great with the rope handle (just drill holes & slip through with a knot) . We could just grab & go whenever we were headed outdoors.

If you take some of the larger things out of the large box packaging- YES- all these things will fit in your First Aid Kit.
Let me just say- all of these things can be picked up at your local drug store or online.
I recommend stuffing as many band-aids in there as you can fit (those are the things you will need & use the most)

I made this quick reference checklist you can take with you to the store. Download & print.
Wishing you all a very SAFE Memorial Day weekend!
To see where I am linking today- visit HERE

Caramel Pear Bars
Hi Everyone! Happy Your Best Weekly Party day!!
So happy to have you join me.
Tip Hero’s Father’s Day Giveaway Event
Sign-ups are now open for this great new giveaway event!
- Event is free to join with an announcement post. If you don’t wish to post the announcement, please send the $5 non-post fee to tiphero@gmail.com
- You’ll receive 1 free link for participating (either Twitter or Pinterest)
- Additional links (RSS/Email, YouTube, Twitter and Pinterest) are available for $5 each
- Sign-ups for this event close on May 22th
- Event runs from May 24th – June 7th
- Prize: $100 Home Depot gift card
Please send all payments to tiphero@gmail.com as a “gift” via PayPal.
Sign up for this event here.
I am totally a chocolate person. But my hubs- he’s all about the caramel. He is always asking me when I will make more recipes with caramel for him instead of things that I’m most fond of. So I started taking a look at my recipes here & noticed that he’s right. I have only posted a few caramel recipes. So I decided to oblige & make something yummy.

I made these Caramel Pear Bars originally with the idea that it was just going to be the caramel with the mix ins in there as a good recipe for a heartier homemade caramel. Then I quickly changed my mind & decided that it really would be so much better if I added a shortbread crust to make it easier to package up for gifts.


Caramel Pear Bars
Ingredients
Cookie Bottom
- 1/2 cup sugar
- 3/4 cup butter
- 2 tsp vanilla
- 1 egg
- 1/4 tsp salt
- 2 cups all-purpose flour
Caramel Topping
- 1/2 cup salted butter
- 1 cup brown sugar- packed
- 1/4 cup corn syrup
- 1/2 tsp salt
- 1/4 tsp baking powder
- 1 cup quick cook oats
- 1 tsp vanilla extract
- 1 pear - peeled cored & diced
Instructions
- Preheat oven to 350 degrees.
- Coat 9x13 pan with cooking spray- set aside.
- In bowl of electric mixer- cream butter, sugar & vanilla.
- Add egg & beat until fluffy.
- Stir in salt.
- Beat in flour 1 cup at a time.
- Press dough evenly into pan.
- Bake 15 minutes or until just set & beginning to turn golden in color.
- Remove & let cool.
Prepare Caramel
- Melt the butter over medium heat in saucepan.
- Add brown sugar, corn syrup & salt.
- Bring to a very low boil, stirring constantly.
- Let cook over very low heat, stir in oats, vanilla & pears.
- Remove from heat.
- Let sit to cool until thickened- about 10 minutes.
- Pour over shortbread in pan.
- Transfer to refrigerator & allow to completely cool before cutting- at least 2-3 hours.
- ( I was way too impatient with these & tried to remove before cool. It was a sloppy mess)
These would be great with a scoop of vanilla ice cream on top.
I loved that I had the perfect chance to pair these up with these ADORABLE bag toppers & gift tags from the Sunshine collection at Life n’ Reflection. They are so cute. I just love blue & yellow together so these just made me smile. Kristy has the most adorable things in her store. If you are planning a party or like to scrapbook or love to play in photoshop- you have got to head on over & see all the things she has to offer. You can pick up this Sunshine set for just $5. Really- can’t beat that.

**I was given this Sunshine set in exchange for this post as part of being a member of the affiliate design team.

Now it’s time for you to share!
Everyone is Welcome as long as you link back to Kleinworth & Co. or Button Up. (Buttons HERE)
Please also connect with me on Pinterest and/or Twitter

Don’t forget to come back & join me on Mondays for Project 52 & Wednesdays for Your Best Weekly
To see where I am linking today- visit HERE
[jetpack_subscription_form]
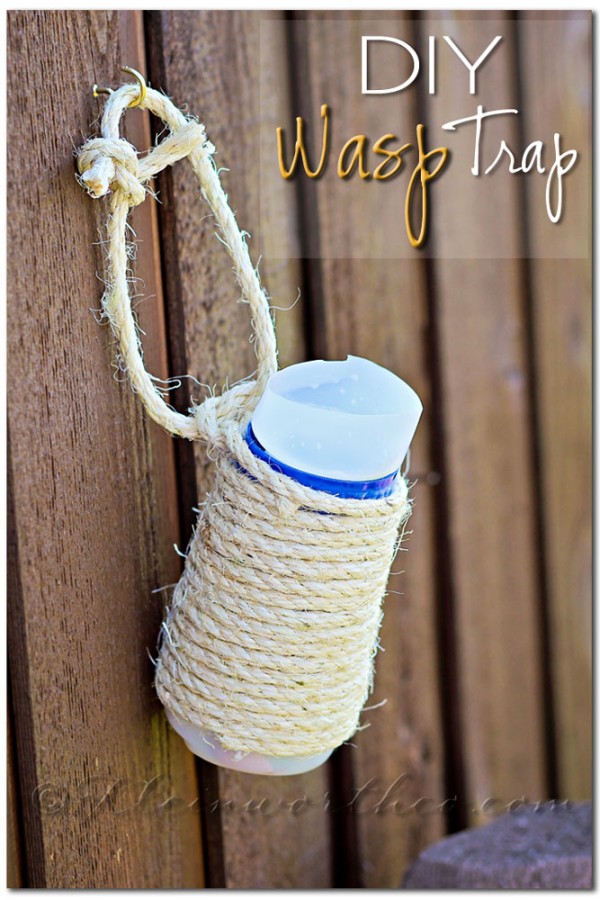
Wasp Control with DIY Wasp Trap
You all know how much I like my coffee. I have posted about that quite a few times & I have also told you how much I love International Delight coffee creamers. So then you also cold probably figure out how many of these plastic bottles I have sitting around here. SO MANY. Good thing I like to re-purpose things with a little DIY.
We have been thrilled to be up here in Northern Idaho enjoying all the beauty of the living things all around us. That means that we have had to get used to having bees & wasps around here. The kids & I have never been stung- so we don’t know if we have an allergy or not. I’m not looking to find out any time soon- so I decided to put all these creamer bottles to use & re-purpose them into a DIY Wasp Trap.

It’s super simple & works so well. Now we can be outside without worrying about the wasps.
They are more attracted to the wasp trap than they are to us.

1. Clean out your creamer bottle & then cut off the flip top part of the lid.
2. Cut off the top of the bottle.
3. Invert the bottle into the neck & tape in so it looks like a funnel.
4. Optional- wrap & glue sisal rope for a more aesthetically pleasing trap if it’s in a visible place. ( didn’t want to see the wasps in there)
5. Tie a loop so it can be hung on something. We put a hook up for it.
6. Bait the trap using some sugar & water. Fill just enough for them to drown but not high enough for them to climb back out.
7. Spray the funnel part with some cooking spray so that they slip right in when they land.
The wasps fly in for the bait but can’t figure out how to get back out of the opening. Works quite well.
Since I can’t seem to get enough of my International Delight flavors- (there are so many to choose from) and I drink coffee in mass quantities- it looks like I am going to be able to keep a good supply of these DIY Wasp Traps all summer long.
What’s Your ID? International Delight is looking for their most passionate flavor fans. Put your ID on the map to enter to win a Magical Trip, play games and discover more unexpected delight. Share your ID flavor at .
This is a sponsored conversation written by me on behalf of International Delight. The opinions and text are all mine.
Looking for more of our outdoor projects?
Don’t miss these great ideas from these bloggers….
One Little Project – How to make a garden box
A Mom’s Take – Easy DIY Garden Markers
To see where I am linking today- visit HERE

4 Quick & Easy Spring Recipes
I’m super excited to share with you today….

I’m participating in a Good Old Fashioned Recipe Blog Swap! Julie {White Lights on Wednesday}, Kelley {Miss Information} and Rachel {i love my disorganized life} have paired up 30 incredible bloggers to trade blogs for the day.
Rachel from {I Love} My Disorganized Life and I will be sharing a fabulous recipe on each other’s blogs {but we can’t tell you what they are, because they’re a secret!}. Be sure to visit both of us on May 27th, we wouldn’t want you to miss out on any deliciousness!
You all inspire me so much each & every week. Just look at all the amazing things that were shared. I so enjoy what you all create.
This week you inspired 4 Quick & Easy Spring Recipes
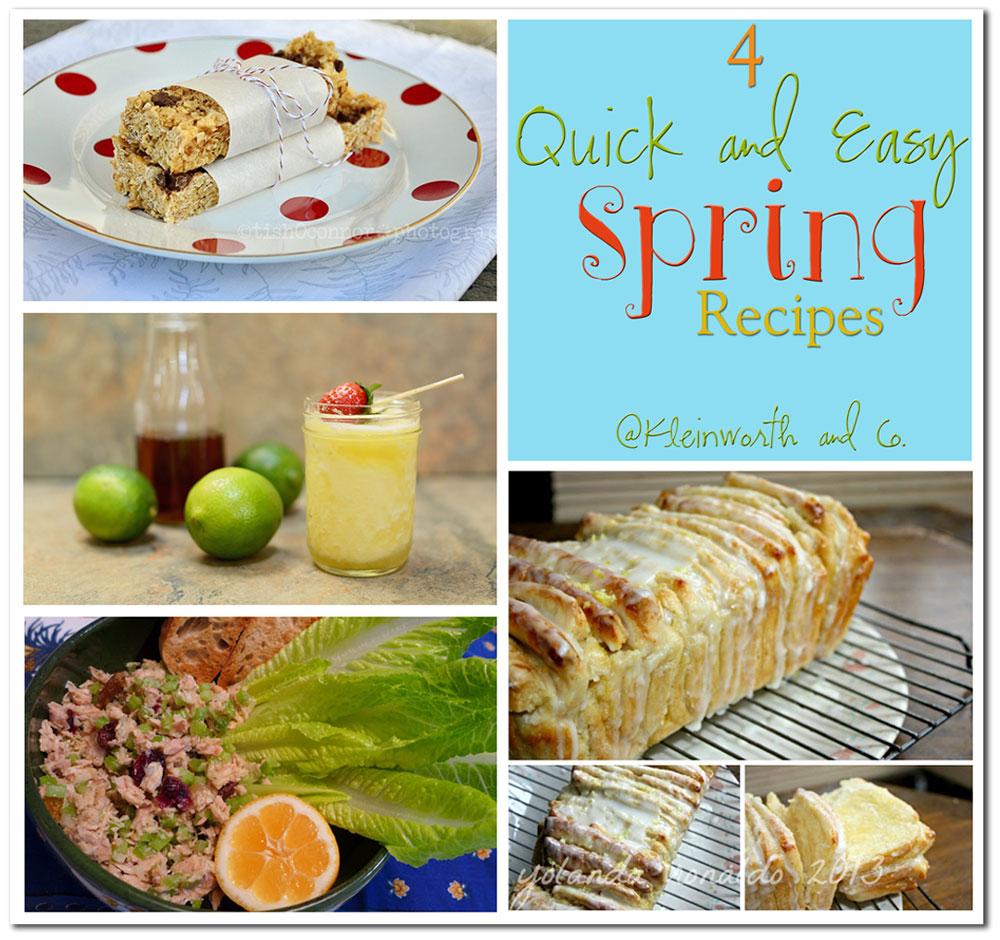
Tuna Fish Salad with a twist from Pret-a-Vivre
Lemon Pull-Apart Bread from Peanut Butter & Jelly
Homemade Granola Bars from le mie foto
Refreshing Fruit Shakes from Little by Little
This past Wednesday I kicked off a new monthly venture- Recipe Round-Up.
Each month a group of bloggers & I will get together & share a recipe all centered around one theme.
This month we celebrated National Chocolate Chip Day with Chocolate Chip Recipes. Be sure to head over & grab them all.

Do you want to participate in future Recipe Round-Up’s & join in on the fun??
email Gina at Kleinworth & Co (chichomeschoolmama{at}att{dot}net) for details.
I am also focused on Memorial Day which is right around the corner.
For the links on where you can pick up all these for Free- head over to my 17 Favorite Patriotic Fonts.
I also shared my latest craftiness for the hearth.

See my Rustic Summer Wreath.
Have a great weekend everyone!
Don’t forget to come back & join me on Mondays for Project 52 & Wednesdays for Your Best Weekly
To see where I am linking today- visit HERE
[jetpack_subscription_form]

10 Chocolate Dessert Recipes
Today I have a VERY special treat for you all.
My dear friend Chrissy – the AMAZING Chrissy, from The Taylor House is here today sharing her favorite Chocolate Dessert Recipes.
Please give her a nice warm welcome & check out all these awesome recipes that will have you drooling for sure.
I’m also guest posting over at her place today where I’m sharing my Top 12 Chocolate Recipes.
Hi, everyone! It’s Chrissy from The Taylor House! I am so excited to be sharing some of my families favorite Chocolate dessert recipes with you today here at Kleinworth & Co. I have picked ten of our favorites that range from brownies to hot chocolate and all of them contain our favorite ingredient – Chocolate!
I love trying new recipes or creating my own new version of a recipe for my family. My boys love it when I make desserts and they seem to always be requesting desserts with either chocolate, peanut butter or caramel. So, I have quite a list of chocolate dessert recipes in my file and have tried to share them with my readers and fans. I think that it is my mission in life to make as many delicious looking and tasting recipes as I can!
What are your favorite dessert recipes? Do you always make them the same or do you change them up and try new things? Does your favorites include chocolate or do you prefer peanut butter or maybe even fruit?

10 Chocolate Dessert Recipes
1. Smore Chocolate Chip Cookies – Traditional Chocolate Chip Cookies with a Marshmallow surprise baked in.

2. Chocolate Mint Parfait – Layers of Mint, fudge, cool whip and cream cheese mix make these an amazing treat.

3. Chocolate Brownie Smore Pie – A delicious combination of Brownies & Smores in a graham cracker crust.

4. Chocolate Mint Oreo Cupcakes – Mint Oreos topped these chocolate cupcakes with a mint flavored frosting.

5. High Fiber Brownies – Who knew Brownies could be good for you?

6. Chocolate Mini Pie Bites – Mini Fillo Cups filled with chocolate pie filling.

7. Reese’s Peanut Butter Crispy Treats – A twist on Crispy Treats using Reese’s candy.

8. Oreo Cupcake Recipe – Oreo Cookies and Cream Cupcake Recipe.

9. Peppermint Hot Chocolate – Hot Chocolate with Peppermint and whip cream.

10. Peanut Butter Balls – Peanut Butter Balls dipped in Chocolate.

I hope you enjoy looking through these recipes and try making them yourself. If you are anything like me, one of these chocolate dessert recipes is doing to hit the spot! I would love to hear about new dessert recipes, so leave a comment below and share them with us!
Chrissy Taylor is a wife, Mom, blogger and property manager. She and her husband of 15 years are raising two active boys in the Twin Cities area of Minnesota. Chrissy enjoys blogging about cooking, crafts, gifts and household tips.
You can connect with her at:
The Taylor House * Facebook * Twitter * Pinterest * Google+
Don’t forget to head on over to Chrissy’s place & check out my Top 12 Chocolate Recipes.
Don’t forget to come back & join me on Mondays for Project 52 & Wednesdays for Your Best Weekly
To see where I am linking today- visit HERE
[jetpack_subscription_form]
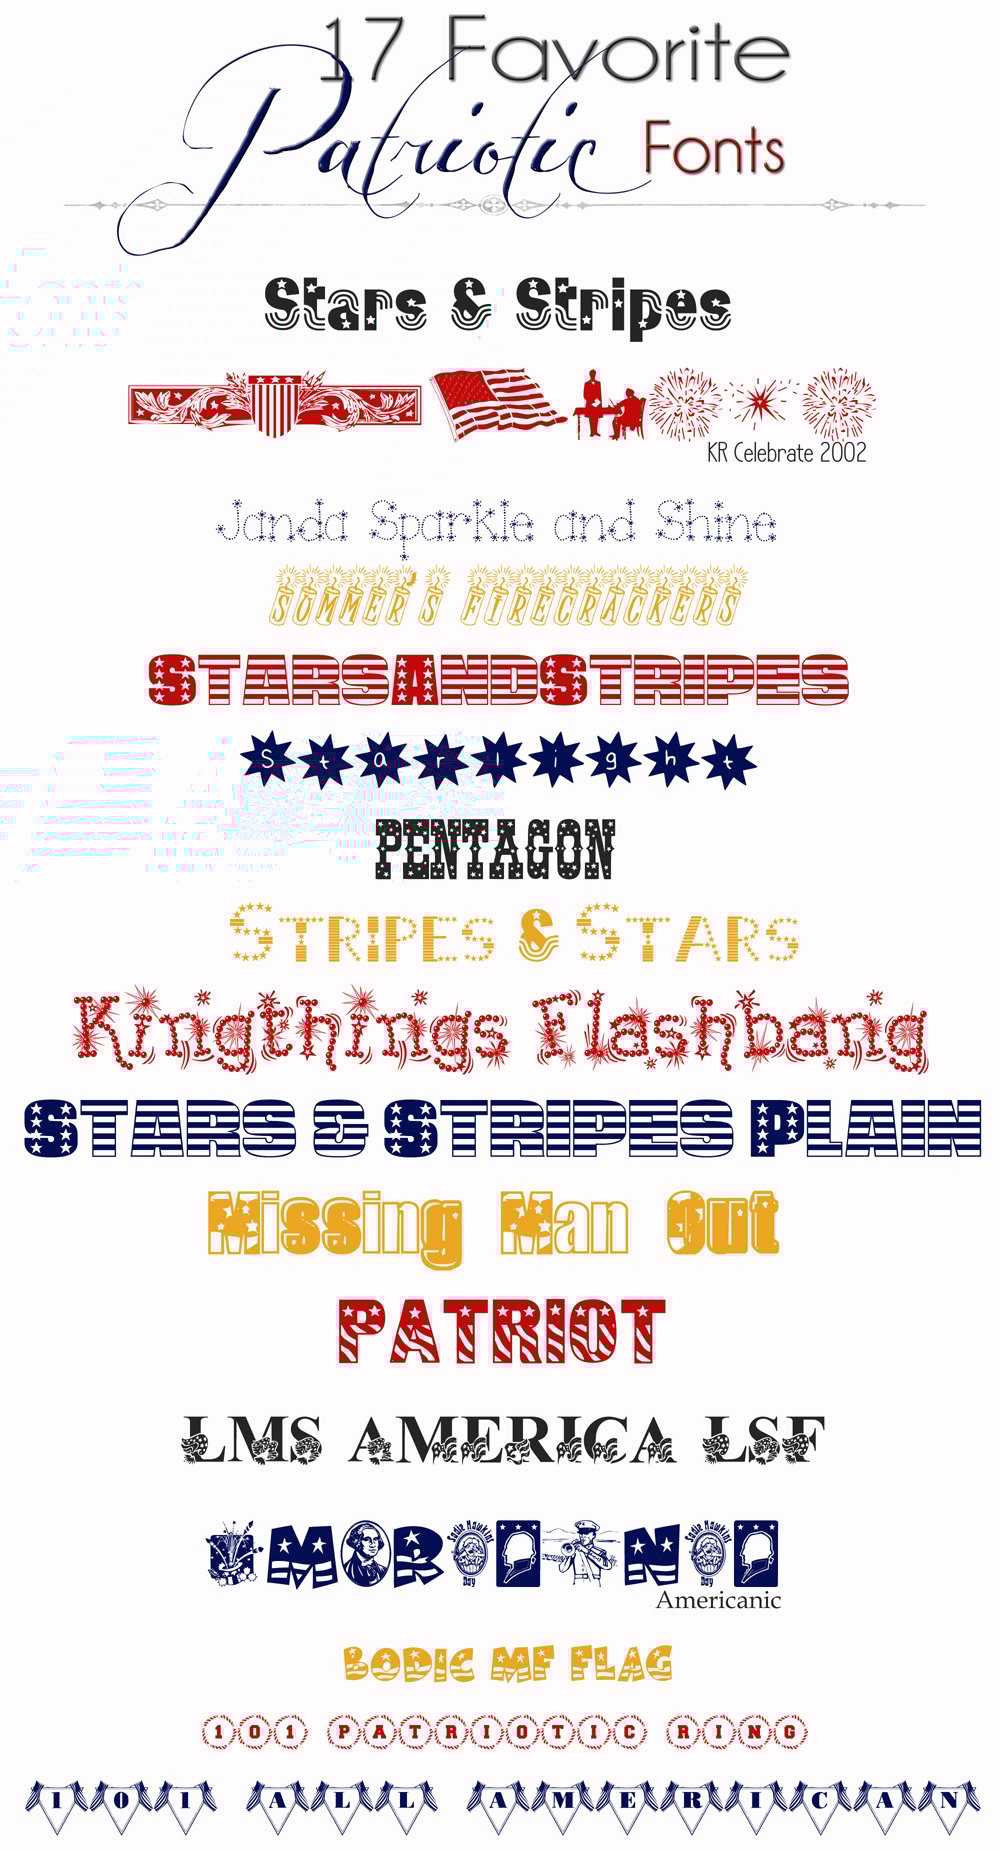
17 Favorite Patriotic Fonts
Good Morning!!
I was just looking at the calendar & realized that May is nearly gone already!!! Shocking how fast this year is flying past. So now that Mother’s Day is out of the way I have been in full summer mode. That means that my head is geared towards all the things that happen in the summer. The thing that really kicks off summer is Memorial Day. So I thought I would start off my summer prep with finding some of my Favorite Patriotic Fonts. I know I am going to need them for all my festivities we will have happening between our block parties here in the neighborhood & then all the things at the station- I am sure I will be needing these time & time again throughout the summer. I will definitely be putting them to use with some of my party recipes when I’m decorating my spread this summer.
So here you have it
17 Favorite Patriotic Fonts
You can find more HERE & another fun page HERE
To see where I am linking today- visit HERE
[include id=”1″ title=”Footer Ad”]
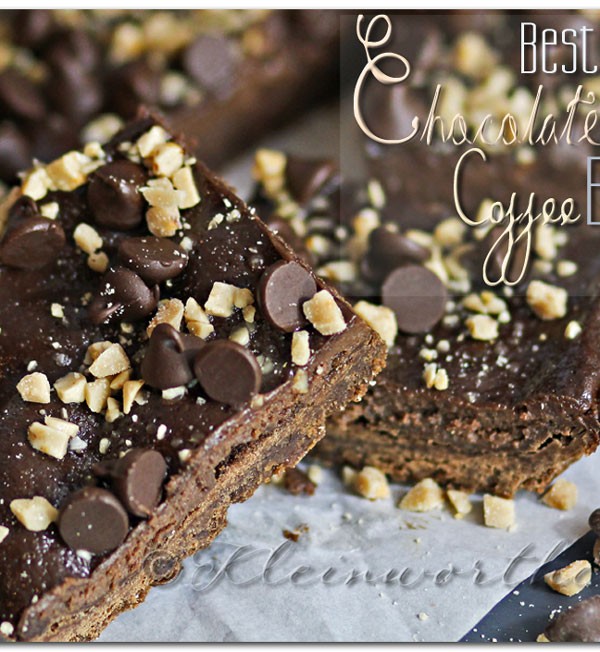
Best Chocolate Chip Coffee Bars
YAY!! I’m so excited for today!!
Today is National Chocolate Chip Day!!! I think you all know that I love chocolate chips & will find a way to add them to as many dishes as I can.
So today gave me a HUGE excuse to make something new with chocolate chips. What a fun thing to celebrate – right??!!

Don’t they look so good????
Oh my word- I even got my hubs (who isn’t a huge fan of chocolate chips – I know) to really love these. It could be that they are infused with coffee extract instead of vanilla. That made them pretty yummy. You could substitute with a different extract if you have another that is a favorite of your’s.


Best Chocolate Chip Coffee Bars
Ingredients
- Basic Crust
- 1-1/3 cup all-purpose flour
- 1/2 tsp baking powder
- 1/3 cup unsweetened cocoa powder
- 1/4 tsp salt
- 3/4 cup 1-1/2 sticks unsalted butter- softened
- 1/2 cup granulated sugar
- 1 large egg yolk
- 1 tsp coffee extract
Topping
- 1 - 11 oz bag chocolate chips
- 1-1/2 cup milk
- 1/3 cup granulated sugar
- 4 large eggs
- 2 tsp coffee extract
- 2/3 cup toffee bits
- 1/2 cup chocolate chips
Instructions
- Heat oven to 350 degrees
- Line 9x13 baking pan with parchment- allowing a little to extend beyond the pan
- In medium bowl whisk flour, baking powder, salt, cocoa powder.
- Beat butter & remaining ingredients on medium in mixer with paddle attachment until creamy.
- On low- beat in dry mixture- scrape down sides
- Drop into prepared pan.
- Press down dough until it is in a thin layer covering the entire bottom of pan
- Bake 20 minutes- until surface is dry & set.
- When done- remove & reduce your oven temp to 325 degrees.
While your bottom is baking- place your 11 ounces of chocolate chips into a medium bowl.
- In small saucepan heat milk to a simmer- remove & carefully pour over chocolate chips.
- Whisk until all chocolate chips are melted.
- Whisk in sugar & coffee extract until blended.
- At this point your liquid should be cool enough to add your eggs without scrambling them.
- Whisk until the eggs are completely combined.
- Pour over your crust that should have come out from baking just moments before you finished the chocolate liquid mixture.
- Bake 30 minutes or until the edges have risen slightly higher than the center & center is just set. (mine had some spots that rose into large bubbles- they flattened once it cooled)
- After removing from the oven- sprinkle with toffee bits & remaining 1/2 cup of chocolate chips.
- Set IN PAN on wire rack to cool 15 minutes.
- Move to refrigerator for a minimum of 2 hours to fully set.
- Once set- pull up on parchment to remove from pan & cut into squares.
- Store in air tight container in the refrigerator.

I’m super excited to announce that I have teamed up with 5 other amazing bloggers to celebrate National Chocolate Chip Day today. We are also kicking off a monthly venture called Recipe Round-Up. Today we are ALL sharing Chocolate Chip Recipes together- stay tuned to see what we share next month. Please visit all the other blogs listed here & gather these amazing recipes for your book.
Recipe Round-Up May:
1. Best Chocolate Chip Coffee Bars from Kleinworth & Co.
2. Best Chocolate Chip Banana Bread Ever from Nap-Time Creations
3. Best Chocolate Chip Brownies with Kahlua from One Martini at a Time
4. S’Mores Chocolate Chip Cookie Recipe from The Taylor House
5. Chocolate Chip Cannoli Bites from Let’s Dish
6. Chocolate Chip Cookie Lava Cakes from Mostly-Homemade Mom
Do you want to participate in future Recipe Round-Up’s & join in on the fun??
email Gina at Kleinworth & Co (chichomeschoolmama{at}att{dot}net) for details.
Now it’s time for you to share! Everyone is Welcome as long as you link back to Kleinworth & Co. or Button Up. (Buttons HERE)
Please also connect with me on Pinterest and/or Twitter
Don’t forget to come back & join me on Mondays for Project 52 & Wednesdays for Your Best Weekly
To see where I am linking today- visit HERE
[jetpack_subscription_form]

Rustic Summer Wreath
Back on Easter we spent the day enjoying the glorious weather & working on getting the yard cleaned up from the winter. That meant trimming branches from the pine tree. The hubs thought I was nuts when I was trimming all the pine needles off the branches & storing the branches all in a large tote. He really thought I was crazy when I told him I was going to craft with them. Hehehe- I spent the past weekend finally doing something with them.
He never liked the coffee filter wreath I had made for spring. He thought it looked like a giant tutu & asked me every week when I was going to make something new for above the mantle. So I finally did. I brought in the big tote, grabbed some twine & got busy. He thought the coffee filter wreath wasn’t rustic enough for this cabin. He was probably right but I was craving something a little prettier than cabin decor. So – yes, we are back to cabin decor around here. But I was able to make it pretty too.

I just laid them in the formation I wanted & started wrapping & tying until they were all holding firmly together.
Then I attached a wire by wrapping it around the top branch so that I would have something sturdy for the hook.
Then I took one of my previously made wreaths that I used to use on our old front door & tied it on there for some color.
It was far too small for our giant front door anyhow- so I was going to have to change things up regardless if I wanted to use it again.
It worked out perfectly.
So there you have it- my new rustic summer wreath. Super simple.
Don’t forget to come back & join me on Mondays for Project 52 & Wednesdays for Your Best Weekly
To see where I am linking today- visit HERE
[jetpack_subscription_form]
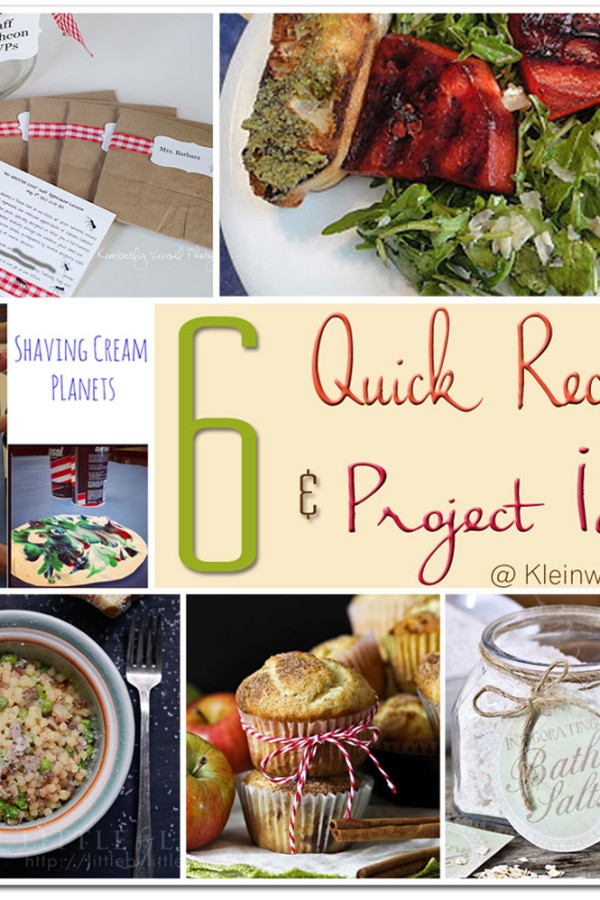
6 Quick Recipes & Project Ideas
Great projects shared this past week for Your Best Weekly. We had some really great quick recipes that look amazing. We also had some really fun project ideas that I know I will be using in the future. I also shared my homemade Mother’s Day gift of Coffee Infused bath salts & shared with you all how to make bath salts. Once you make them you can use my free printable tags if you are giving them as gifts. It’s been a great week of sharing these fabulous recipes & projects. Thank you so much for all your creativity both in & out of the kitchen.

Don’t these all look great!!
Be sure to head on over & pick up all the details for these quick recipes & projects.

Grilled Watermelon dressed with Balsamic syrup on Arugula from Pret-a-Vivre

Fregola Sarda from Little – by- Little
Ban-Apple Muffins from Me- Kleinworth & Co.

Picnic Luncheon Invitations & Party Favors from A Fresh Perspective

Shaving Cream Planets from Random-osity

DIY Coffee Infused Bath Salts from Me- Kleinworth & Co.
Don’t forget to come back & join me on Mondays for Project 52 & Wednesdays for Your Best Weekly
To see where I am linking today- visit HERE
[jetpack_subscription_form]
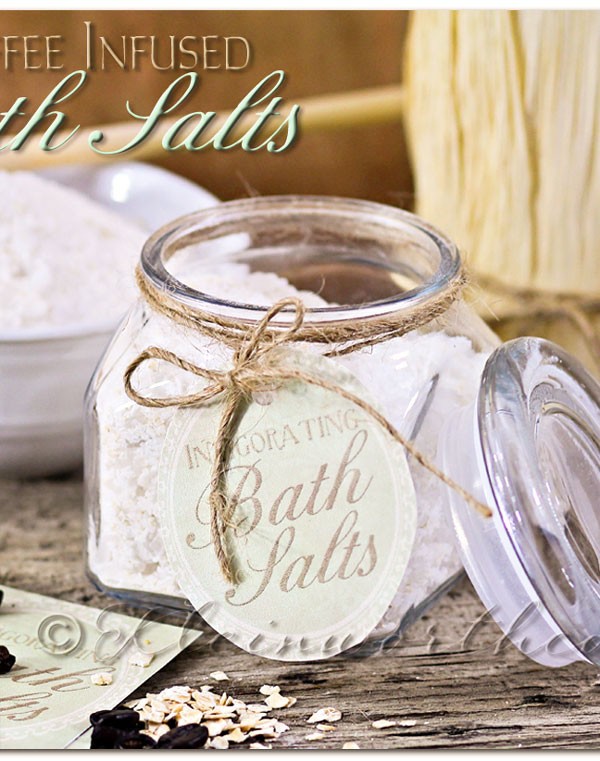
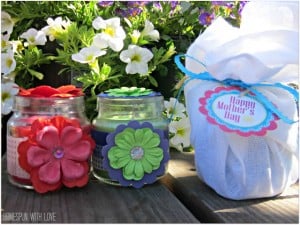
DIY Coffee Infused Bath Salts & 5 Homemade Mother’s Day Gifts
Have you wrapped up your gifts for mom yet??
No worries- I have some great ideas here for you that won’t break the bank & most of them you can do with the things you have already on hand.
Free Printable Checklist Templates
Normally I would make my mom some sugar scrub. She loves it & helps keep her feeling soft. Unfortunately with the chemotherapy- it makes her skin super sensitive & anything abrasive just isn’t good for her right now. So I did the next best thing- bath salts. She loves to soak her feet. It’s one of the things that the kids have grown to love about our time when we are able to visit her. Each night they all sit around the tub & fill it with all sorts of great smelling salts & bubbles & talk about all the fun they had that day. It’s something they just love to do together & it’s also a fond memory that they will always have.
So because of that I made her these coffee infused bath salts. They smell HEAVENLY if you are a coffee fanatic like I am.
Even if you are not a coffee drinker- I know many that just like the smell. So you will love this too.
1 Cup Rock Salt
1 Cup Epsom Salt
1/2 Cup Baking Soda
1/4 Cup Ground Oats (I just pulsed mine in a blender)
1/4 tsp Coffee Extract
Combine all in a medium sized bowl- mix & stir with wooden spoon until well incorporated & the color of the extract is no longer in clumps.
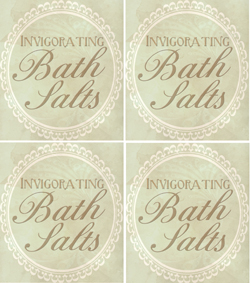
Transfer to decorative jar. Print gift tag & tie on jar.
Simple & easy gift that will be appreciated with each use.
I also made a free printable for you to download to go along with your gift.
I made them large so that you could scale them down to whatever size jar you are using.
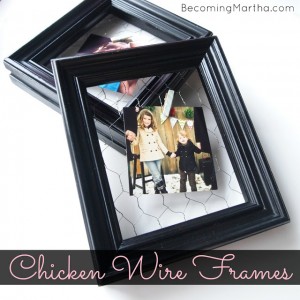
I also found some other fabulous homemade gifts that others have made that I thought you would really enjoy.
They are so creative & definitely something mom would enjoy!
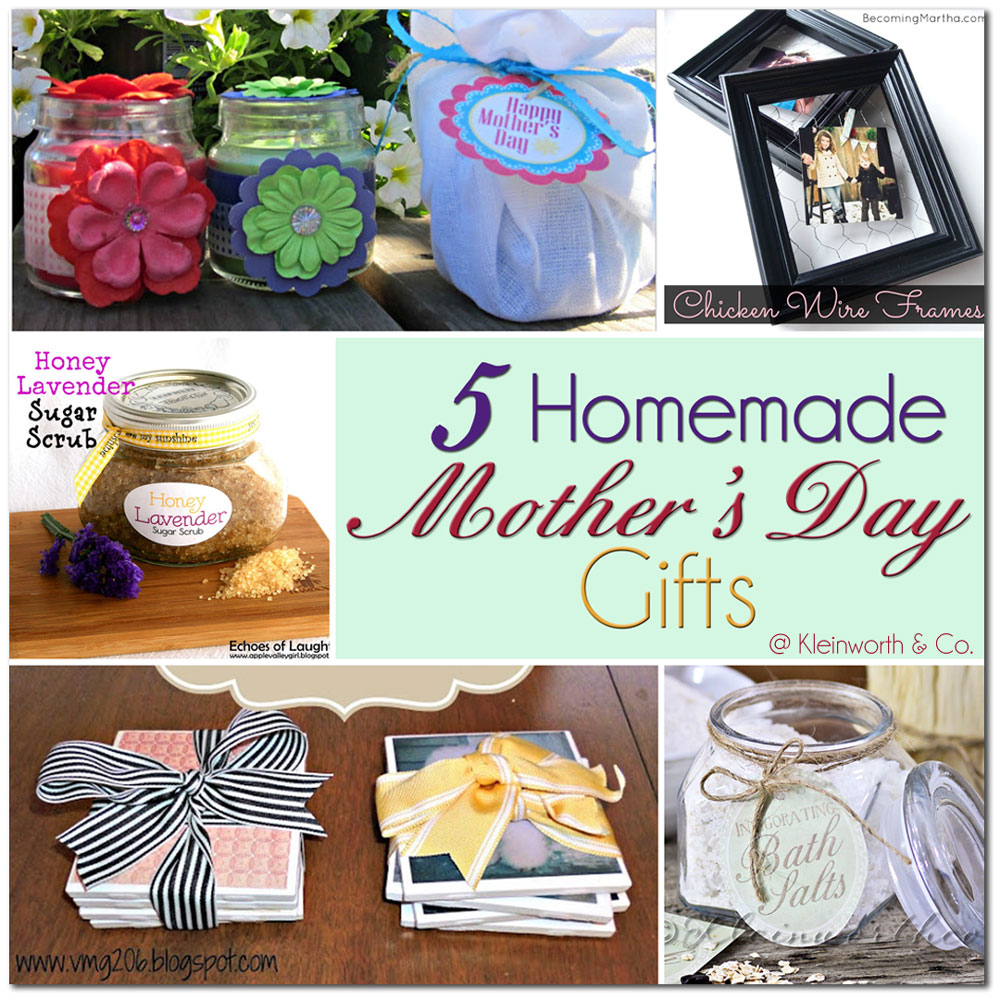
Visit them all & get creative. Mom will be so happy!
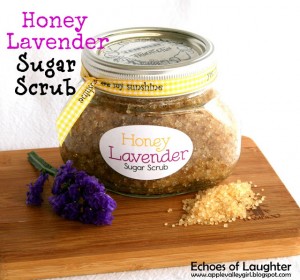
Honey Lavender Sugar Scrub
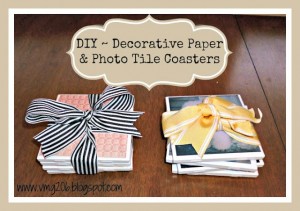
DIY Tile Coasters
Washi Tape Mother’s Day Candles
Have fun!!
Now it’s time for you to share!
Everyone is Welcome as long as you link back to Kleinworth & Co. or Button Up. (Buttons HERE)
Please also connect with me on Pinterest and/or Twitter
Don’t forget to come back & join me on Mondays for Project 52 & Wednesdays for Your Best Weekly
To see where I am linking today- visit HERE
[jetpack_subscription_form]


