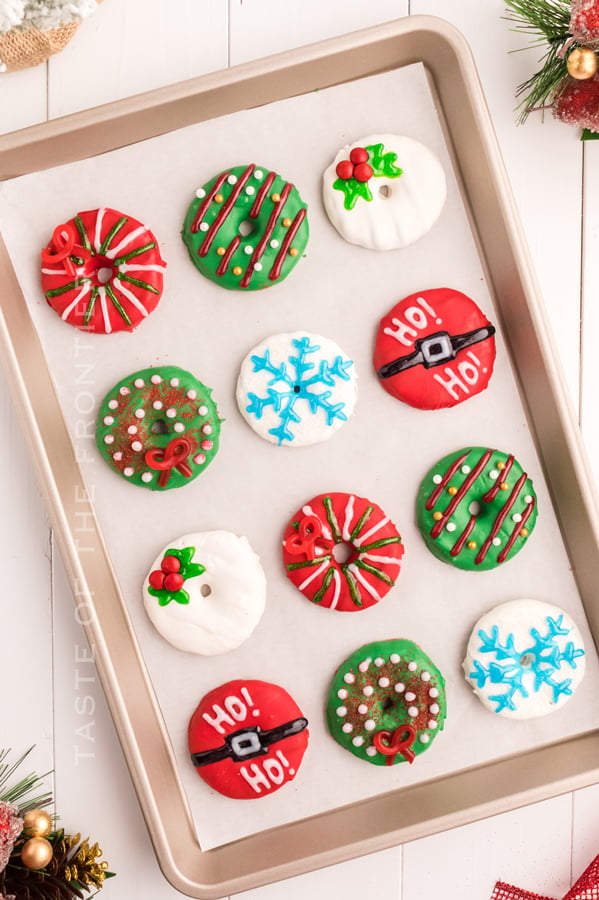
Decorated Christmas Wreath Cookies are a festive holiday dessert. Perfect for a cookie exchange or to enjoy with family and friends.
Are you short on time but do you want to give a semi-homemade gift? Or maybe you are hosting a cookie decorating party and you need ideas for how to keep it simple and easy without it becoming overwhelming.
I have the perfect solution for you. These Decorated Christmas Wreath Cookies are super cute and bring big smiles. You can make them with pre-packaged cookies and a handful of other ingredients.
They are so adorable and make it look like you spent all day in the kitchen – but in reality – they come together in about an hour. I know you’ll love them as much as I do.
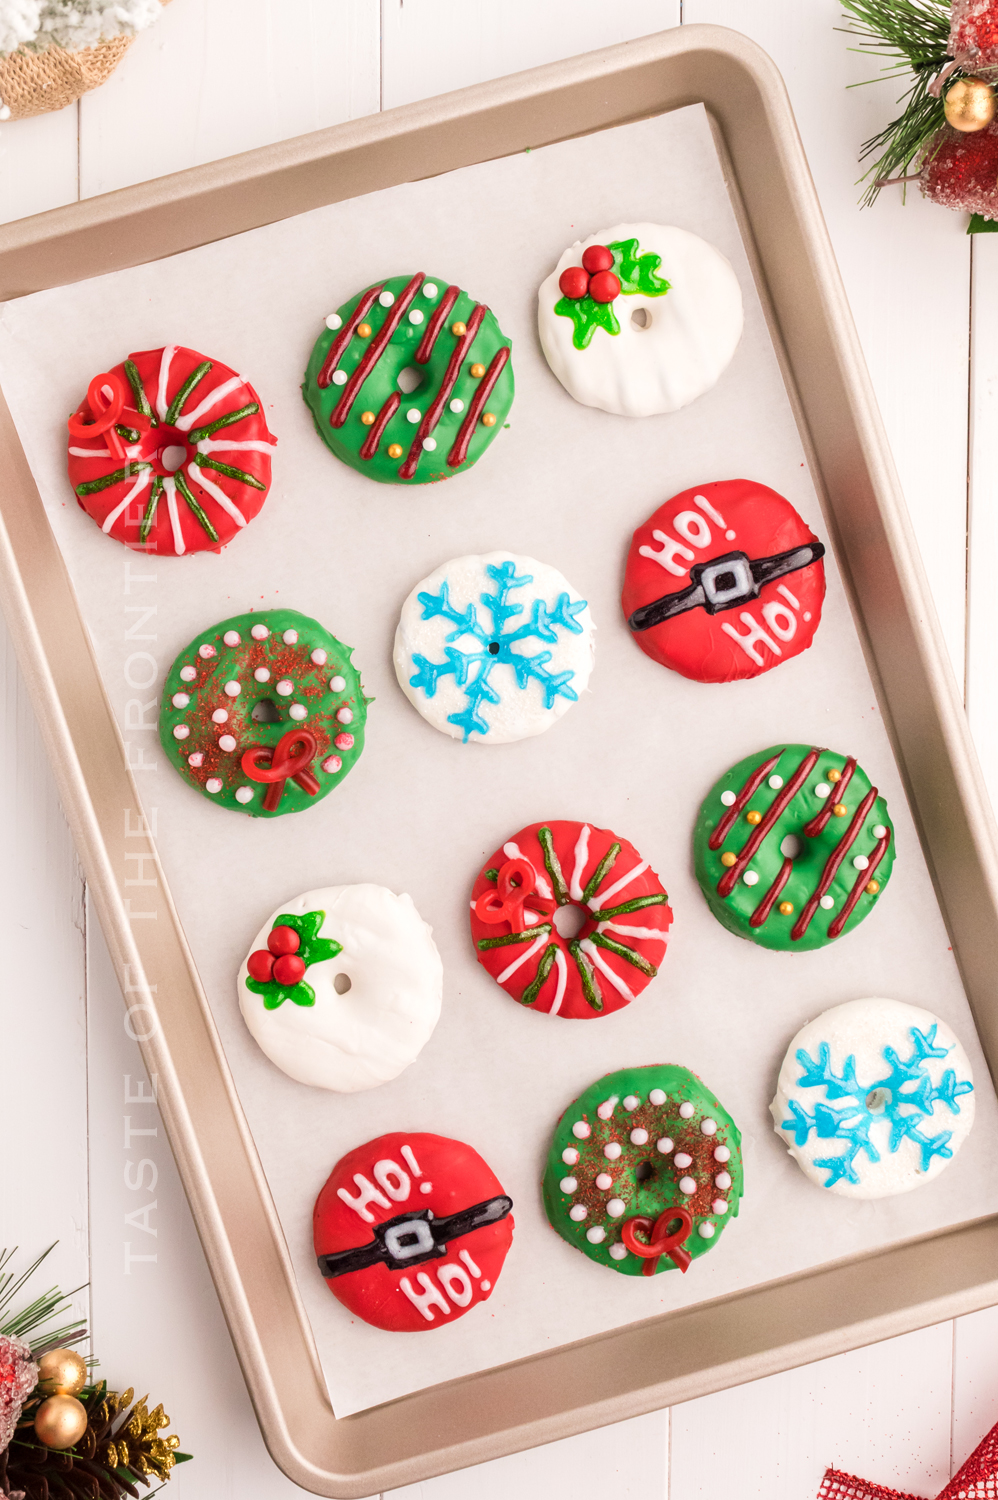
What’s fun about these cookies is that they can be decorated however you like. Customize them for any holiday celebration or gathering.
The sky is the limit because everyone has a different creative idea for their wreath. This is why I love offering this as a quick way to put together a cookie decorating party for the little ones. It lets them do something creative and keeps their hands busy – even if they are taste testing as they go.
Christmas Cookies

Here are some commonly asked questions
How to Store Decorated Christmas Wreath Cookies
Once the chocolate has completely firmed up you can transfer them to an airtight container – making sure to keep them in a single layer.
These cookies do not need to be refrigerated and can be kept at room temperature for several days. I do not recommend stacking as the gel colors don’t firm up and will get ruined when stacked.
What is the best chocolate for dipping cookies?
While you can use white chocolate chips and then tint the chocolate if desired, I have found that it often requires a bit of coconut oil or shortening to get the chocolate to melt to the right consistency.
I like to use candy melts because the chocolate is made with just the right formula so that it performs exactly as needed. PLUS it already comes in the color that I need – making it so much faster and easier. I have had instances where the white chocolate melted fine and then seized once I tried adding the food coloring.
The candy melts come in a multitude of colors, varieties, and flavors so the sky is the limit on what you can do with them when it comes to making these cookies.
Wreath Cookies
Can these cookies be made ahead of time?
You bet. You can coat the cookies with the chocolate ahead of time if you want to keep things simple when it comes time to decorate.
Just keep the coated cookies in an airtight container at room temperature. The chocolate coating tends to sweat when it sits out at room temperature after being refrigerated – which can make the decorating part more difficult.
All that being said – the decorations adhere to the cookies better if they are being added when the chocolate coating is still semi-soft and not fully set.
Can I use chocolate chips instead of candy melts?
So, because we are melting the chocolate, I have found that chocolate chips don’t always temper well for recipes like this. Sometimes you need to add coconut oil to get it to melt creamy enough for it to coat the cookies well.
Sometimes – usually with white or colored chocolate- it likes to seize and then you are stuck with an unusable mess. I highly recommend using candy melts for this recipe.
Cookies for Cookie Exchange
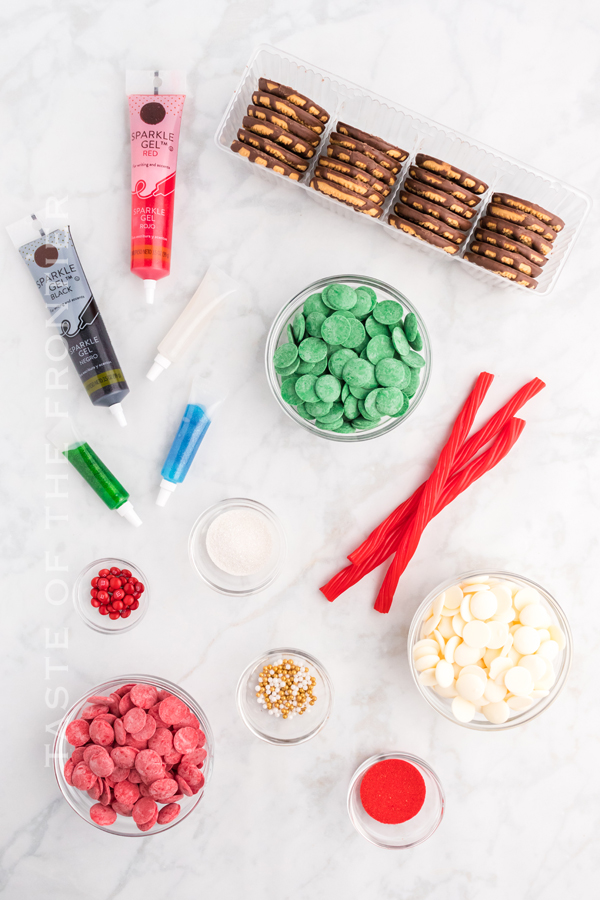
Ingredients for Decorated Christmas Wreath Cookies
- candy melts: green, red, and white
- fudge striped cookies
Decorations:
- edible glitter/sparkle gel black, white, red, blue & green
- mini M&M’s I only used the red ones
- gold & white beads I used the Wilton 4-Cell Gold Sprinkles Mix
- red & silver sanding sugar
- pull ‘n’ peel licorice
Note – if using Nonpareils to decorate, there is a chance that they will sweat when refrigerated and the colors will bleed.
Decorated Cookies
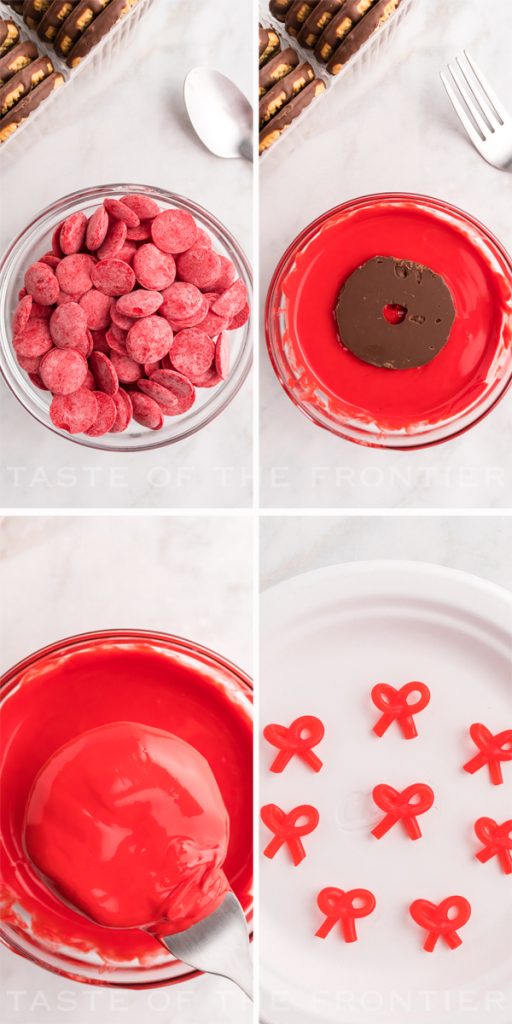
How to Make Decorated Christmas Wreath Cookies
- Line a baking sheet with parchment paper.
- Prepare 8 licorice bows (4 for green and 4 for red cookies).
- In a small microwave-safe bowl, add 1 ½ cups of one color candy melts. Then follow heating instructions on the back of the package. Make sure candy melts are all melted and the mixture is smooth.
- Place one fudge striped cookie, top side down, into the melted candy melt chocolate. Use a fork to flip onto the other side, making sure that the cookie is completely covered.
- Lift the cookie out with the fork and gently tap off the excess chocolate and continue until the top is smooth.
- Place the coated cookie on the parchment paper and decorate! It’s best to decorate while the chocolate is still warm in order for the decorations to stick. This works best by dipping 2-3 cookies and then decorating those before continuing with the remaining cookies of that color.
- Repeat the process with the other colors of candy melts.
- Once decorated, let the cookies cool for the chocolate to harden. Put the tray in the refrigerator for 10 minutes for faster cooling.
- Serve chilled or at room temperature.
- Store in an airtight container for up to two weeks.
Fudge Striped Cookies
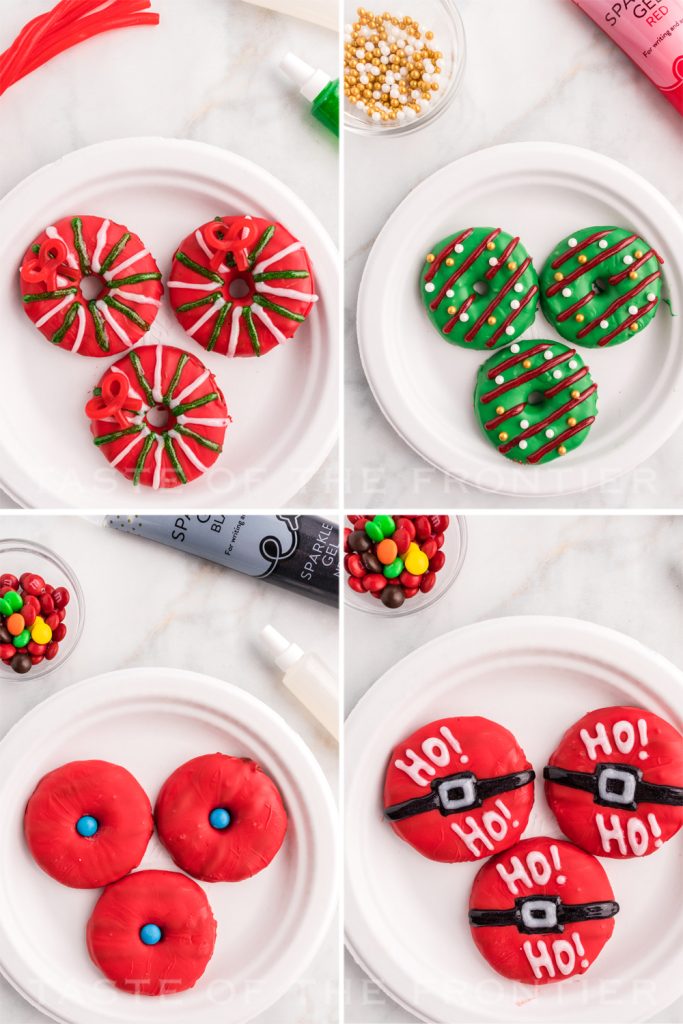
Red Cookies
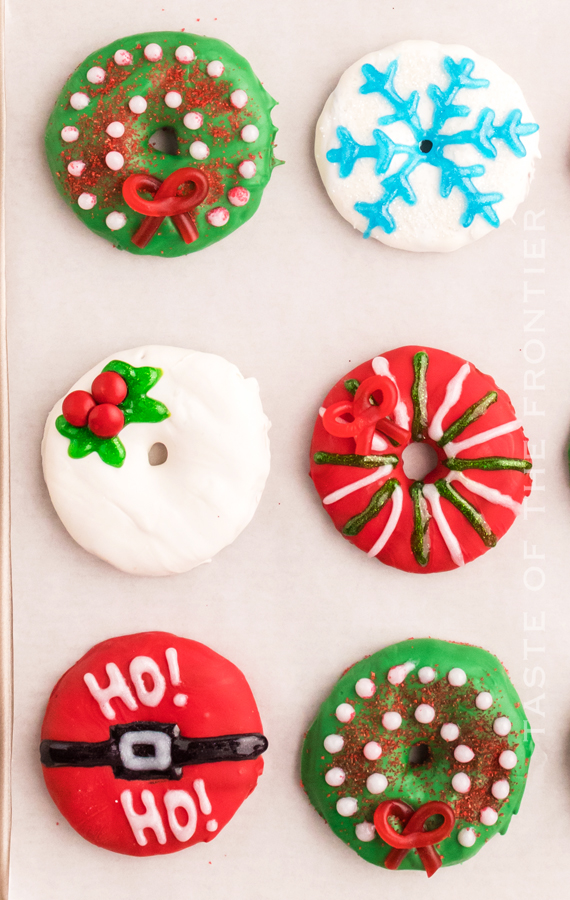
- Santa Belt: Put a mini M&M into the hole so the gel doesn’t fall through. Use black glitter gel to draw the belt, including filling in the center buckle, then add white glitter gel to highlight the buckle. Then add the “Ho! Ho!” with white glitter gel.
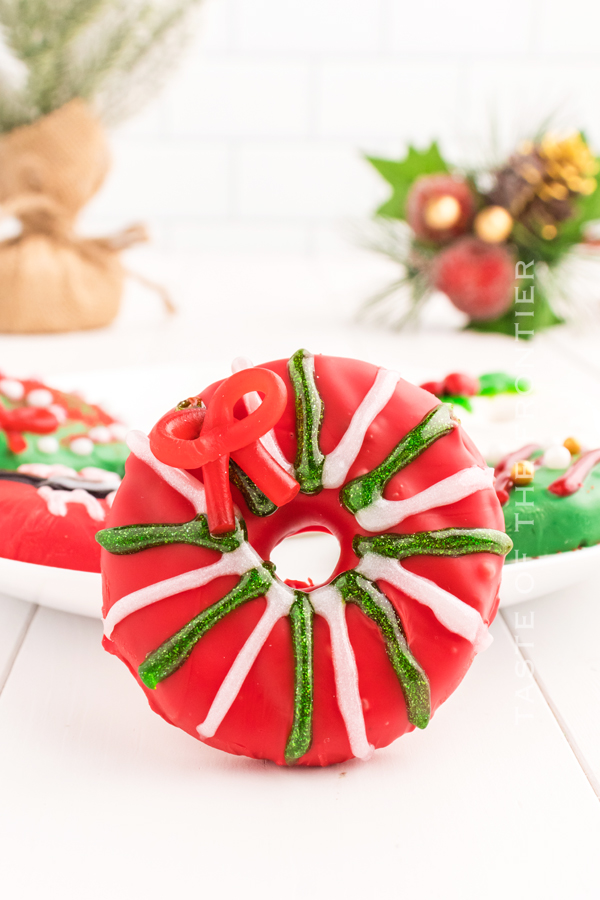
- Green & White Stripes: Draw lines using the glitter gel, alternating between green and white, then add a licorice bow in the upper left.
Why didn’t my chocolate wafers melt correctly?
When your chocolate wafers become chunky rather than creamy, it is said that the chocolate is seized. This is typically due to overheating or contact with water or steam.
In the first case, the chocolate is just burning from excess heat, but in the second case, there is a negative reaction between the chocolate (which is waxy and has many oils that are hydrophobic, or “water-fearing”) and the water, causing the components of the chocolate to separate.
Be sure to refer to the package directions when melting chocolate to prevent this from happening.
Wreath Cookies for Christmas
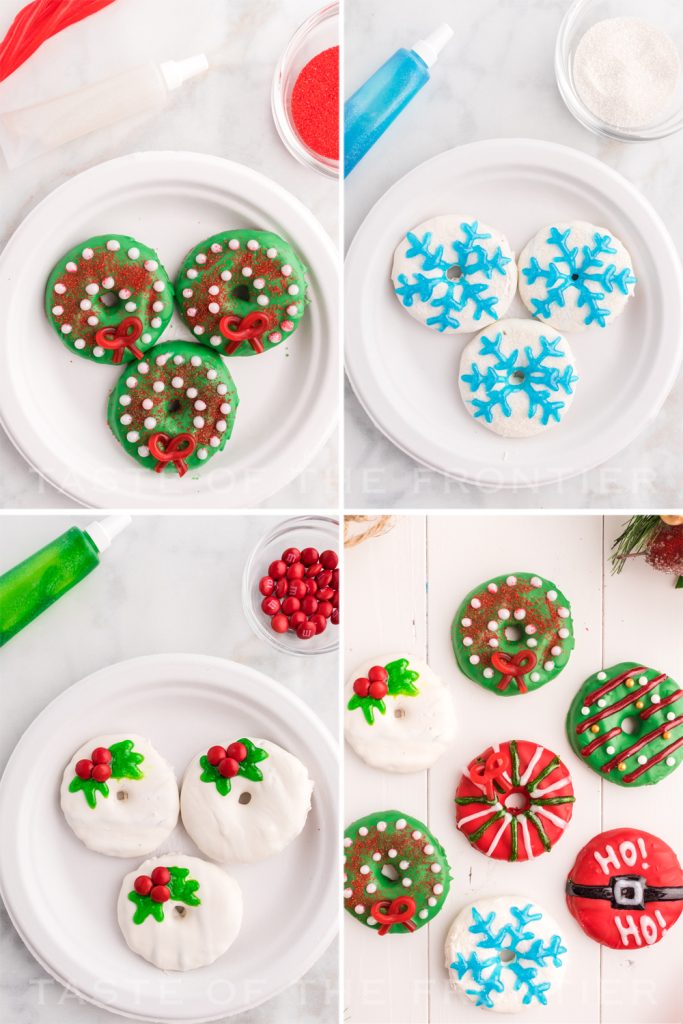
White Cookies
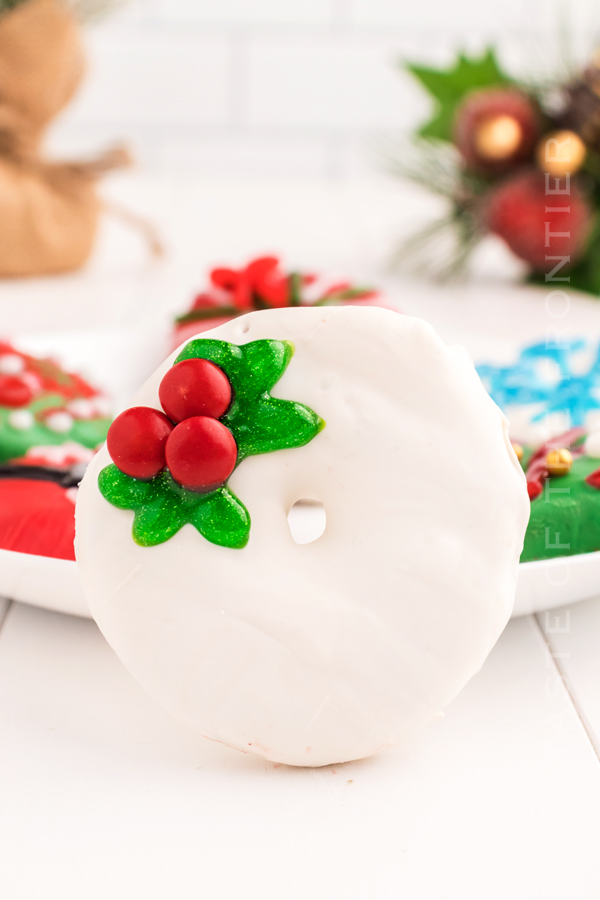
- Holly Cookie: Use green glitter gel to draw the leaves, then add 3 red M&M’s.
- Blue Snowflake: Sprinkle on silver sanding sugar, then draw snowflake with blue glitter gel.
Green Cookies
- Gold & White Beads: Draw red glitter gel lines, then add gold & white beads.
- White Dots with Bow: Add the licorice bow while candy is still warm, then sprinkle red sanding sugar followed by white glitter gel dots.
No Bake Christmas Wreath Cookies
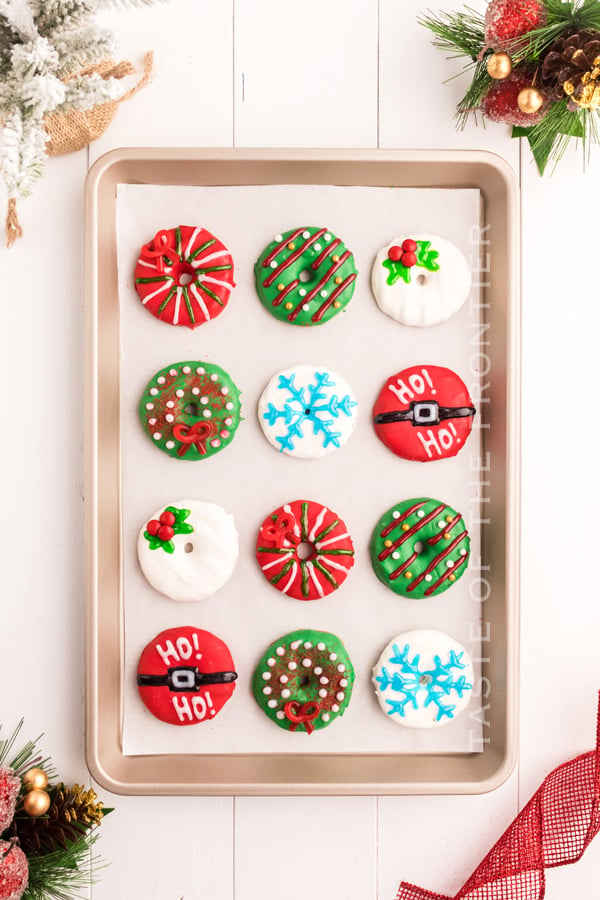
Tips for the Best Decorated Christmas Wreath Cookies
- The glitter gel doesn’t harden all of the way, so be careful when eating and transporting. I would not recommend stacking.
- To make the licorice bow, tear off one string of licorice. Take one end and make a small loop, then take the other end and make another small loop, while crossing the middle sections, like an “x”, over each other to make a bow. Firmly press together the part where the licorice crosses in order for it to stay. Then trim the bow ribbon to the desired length.
- If candy melts are too thick, continue adding one teaspoon of vegetable shortening until desired consistency is achieved.
- For the white candy melts, the chocolate from the cookie may start to melt and turn the white candy brown. The best way to avoid this is to place the cookie in the candy melts, top side up, and spoon the candy melts on top, remove, and shake off excess into another bowl so the chocolate drippings don’t mix with the white. This method is more effective for this cookie.
What are Christmas Wreath Cookies?
These delicious Christmas Wreath Cookies use fudge striped cookies that are dipped in vanilla-flavored candy melts and decorated with sprinkles, candy, and edible glitter/sparkle gel! Decorate them any way you’d like to customize your own wreaths.
Why use Fudge Striped Cookies?
These cookies already taste delicious on their own, but already having a hole in the middle makes them the perfect cookie to use as a wreath.
Cute Christmas Cookies
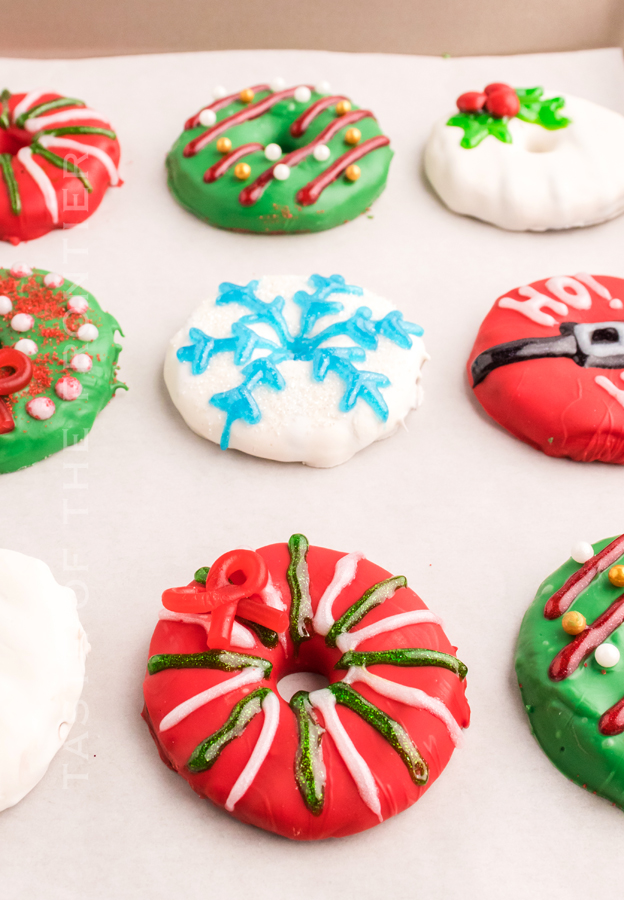
How long does it take to make this recipe?
It is anticipated that this recipe would take about an hour depending on how you choose to decorate them. The time may vary by how organized you are and how efficiently the chocolate melts in the microwave.
The time it takes to set will depend on the climate in and around your home. Warm and humid climates may take longer for the chocolate to solidify.
Could I add other toppings to this recipe?
Yes. It is recommended that choosing types of toppings should be limited to dry ingredients, but you may choose to add your favorite topping.
Cookie Decorating Party
If you love this Easy Christmas recipe, you’re going to love these other treats too. Please click each link below to find the easy, printable recipe!




If you love this recipe for Decorated Christmas Wreath Cookies as much as I do, please write a five-star review, and be sure to help me share on Facebook and Pinterest!

CONNECT WITH YUMMI HAUS!
Be sure to follow me on my social media, so you never miss a post!
Decorated Christmas Wreath Cookies
Ingredients
- 3 bags candy melts: green, red, and white (I used Wilton – 12-ounces each)
- 1 package fudge striped cookies I used the Keebler brand
Decorations:
- edible glitter/sparkle gel black, white, red, blue & green
- mini M&M’s I only used the red ones
- gold & white beads I used the Wilton 4-Cell Gold Sprinkles Mix
- red & silver sanding sugar
- pull ‘n’ peel licorice
Instructions
- Line a baking sheet with parchment paper.
- Prepare 8 licorice bows (4 for green and 4 for red cookies).
- In a small microwave-safe bowl, add 1 ½ cups of one color candy melts. Then follow heating instructions on the back of the package. Make sure candy melts are all melted and the mixture is smooth.
- Place one fudge striped cookie, top side down, into the melted candy melt chocolate. Use a fork to flip onto the other side, making sure that the cookie is completely covered.
- Lift the cookie out with the fork and gently tap off the excess chocolate and continue until the top is smooth.
- Place the coated cookie on the parchment paper and decorate! It’s best to decorate while the chocolate is still warm in order for the decorations to stick. This works best by dipping 2-3 cookies and then decorating those before continuing with the remaining cookies of that color.
- Repeat the process with the other colors of candy melts.
- Once decorated, let the cookies cool for the chocolate to harden. Put the tray in the refrigerator for 10 minutes for faster cooling.
- Serve chilled or at room temperature.
- Store in an airtight container for up to two weeks.
White Cookies
- Holly Cookie: Use green glitter gel to draw the leaves, then add 3 red M&M’s.
- Blue Snowflake: Sprinkle on silver sanding sugar, then draw snowflake with blue glitter gel.
Green Cookies
- Gold & White Beads: Draw red glitter gel lines, then add gold & white beads.
- White Dots with Bow: Add the licorice bow while candy is still warm, then sprinkle red sanding sugar followed by white glitter gel dots.
Red Cookies
- Santa Belt: Put a mini M&M into the hole so the gel doesn’t fall through. Use black glitter gel to draw the belt, including filling in the center buckle, then add white glitter gel to highlight the buckle. Then add the “Ho! Ho!” with white glitter gel.
- Green & White Stripes: Draw lines using the glitter gel, alternating between green and white, then add a licorice bow in the upper left.
Notes
- The glitter gel doesn’t harden all of the way, so be careful when eating and transporting. I would not recommend stacking.
- To make the licorice bow, tear off one string of licorice. Take one end and make a small loop, then take the other end and make another small loop, while crossing the middle sections, like an “x”, over each other to make a bow. Firmly press together the part where the licorice crosses in order for it to stay. Then trim the bow ribbon to the desired length.
- If candy melts are too thick, continue adding one teaspoon of vegetable shortening until desired consistency is achieved.
- For the white candy melts, the chocolate from the cookie may start to melt and turn the white candy brown. The best way to avoid this is to place the cookie in the candy melts, top side up, and spoon the candy melts on top, remove, and shake off excess into another bowl so the chocolate drippings don’t mix with the white. This method is more effective for this cookie.
Nutritional information for the recipe is provided as a courtesy and is approximate. Please double-check with your own dietary calculator for the best accuracy. We at Yummi Haus cannot guarantee the accuracy of the nutritional information given for any recipe on this site.





Share Your Thoughts