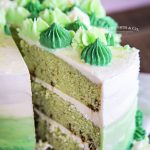
Mint Chocolate Chip Cake
Mint Chocolate Chip Cake is 3 layers of deliciously moist mint cake that are speckled with crushed Andes mints throughout & frosted with a subtle mint buttercream icing in a green to white ombre design. Perfect for St. Patrick's Day celebrations, birthdays & more!
Ingredients
Cake
- 2 cups granulated sugar
- ½ cup vegetable oil
- 3 large eggs
- 1½ tsp mint chocolate chip flavor *see link in post)
- ½ cup sour cream
- 2½ cups all-purpose flour
- 3 tsp baking powder
- 1 tsp table salt
- 1¼ cups milk I used 2%
- 2 drops green food color I used mint green soft gel paste - see link in post
- 25 Andes mint chocolates - chopped
Frosting
- 1½ cups butter – room temperature
- 5-6 cups confectioner’s sugar
- 2 tsp mint chocolate chip flavor
- 3 tbsp milk
- green food color divided
Instructions
Cake
- Preheat the oven to 350 degrees.
- Prepare 3 - 8" round pans by either greasing and lining the bottom with parchment or coating the bottom and sides with bakers release.
- In a large mixing bowl, combine the sugar, oil, eggs, and mint chocolate chip flavor. Beat on medium for about 2 minutes. The mixture should be slightly lighter in color.
- Stir in the sour cream until incorporated.
- Combine the flour, baking powder, and salt in a small bowl.
- Add half of the dry mixture to the egg mixture along with half of the milk. Mix on low until the flour is mostly mixed in.
- Scrape down the sides of the bowl and then add the remaining dry ingredients, milk, and food color. Beat on low until all of the ingredients are well incorporated.
- Fold in the crushed Andes mints.
- Divide the batter evenly between the 3 prepared cake pans. It should be almost 2 cups of batter per pan.
- Bake for 25-30 minutes, or until the toothpick test comes out clean. You can also test by gently pressing the center of the cake - if it springs back - the cake is done. Be sure to rotate the cakes in the oven about halfway through the baking process.
- Once done, remove from the oven and allow to cool until the cakes reach room temperature.
- Remove the cakes from the pan and wrap each individually in plastic wrap and place them in the freezer. They should be frozen prior to assembling the cake.
Frosting
- Place the butter in a large mixer bowl and beat on high speed for several minutes until light and fluffy.
- Sift in half of the confectioner’s sugar and beat again, starting slowly until incorporated and then increase to high until well-whipped.
- Add the remaining confectioner’s sugar along with the mint chocolate chip flavor, and the milk and mix slowly until just incorporated. Then increase the speed and beat well until whipped and creamy.
- Separate out about half of the frosting into a large bowl. This will be your white. Then divide the remaining frosting in half - setting aside one portion and leaving the remaining portion in the mixer bowl.
- Add food color and beat well - adding more as needed to achieve the desired color. I usually start with the lighter colors and then gradually move to the darker ones.
- Remove that shade of frosting and place it in another bowl.
- Add the remaining frosting you had set aside and repeat the tinting process until that portion has reached the desired color.
- Once you have the white and 2 shades of green, you are ready to assemble and decorate this cake.
- Spread or pipe onto your baked treats – cake, cupcakes, etc.
- Store in an airtight container in the refrigerator for up to 7 days or freeze for up to 3 months.
Decorate
- Place one of the frozen cake layers on a cake plate or cardboard round. You can add a small dollop of frosting underneath to keep it from shifting on the plate.
- Use a cake leveler or sharp knife to trim off the dome if your cake did not bake flat.
- Add some of the frosting in an even layer on top of that bottom round of cake.
- Repeat the leveling process with the second and third layers and stack one on top of the filling layer you just added, add another filling layer on that one before adding the final cake layer.
- Using an offset spatula, spread a thin coat (this is the crumb coat) of frosting around the whole cake, tops, and sides. You should be able to see through it. I like to freeze the cake at this time to set the frosting and make it easier to work with for the decorating.
- Once frozen, add another thicker layer of frosting to the top and sides of the cake. For the ombre effect, use the dark green at the bottom, light green in the middle, and white at the top, and then smooth them together using a rubber cake scraper.
- Transfer the remaining frosting to piping bags - each color in its own bag and decorate as desired. I use several open star tips for this one.
- Add green disco dust if desired.
- Keep refrigerated until ready to serve.
Notes
Frosting
*To make this ultra-creamy – beat each step for 5 full minutes before adding more ingredients. This isn’t necessary but enhances the texture. *This is enough to fill, crumb coat, and frost & decorate a 3-layer, 8″ round cake. Increase the recipe by 1/2 if you like your frosting thicker than what you see here or wish to pipe on more decoration. To make Bakers Release - it is as simple as 1,1 & 1.
1 cup all-purpose flour
1 cup shortening
1 cup cooking oil Mix the ingredients together - whisking well.
Store in an airtight container in the pantry or refrigerator.
When ready to use, dip a pastry brush into the mixture and spread it over the cake pan.