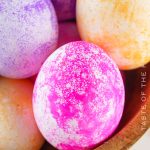
Dye Eggs with Rice
Skip the water and vinegar cups and make Dyed Eggs using Rice instead. Less messy and a nice little change to the traditional chaos of dying eggs.
Equipment
- Quart-Size Resealable Bags
- Latex Gloves (optional)
Ingredients
- White Rice - uncooked
- Food Dye – liquid
- Hard Boiled Eggs
Instructions
- Decide how many colors you’re going to make and have one bag for each color. If you’re using gloves, this will be the best time to put them on.
- Place a cup of rice in each bag. It doesn’t have to be exact; you can just estimate it if you don’t feel like measuring. Just don’t put too much in the bag. About a ¼ full.
- Place four drops of food coloring in each bag. Only one color per bag.
- Remove air from the bag and seal it before squishing the rice all around until the dye is distributed.
- Be sure the eggs are dry and not at all wet before choosing placing the egg in the one of the bags.
- Remove the air and seal the bag before gently moving the egg around in the colored rice until you are satisfied with the color distribution.
- Remove the colored egg.
- Set the egg aside to dry or place it in a second color if you want to get more creative with it.
Notes
Tips:
- The more rice you add to the bag, the more dye you’ll need.
- If you get a few eggs in and the color isn’t adhering to the eggs as much as you would like, add a couple more drops of dye to the rice and try again.
- I used gel dye, but I’ve had luck with water-based dyes as well. Avoid oil-based dyes as they tend to not grab onto the shell as well.
- This works for farm fresh/brown eggs as well, the dye will just appear less saturated or in some cases, darker.
- I’ve used minute rice and regular rice and both worked, although I liked the minute rice more.
- Brown rice should work as well if that’s what you have on hand.
- You can do multiple colors, one after another. Just give it a couple of minutes to dry in between colors for the best results.